
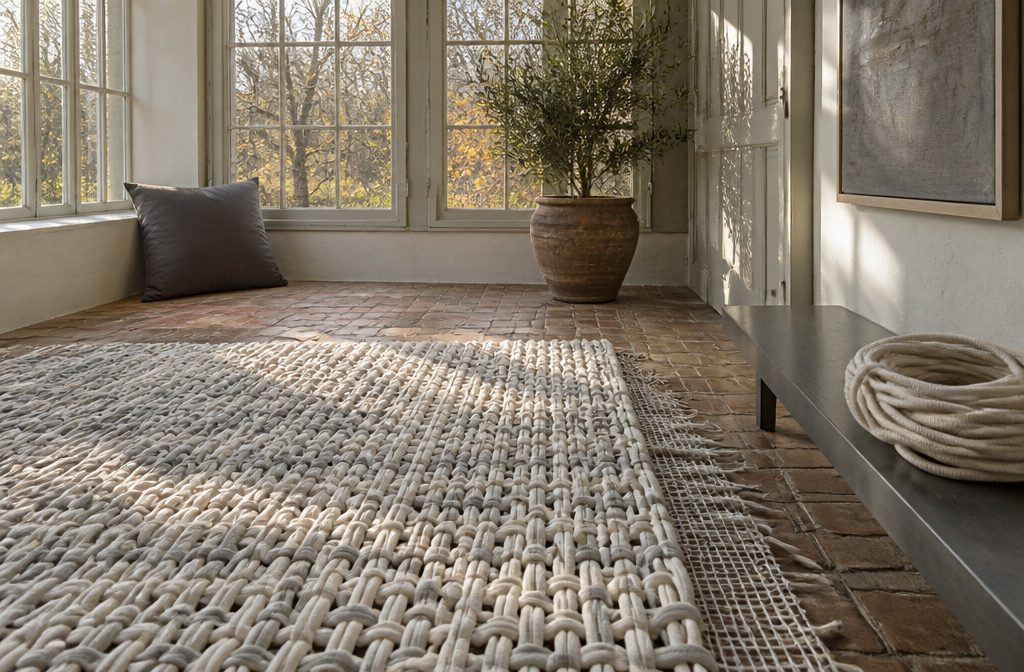
A finished cotton piping rug costs $300–350 in materials for a 5×8 and takes more than 200 yards of piping cut into short pieces, woven through netting, and secured with rubber bands.
The stage that slows most people down is covering the entire grid one square at a time, then joining separate sections if the netting roll is narrower than the rug width.
1. Determine Rug Size and Cut the Netting Base
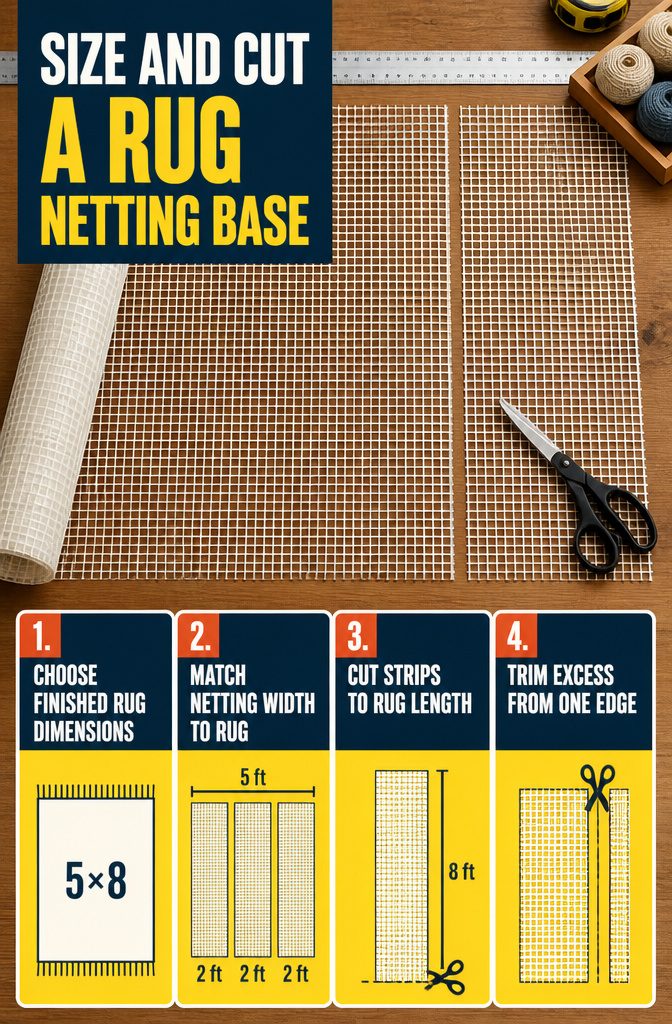
The first question is how much floor you want to cover.
Once you have the dimensions in mind, the netting needs to match. If your roll of netting is narrower than the finished rug, you will need multiple strips laid side by side.
For a 5×8 rug using 2-foot-wide netting, that means three pieces cut to 8 feet each. The math is straightforward: width of the roll times number of pieces should meet or exceed the final rug width.
Roll out the netting to the length you need and cut it with scissors. If the total width of your pieces exceeds the target by more than a few inches, trim the excess from one edge before you start weaving.
That extra foot of width gets cut away so you are not working with more material than you can finish cleanly. The trimmed pieces become the foundation that holds every piece of cotton piping in place.
2. Cut Cotton Piping Into 3 to 4 Inch Pieces
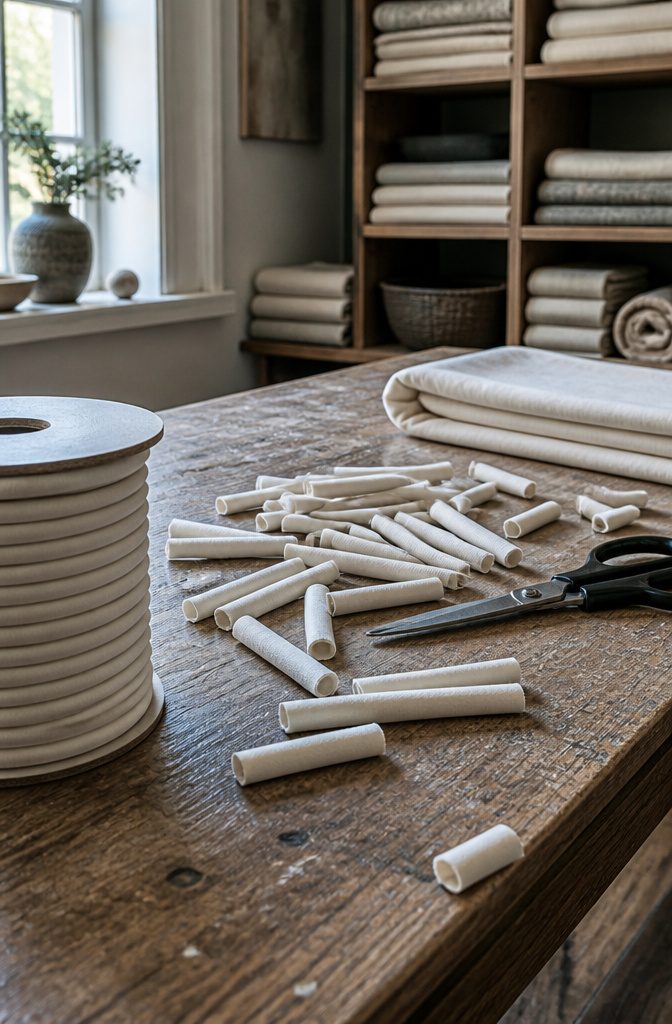
Start by cutting your cotton piping into roughly 4-inch pieces. The exact length can vary between 3 and 4 inches without causing trouble, and a little variation actually gives the finished rug a more handmade texture rather than something machine-regular.
Piping diameter matters more than you’d think.
I’ve found 1/2 inch and 11/16 inch work best for this technique, giving you a thick, cushy result without needing to double up the material. One-inch piping also works, though the slightly thinner sizes tend to sit better in the netting.
If you’re working with 1/6-inch piping, you’ll need to double it up in each opening to get the same density, which slows the process down and uses more yardage. Anything 1/2 inch or thicker can be used as a single strand.
Keep your cuts fairly consistent as you work through the pile. You’re aiming for similar lengths, not identical ones, and a few shorter or longer pieces won’t throw off the grid once everything is woven in.
3. Weave Piping Through the Netting and Secure With Rubber Bands
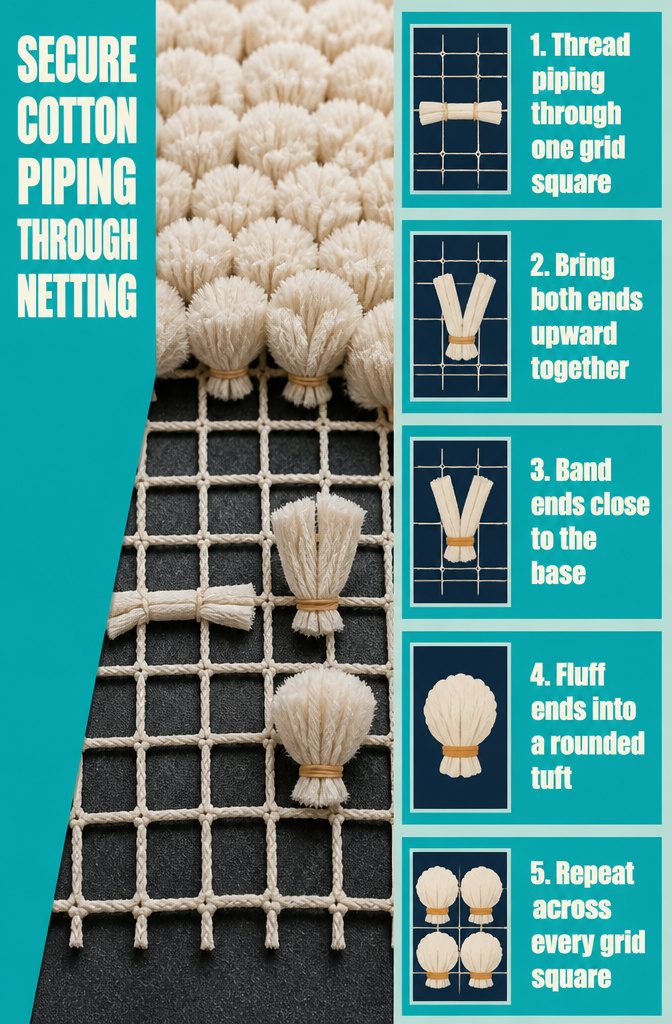
Weave Piping Through the Netting and Secure With Rubber Bands
- Weave each cut piece of cotton piping through one square of the netting grid, threading it in and out so the piping sits flat against the base.
- Pull the two ends of the piping piece upward so they meet above the grid.
- Wrap a rubber band around both ends together to hold them in place. The band should sit close to the base so the piping stands upright.
- Fluff out the piping ends so they fan into a rounded pom-pom shape instead of staying flat.
- Repeat for every grid square until the entire rug surface is covered.
If you prefer not to use rubber bands, wrap thin string around the piping and tie a double knot, pulling tight before you cut off the excess.
String takes more time than rubber bands but avoids the risk of bands deteriorating or breaking after a few years.
Rubber bands have held up well in practice, but the choice depends on how long you expect the rug to last.
4. Cover the Netting and Join Sections if Needed
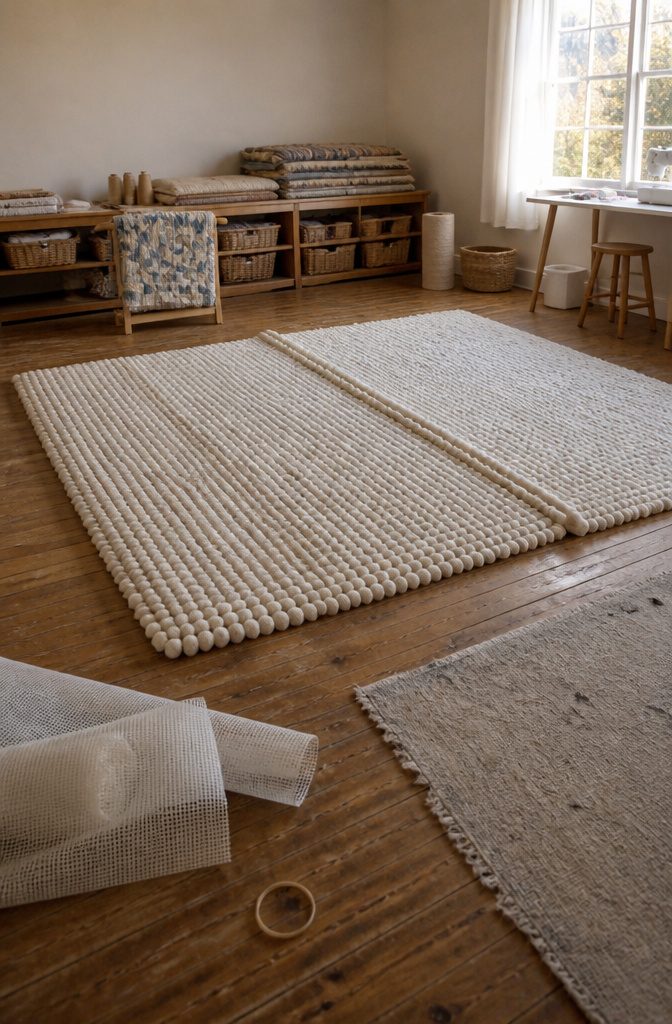
Once the netting is fully covered, you’re done if you’re making a small rug or a runner.
Larger rugs need separate sections of netting joined together, and the process is the same as the weaving and securing you just did, except this time you’re weaving piping through the ends of each mesh piece where they meet.
Pull the strips upward, bundle them together, secure with a rubber band, and fluff them out into the same pom-pom shape. Work your way along the edges of all pieces that need to join until the whole rug is connected.
I find it helps to lay the sections edge to edge on the floor first so you can see exactly where the seams will fall.
The joined sections won’t look different from the rest of the rug once they’re fluffed, which is the point.
5. Trim Uneven Edges With Sharp Scissors
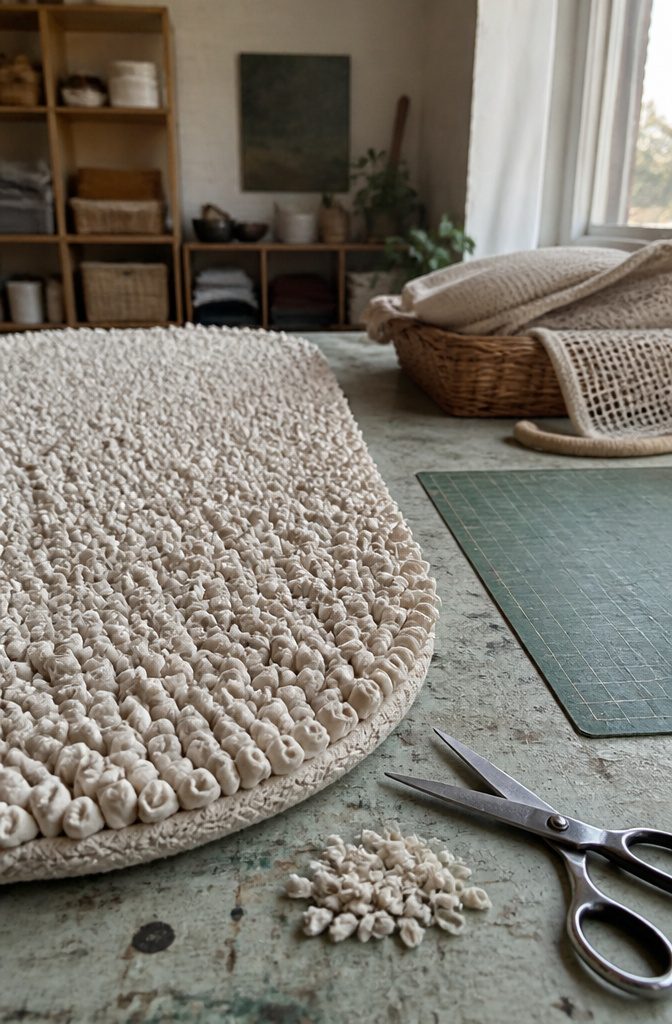
Once the rug feels secure and you’ve finished covering the netting, trim the outer edges all the way around with a pair of sharp scissors to make them even to one another.
The piping pieces won’t all line up perfectly after you’ve woven and banded them, so running the scissors along the perimeter gives you a clean, level edge rather than a ragged one.
You’ll also want to scan the interior for any pieces that stuck out longer than the rest during the weaving process. I trim those back to match their neighbors so they don’t catch underfoot or look like mistakes.
It doesn’t need to be furniture-grade precision, just noticeably tidier than what the weaving left you with. Sharp scissors matter here because dull ones crush the cotton piping instead of cutting it cleanly, and a crushed edge frays faster.
6. Cut Fabric Into Strips and Braid Them
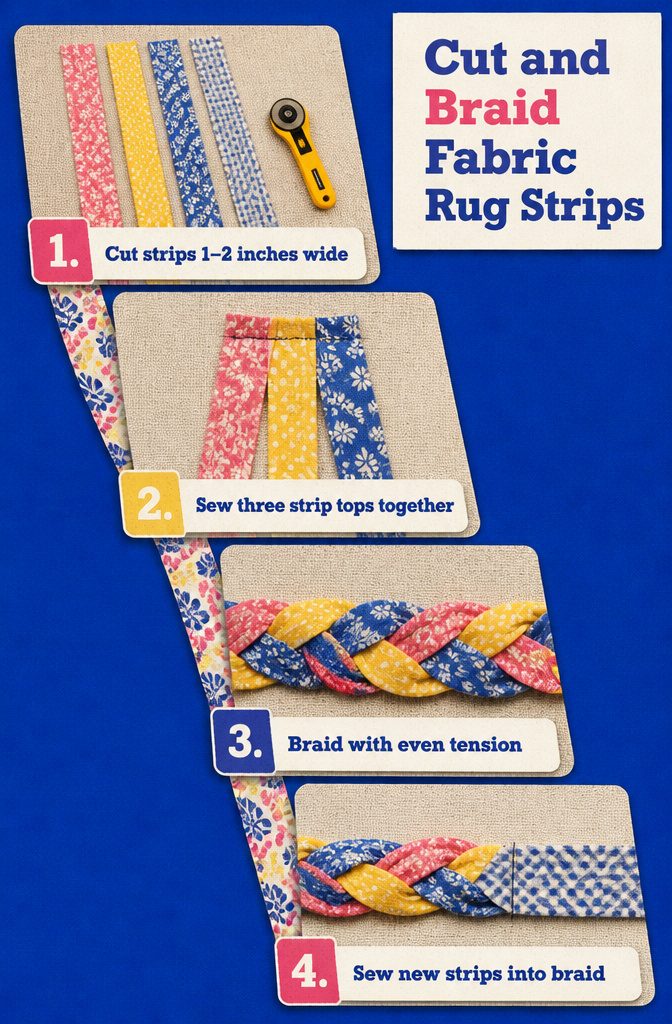
- Cut your fabric into strips 1–2 inches wide, or about 2 inches if you’re working with old sheets. A rotary cutter speeds this up, though scissors work fine. You can tear the fabric instead for a more rustic edge, or cut clean lines if you want the braid to look tidy.
- Take three strips and sew them together at the top to hold them in place while you braid. This keeps the strips from sliding around as you work.
- Braid the three strips together, keeping the tension even as you go. The length depends on the size of rug you’re after, so keep braiding until you’ve covered the area you need.
- As you reach the end of the three strips, sew additional strips onto the braid to keep it going. Attach each new strip to the tail of an existing one, then fold the join into the braid so it disappears. Keep adding and braiding until the braid is long enough to coil into your finished rug.
7. Coil the Braid From the Center and Stitch It Together
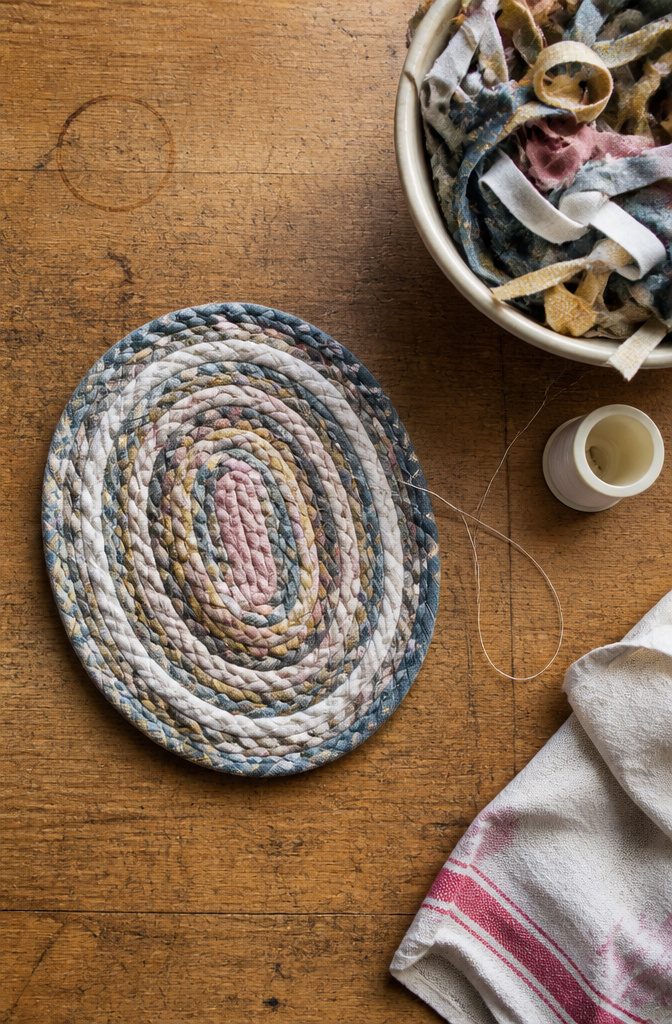
Coil the Braid From the Center and Stitch It Together
Start coiling from the center, forming either a tight circle or an oval depending on the shape you want.
Stitch each new row to the one before it as you go, working your way outward in a spiral. The needle moves through the edge of the previous coil and catches the new one, locking them together without gaps.
If you need to pause, tuck the needle into the coil itself so the braid does not unwind while you step away. The work holds its shape better that way, and you can pick up exactly where you left off.
When the braid runs out or the rug reaches the size you want, you have two ways to finish or join ends: stitch them together with matching thread, or use hot glue if you prefer speed over a fully sewn edge.
A circular rug coiled this way typically lands around 11 inches in diameter, though you can keep going as long as you have braid.
8. Crochet Fabric Strips Into Rows
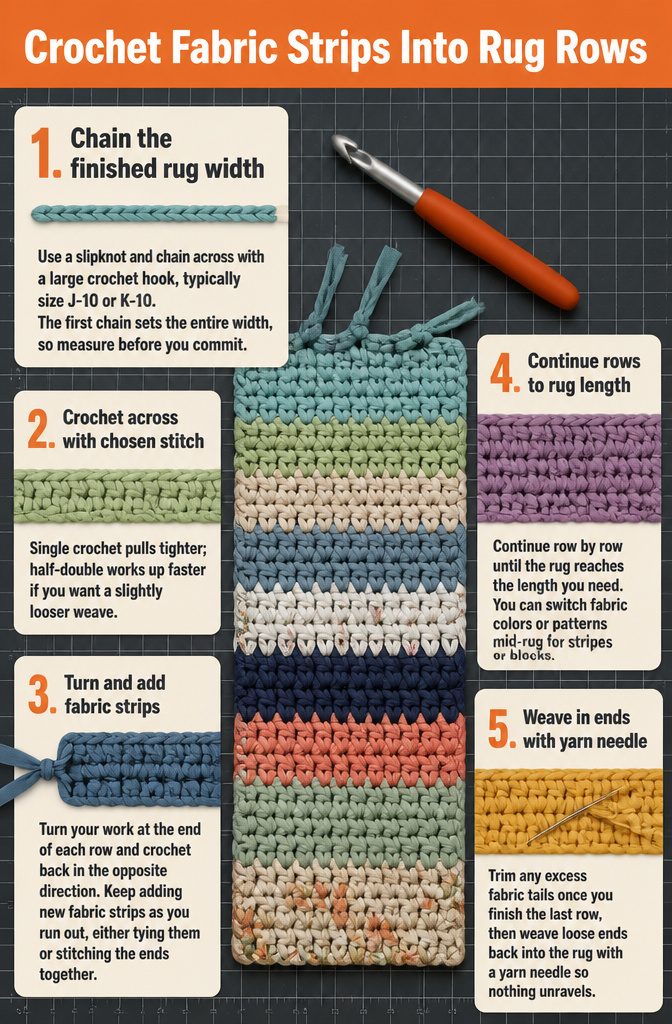
Crochet Fabric Strips Into Rows
- Start with a foundation chain the width you want the finished rug to be. Use a slipknot and chain across with a large crochet hook, typically size J-10 or K-10. The first chain sets the entire width, so measure before you commit.
- Crochet back across the foundation chain using single crochet or half-double crochet stitches. Single crochet pulls tighter; half-double works up faster if you want a slightly looser weave.
- Turn your work at the end of each row and crochet back in the opposite direction. Keep adding new fabric strips as you run out, either tying them or stitching the ends together.
- Continue row by row until the rug reaches the length you need. You can switch fabric colors or patterns mid-rug for stripes or blocks.
- Trim any excess fabric tails once you finish the last row, then weave loose ends back into the rug with a yarn needle so nothing unravels.
This method takes more time than braiding but gives you a smooth, tightly woven surface that holds its shape under foot traffic.
9. Weave Fabric Over and Under Warp Threads
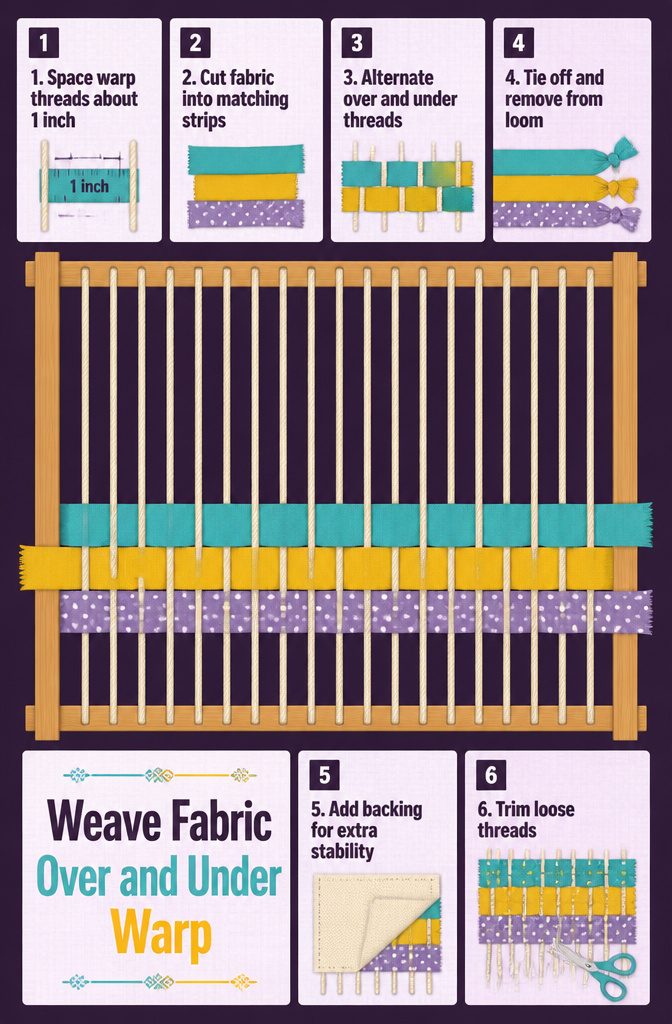
Weave Fabric Over and Under Warp Threads
- Set up your loom by securing vertical warp threads across the frame. Space them evenly, about 1 inch apart. If you don’t have a loom, a sturdy piece of wood or a cardboard box with slits cut along the top and bottom edges will hold the threads in place.
- Cut your fabric into strips, following the same width you used for other methods in the article.
- Start weaving the strips over and under the warp threads, alternating direction each time you cross a row. Pull the fabric taut so the rug weaves tightly and holds its shape.
- Continue weaving until the rug reaches the size you want.
- Tie off the ends of the fabric once the weaving is complete, then carefully remove the rug from the loom.
- Add a backing if you want extra stability, and trim any loose threads. The finished rug will have a smooth, tightly woven surface that works for practical use and looks clean.
Repurposed Fabric and Material Sources
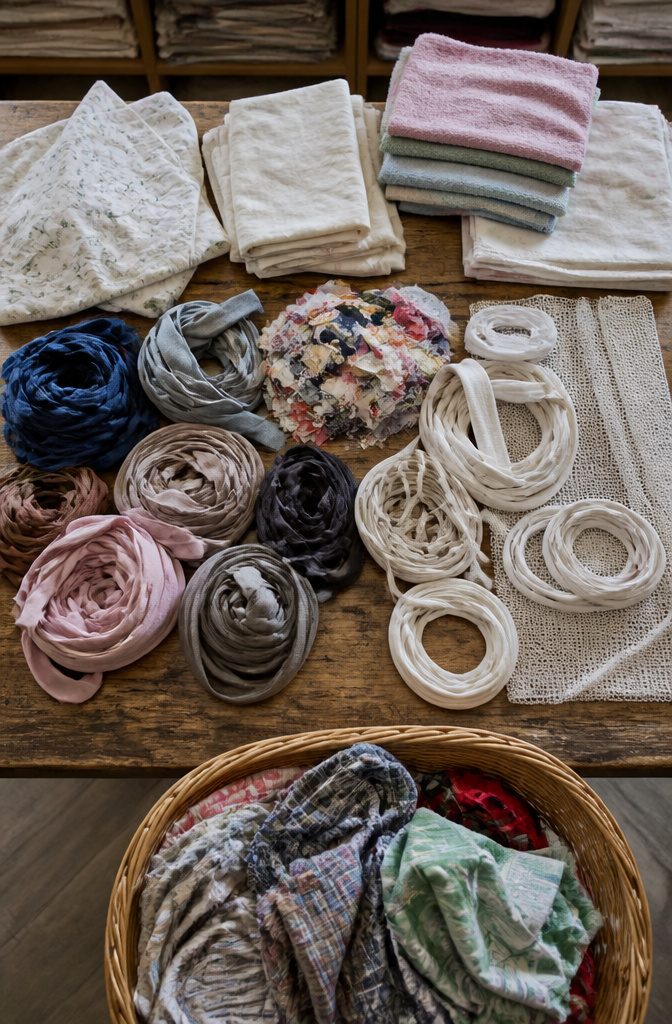
The method sets the material, but every technique on this list runs on secondhand fabric first.
- Old clothing and household textiles cut into strips work for braided, crocheted, woven, and knotted rugs. T-shirts, bed sheets, towels, curtains, and duvet covers all hold up. T-shirts stretch into narrow strips without fraying; sheets and towels need 1–2 inch cuts to get enough bulk for braiding.
- Cotton piping and multi-use netting form the base for the piping method, where short lengths of piping push through netting and lock with small rubber bands. Cotton piping comes in thicknesses from 1/4 inch up to 1 inch and more; the thicker sizes fill the rug faster.
- Fabric scraps from thrift stores or project remnants keep costs down and give you more pattern choices than a single bedsheet allows.
Preparing the material comes first. For braiding and crochet you cut strips, for weaving you set up a warp, and for piping you cut the cord into 3–4 inch pieces before threading it through.
Choosing Among Braiding, Crochet, Weaving and Knotting
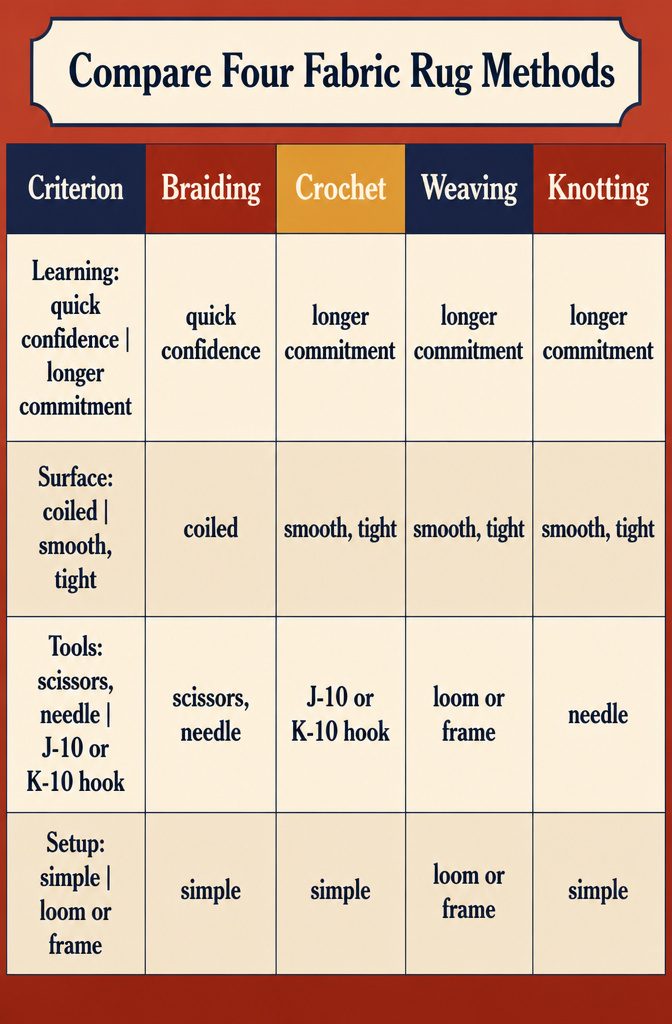
Braiding sits at the easy end. The process repeats the same fold-and-cross motion from start to finish, and the only tools are scissors and a needle for the final seaming.
Most first-time rug makers start here because the method builds confidence quickly, and mistakes undo cleanly before the coil is stitched.
Crochet takes longer. Working fabric strips with a size J-10 or K-10 hook produces a smooth, tightly woven surface, but the time commitment runs higher row by row.
If you already crochet, the transition to fabric strips is straightforward. Weaving requires a loom or a frame you build yourself.
Setting up the vertical warp threads and threading fabric over and under them results in a tight, flat surface, but the equipment barrier keeps most people from choosing it for a first attempt.
Knotting relies on a finger-and-needle technique that secures each piece individually. The method is less common in introductory guides, and the learning curve sits steeper than braiding or crochet.
Material Cost and Yardage for a 5×8 Cotton Piping Rug
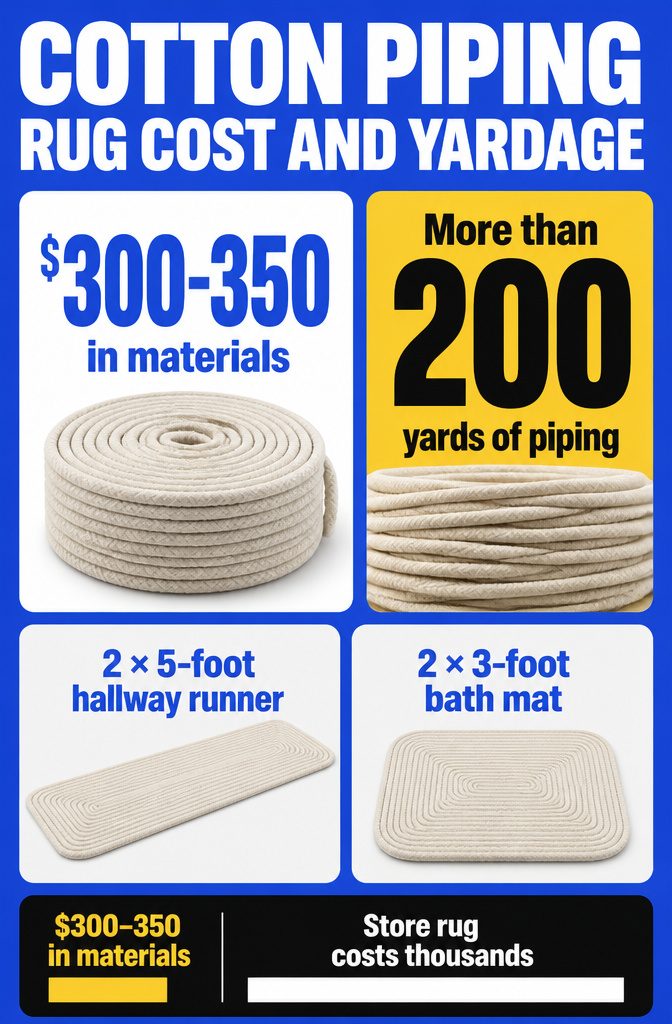
A 5×8 rug takes more than 200 yards of cotton piping and runs $300–350 in materials. Cotton piping is affordable by the yard, but the yardage adds up fast once you start cutting and knotting.
That total still beats what you would pay for a thick handmade rug in a store, where something this size would cost thousands.
Size is flexible. A 2-foot-wide by 5-foot-long runner fits narrow hallways, and several people have finished a 2×3 bath mat in an afternoon or over two days.
The method scales to any dimension you need, which makes it useful for spots where standard rug sizes never quite work. I have seen hallways almost 20 feet long that could take an extended runner using the same technique.
Spot Cleaning and Repairing Cotton Piping Rugs
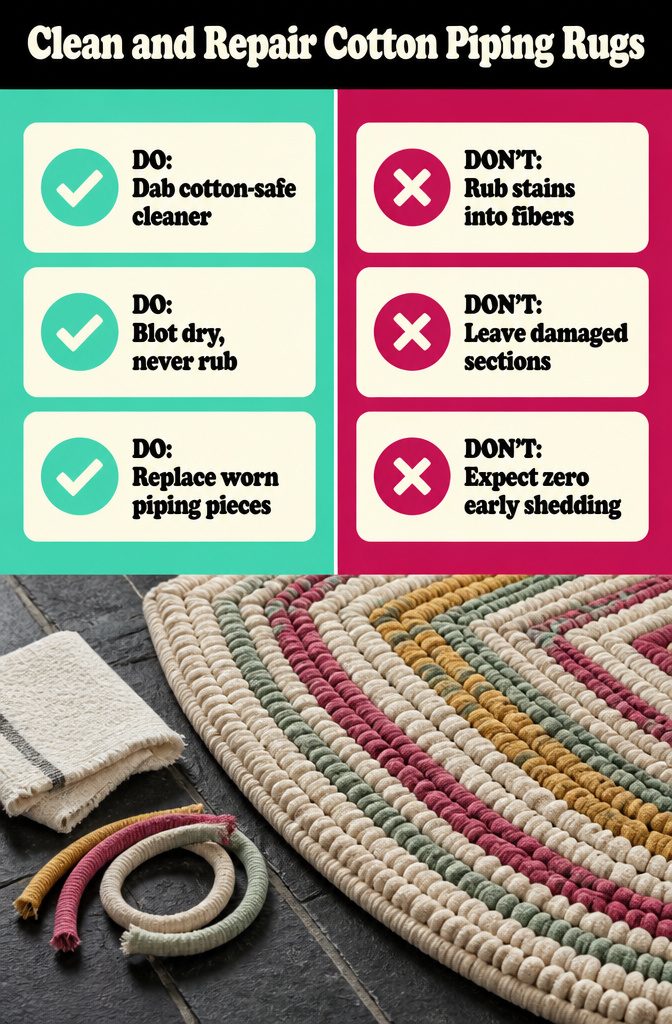
Cotton piping takes spills well if you catch them fast. Dab the spot with any cleaner safe for cotton, working from the outside in, then blot it dry rather than rubbing.
Rubbing pushes the stain deeper and can mat the piping into a flat patch that never quite stands up again.
When a section gets stained past saving or the piping wears thin, pull out the damaged pieces and replace them using the same weaving method that built the rug in the first place.
Cotton piping comes out more easily than it looks like it should, and new pieces slip into the gaps without much fuss. I like that the repair is invisible once it settles in.
Expect some shedding in the first few weeks, then less as the fibers calm down.
The technique feels a bit like latch hook if you’ve done that, but the piping isn’t knotted and you don’t need special tools to get it through the netting.
Other Uses for Braided Fabric Work
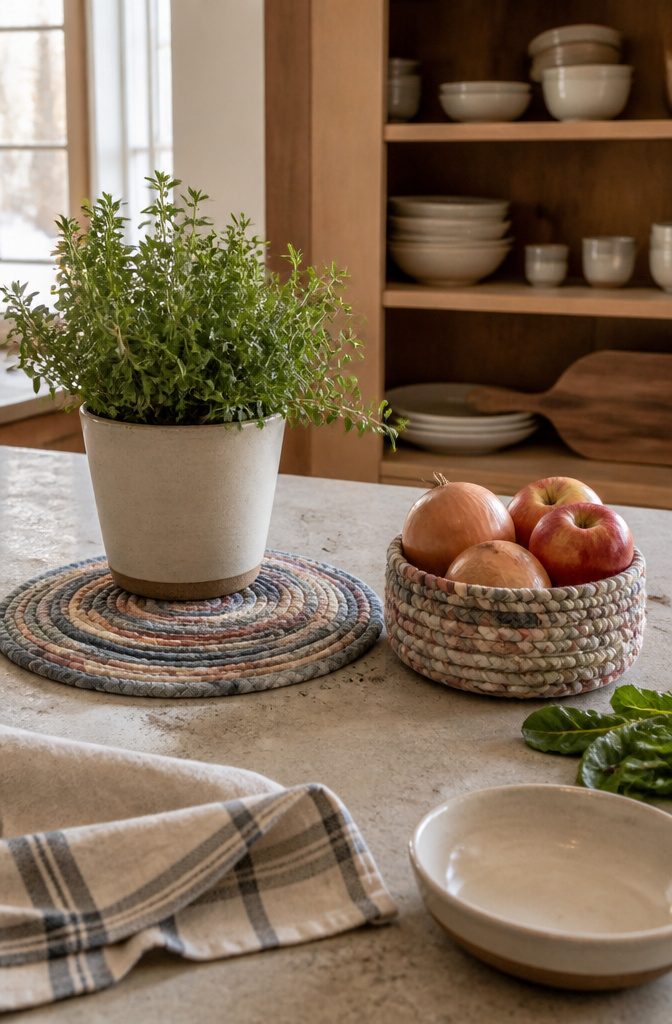
The same braiding method works well beyond floor rugs.
A circular braided piece around 11 inches in diameter sits under a flower pot as a center piece, doubles as a pot holder in the kitchen, or serves as a coaster. Smaller circles fit different uses:
- A 5-inch braided container holds kitchen produce like vegetables or fruits, or corrals small items on a counter.
- Any circular braid can scale up or down depending on how long you coil before you stop stitching.
- The same coiling technique that builds a flat rug turns into a container if you change the direction of the braid partway through. Keep sewing in the new direction and the sides build up naturally.
The braids I made for the rug took a couple hours to stitch into shape once they were ready.
The container took about the same. Both add a handmade touch to the kitchen without requiring new materials if you already have fabric strips left over.
Frequently Asked Questions
Does a cotton piping rug shed?
Yes, it sheds a little during the first few weeks, then less as the fibers settle. This is normal for this type of rug and reduces with time.
Is making a cotton piping rug similar to latch hook?
The technique feels somewhat similar, but the piping isn’t knotted like latch hook and you don’t need special tools. You weave the piping through netting and secure it with rubber bands or string.
Can I make a DIY rug in any size?
Yes, the method scales to any dimension you need. A 2×3 bath mat takes an afternoon or two, a 2×5 runner fits narrow hallways, and some people have made runners almost 20 feet long for extended spaces.
How to braid a rug for beginners?
Cut old fabric into 1–2 inch strips, sew three strips together at the top, then braid them.
Start coiling from the center and stitch each new row to the one before it as you spiral outward. When the braid runs out or the rug reaches the size you want, finish by stitching or gluing the end.
What do you use to weave a rug?
Set up vertical warp threads on a loom or frame, spaced about 1 inch apart. Weave fabric strips over and under the warp threads, alternating direction with each row, until you reach the size you need.
A sturdy piece of wood or cardboard box with slits cut along the edges can hold the threads if you don’t have a loom.






