

Garage storage spans PVC pipe cut into wall mounts for camp chairs on one end and ceiling-mounted hoist systems for seasonal bins on the other.
The single thing that decides which ideas apply is whether your garage still parks a vehicle, because that footprint shapes every zone and height clearance from there.
A 2×4 floor-to-ceiling wood frame with plywood shelves runs less than most metal units and holds more, which is why the DIY build shows up as a real alternative to buying.
1. Metal Shelving Units

Freestanding metal shelving units are the no-commitment way to add serious storage capacity without touching a single wall stud.
Black units pair well with labeled bins because the dark frame makes the bin labels pop at a glance.
Most units in this style adjust their shelf heights, so you can accommodate tall bins on one level and shorter boxes on another without wasting vertical space.
The main trade-off is footprint: a unit that holds a lot also takes up floor space, which matters if the garage doubles as a workspace or parking spot.
2. DIY Garage Shelves
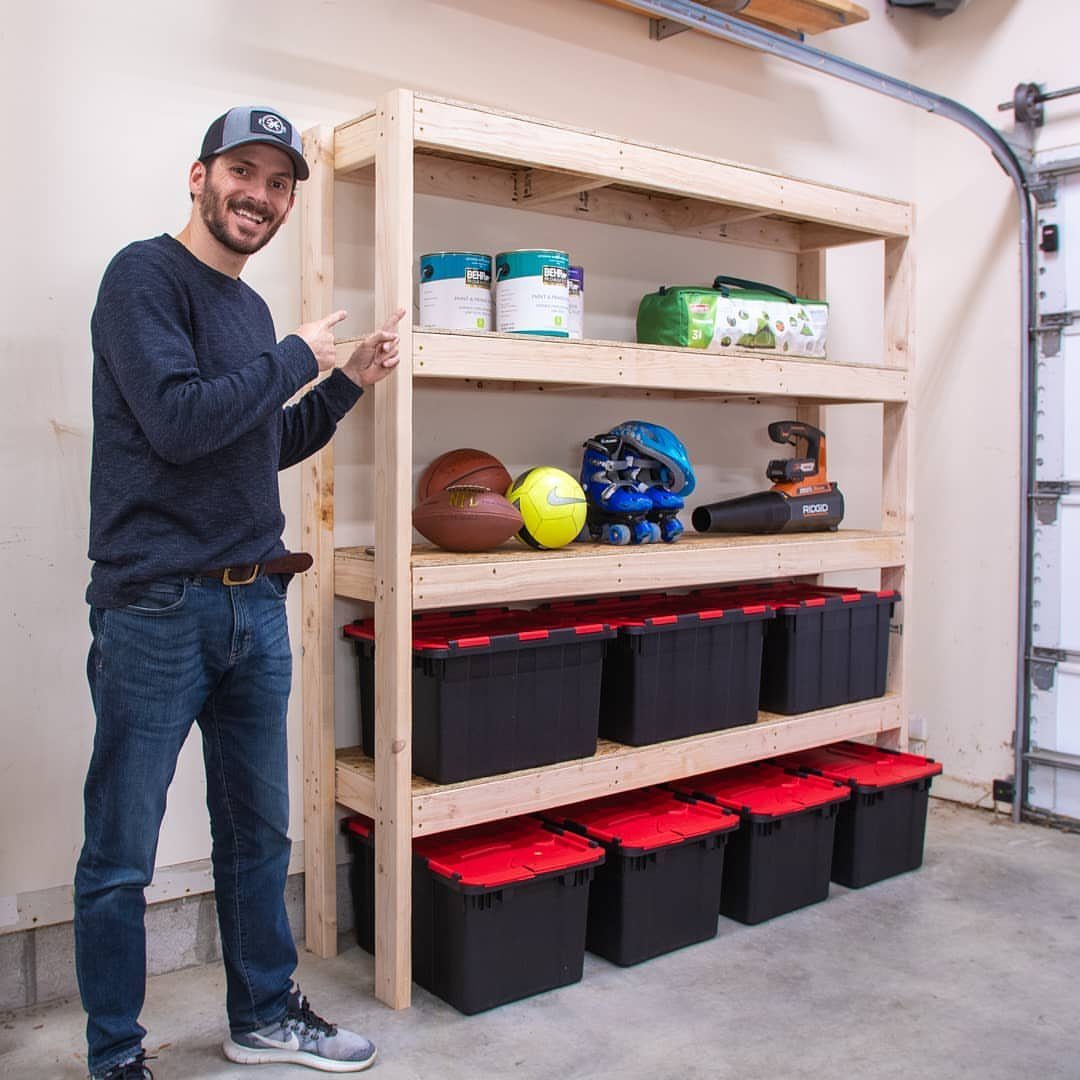
Building your own shelves means you size them to your actual wall, not to whatever a store happened to stock.
A floor-to-ceiling wood frame with horizontal shelves gives plenty of room for bins, sports gear, and cans at different heights. Construction lumber keeps the material cost down, and most DIY versions use 2×4 framing with plywood or OSB shelves.
The result is sturdier than most budget metal units and easier to customize later by adding a middle shelf or adjusting spacing.
It takes a weekend and basic tools: a circular saw, drill, and level.
For just a few hundred dollars you can re-create this storage system yourself in one weekend. This project covers about 16 ft. of wall space and offers a multitude of ways to organize your garage.
3. Wall-Mounted Shelves
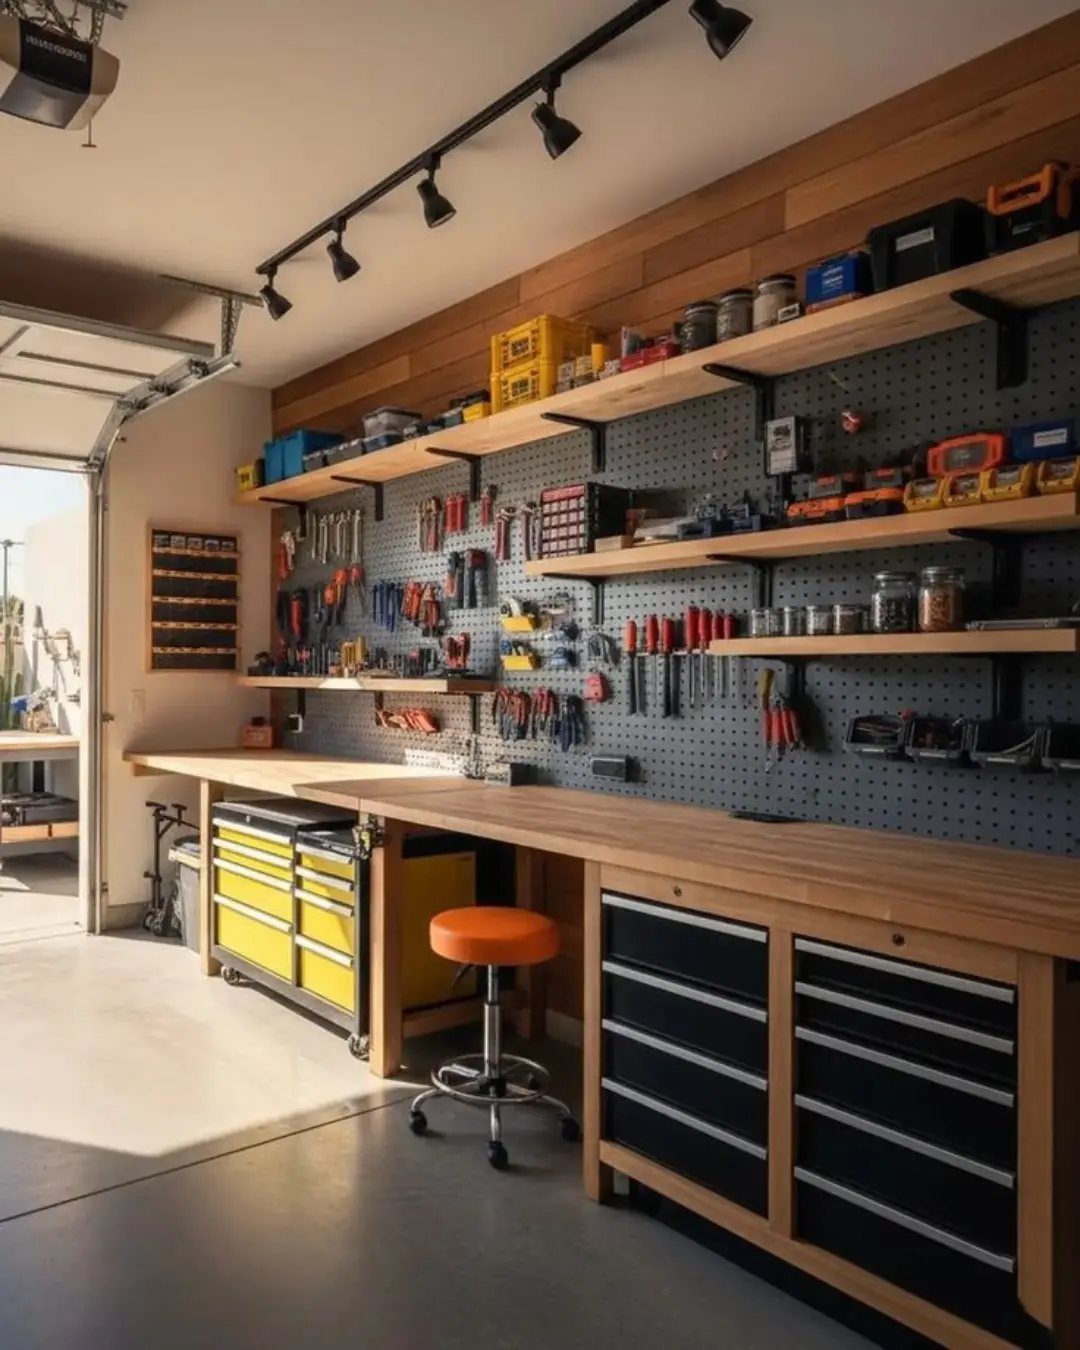
Mounting shelves directly on the wall frees up floor space for vehicles or a workbench, which is the whole reason to consider them over freestanding units.
Long wall-mounted shelves hold heavy bins, paint cans, and bulky supplies without cutting into the room’s footprint.
They work best when anchored into studs or masonry, not just drywall. For a garage with concrete block walls, that means masonry anchors and a hammer drill.
The height is yours to set: mount them high enough to clear a car hood if the garage still parks a vehicle.
4. Pegboard Wall
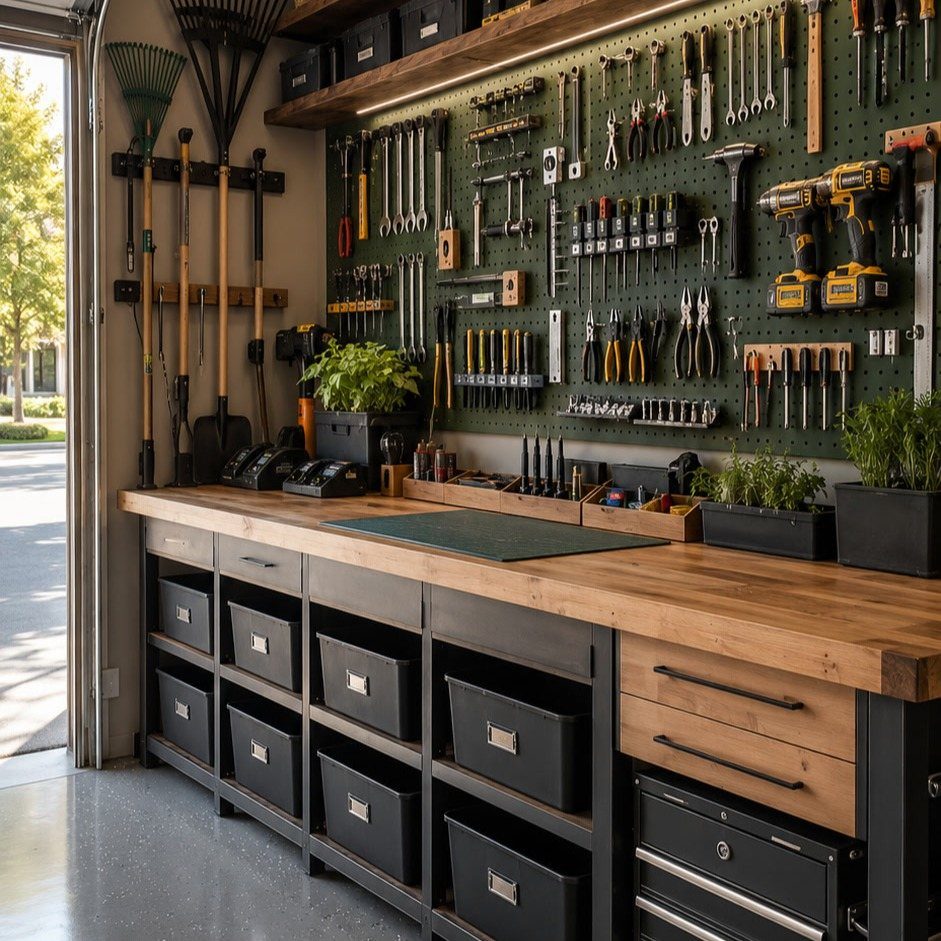
A painted pegboard wall turns an otherwise blank surface into a fully organized tool display where every item has an assigned spot.
Green is an easy way to make the pegboard itself a design choice rather than an afterthought, as visible here.
Standard pegboard comes in 4×8 ft sheets and accepts the same metal hooks whether it is painted or raw. The hooks are the practical part: they rearrange in minutes, so the layout can change as the tool collection grows.
Spacing the pegboard off the wall by about half an inch lets the hooks seat properly; a furring strip at the top and bottom handles this cleanly.
5. Tool Storage
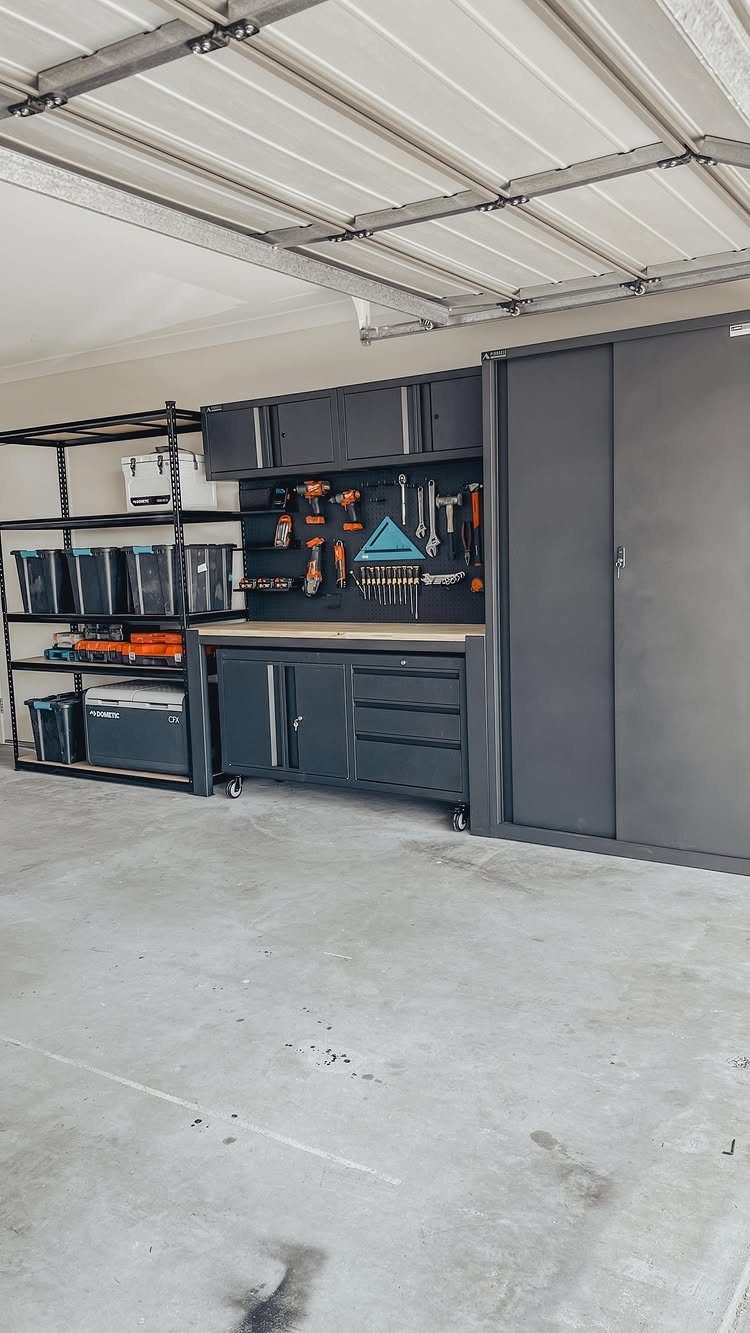
Dedicated tool storage means every hand tool and power tool has a spot, and you stop buying duplicates because you couldn’t find the original.
A grey wall system that combines a pegboard section for hand tools with cabinet and bin storage below keeps the tools you grab daily within reach while less-used items stay behind doors.
That mix suits most setups better than pegboard alone, since power tools and accessories need enclosed storage to stay clean and organized.
Plastic bins sorted by category, mounted at eye level, are faster to search than a single deep drawer.
6. Storage Cabinets
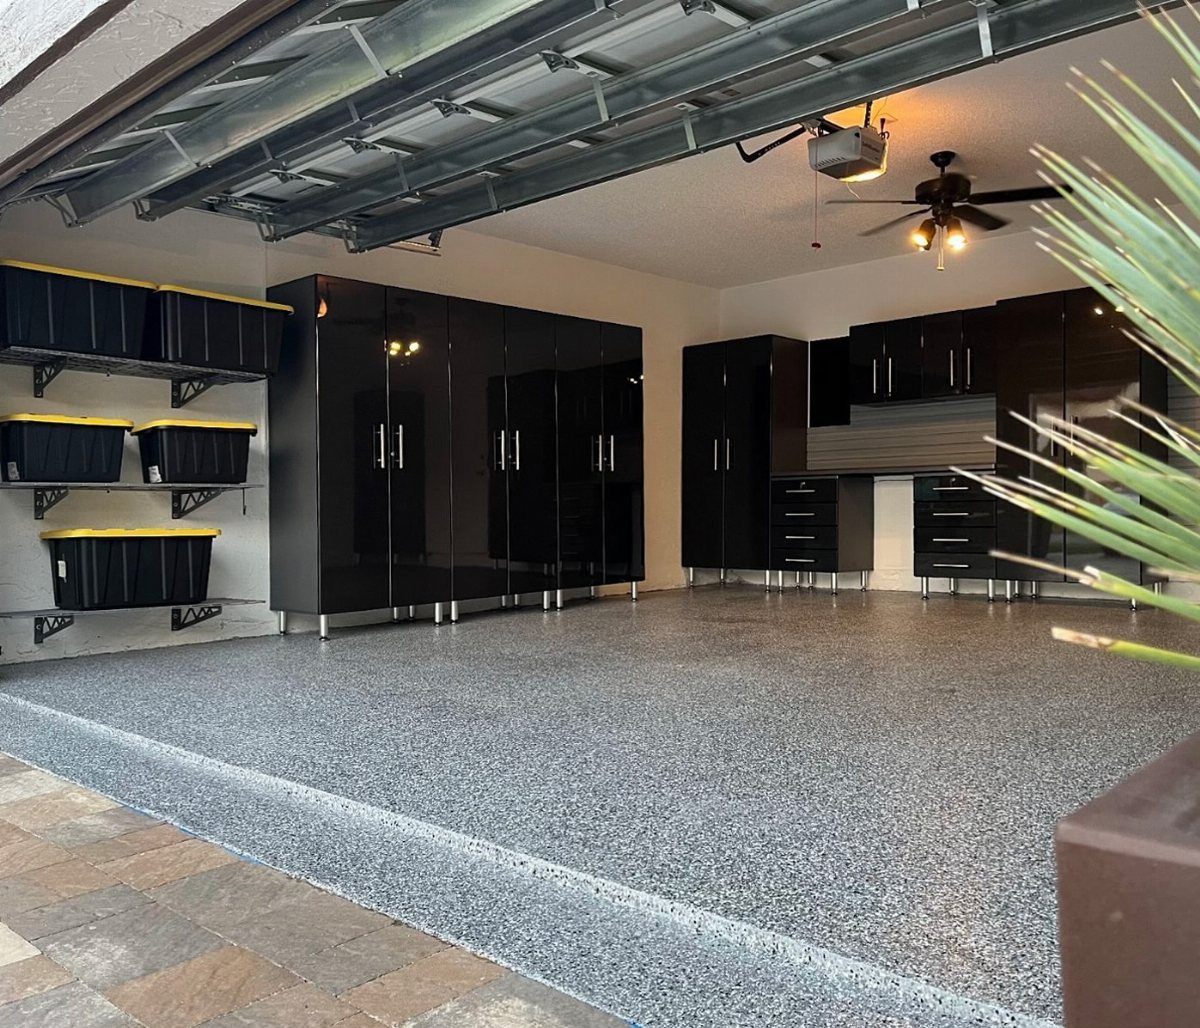
Closed cabinet doors do something open shelving can’t: they hide the clutter and lock away anything hazardous to kids or pets.
Black cabinets against an epoxy floor read as a finished, intentional space rather than a utility room. Steel cabinets with locking doors handle chemicals, power tools, and expensive equipment without putting them on display.
For a garage that also serves as a workshop, wall-to-wall base cabinets give you a continuous work surface on top at a comfortable standing height.
An epoxy floor resists spills from the cabinet contents and is far easier to clean than bare concrete.
7. Garden Tool Caddy

Garden tools are awkward to store because nothing about them is the same size, and a caddy keeps the whole collection upright and together rather than leaned against a wall in a pile.
A wooden caddy like this one handles rakes, shovels, and long-handled tools in a single footprint. The open-top design means grabbing a tool is fast, with no door or lid to deal with.
For garage use, a caddy this size tucks into a corner or along a side wall without claiming much floor space.
8. Wall Hooks
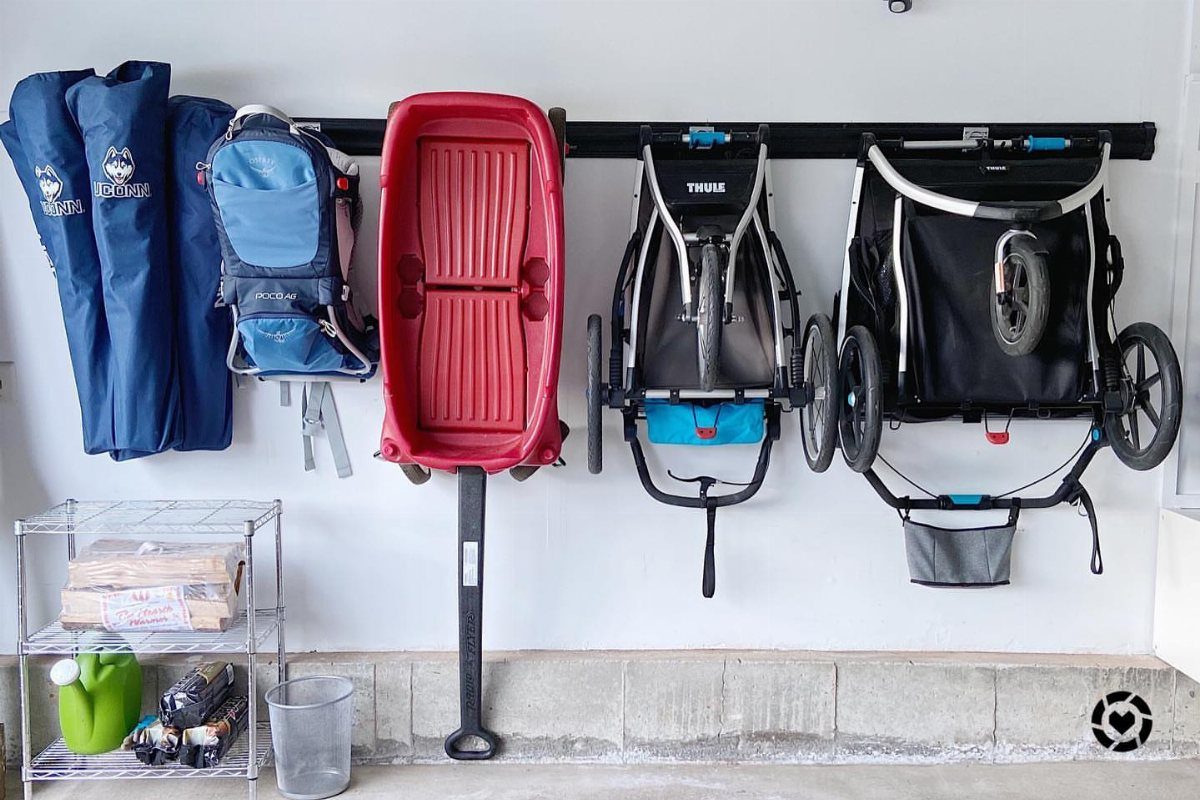
A wall rail with hooks turns bulky, awkward items into a vertical storage system that actually clears the floor.
Rails like the black one here hold bags, sleds, and even bike trailers side by side without any of it tangling.
The key is mounting the rail into studs, not just drywall, since loaded trailers and sleds pull hard on the fasteners.
Spacing the hooks further apart for wide gear and closer together for bags lets one rail handle very different shapes without wasting run.
9. Storage Bins
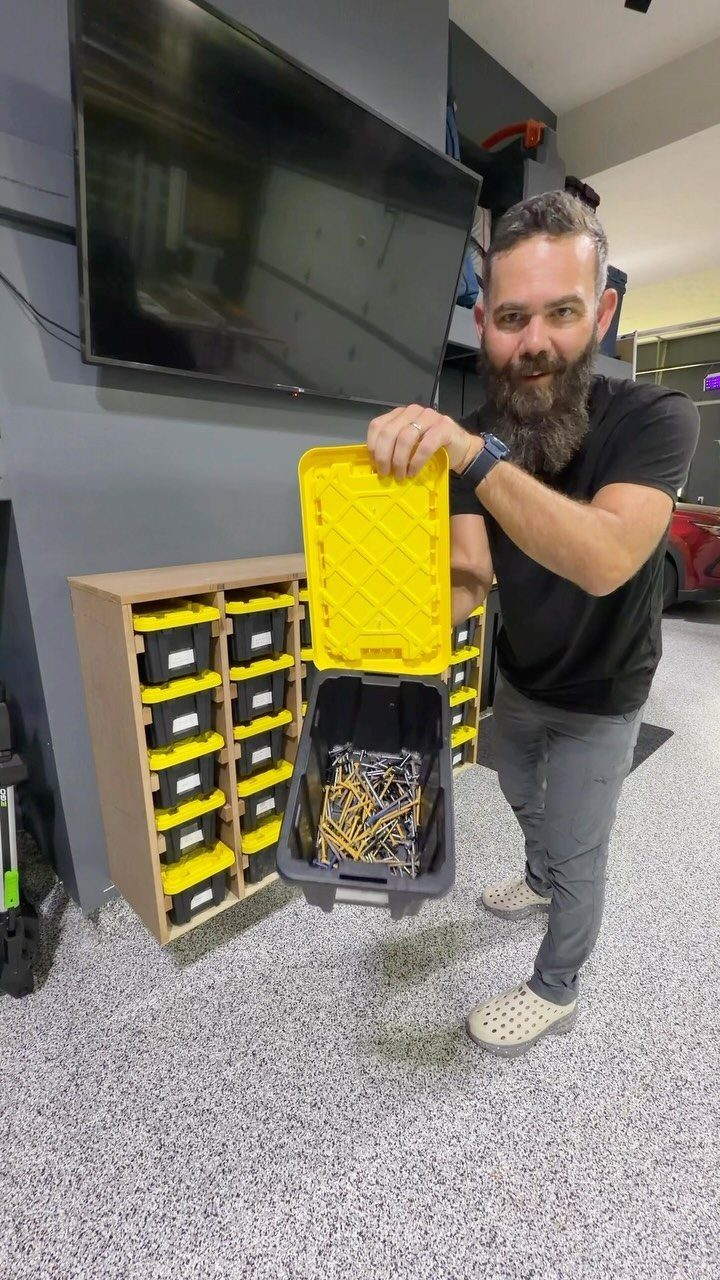
Small hardware, fasteners, and spare parts are the category that turns a garage shelf into a disaster fastest, because loose pieces migrate, mix together, and disappear.
Uniform bins with labeled lids solve that by giving each category a fixed address.
Clear or translucent sides let you check the fill level without pulling anything down; colored lids with written labels add a second layer of identification at a distance.
HDX bins in the 6.5 quart size stack cleanly and fit standard shelf depths without overhanging.
Stack identical bins so the labels all face out, and the shelf stays readable even when it’s full.
10. Slatwall Storage
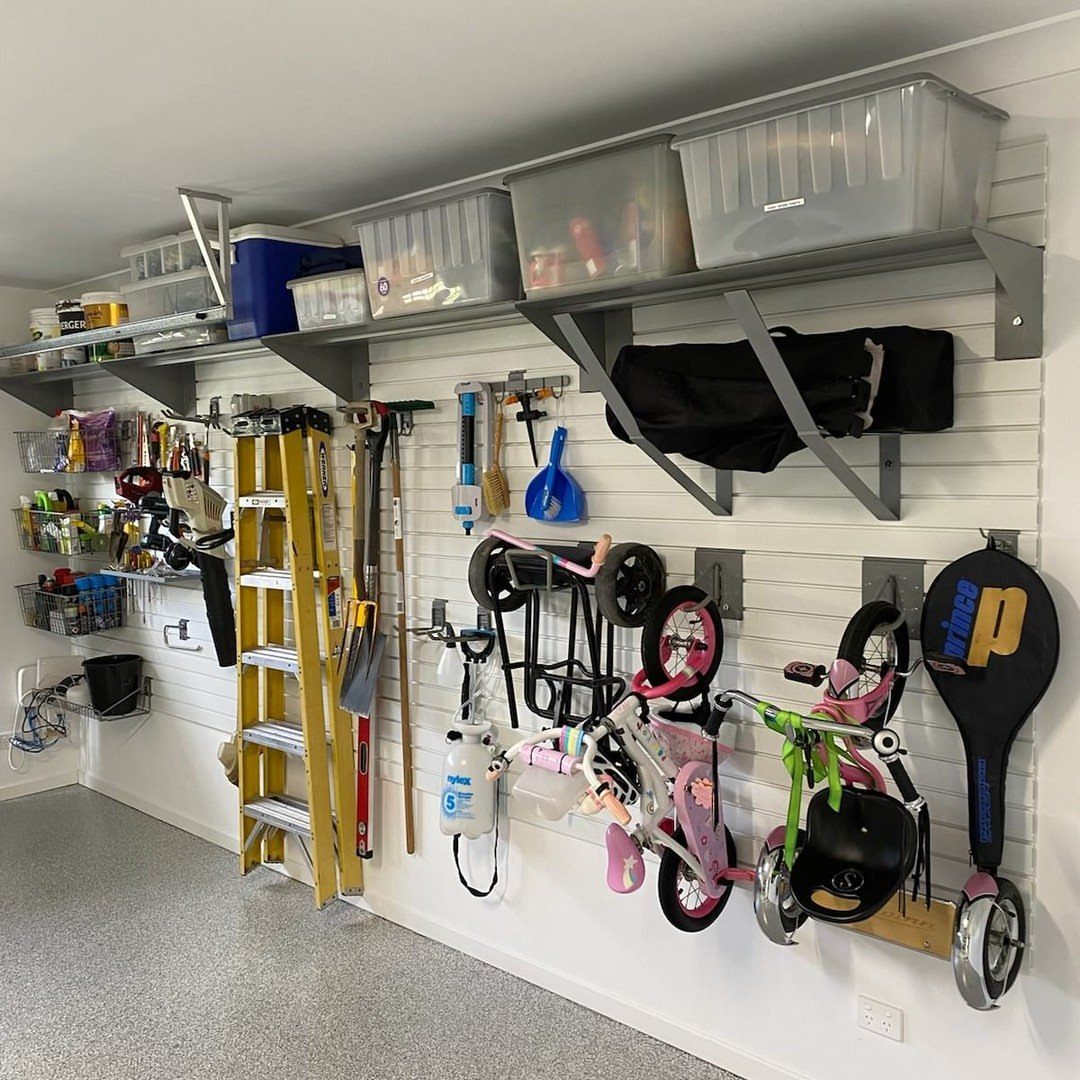
Slatwall panels work differently from pegboard or fixed hooks: every accessory slides into horizontal channels, so the layout changes without any tools or new hardware.
Bins, baskets, and hooks all use the same channel system, so a section holding a tennis racket today can hold a shelf tomorrow.
For a wall that needs to handle a mix of bikes, tools, and bins at once, slatwall earns its cost by eliminating the planning that fixed storage demands upfront.
11. PVC Camping Chair Wall Mounts

Cut sections of PVC pipe mounted directly to the wall give folded camp chairs a vertical home without taking up floor space.
Each chair slides into its own pipe section and stays upright on its own. No brackets, no bungees, nothing to fuss with when you’re grabbing chairs on the way out the door.
The pipe diameter is the one measurement that matters: it needs to be wide enough to accept the folded chair legs without forcing them in. Getting that right once means the mount works for years without loosening.
12. Mobile Workbench with Storage
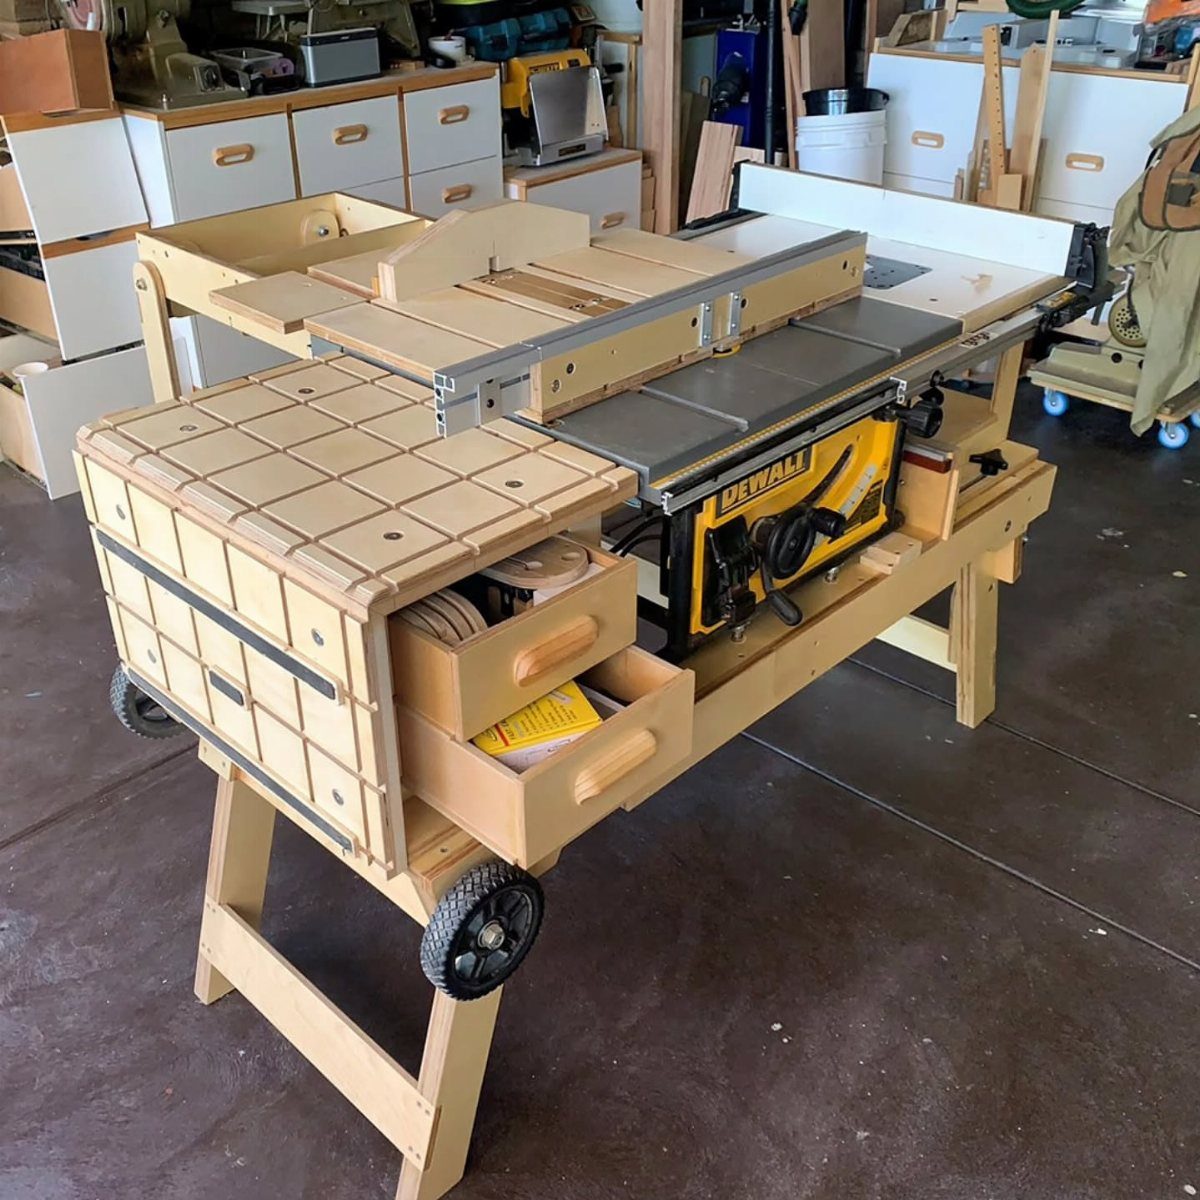
Rolling a workbench to wherever the task is happening changes how a garage workshop actually gets used.
The drawers underneath keep frequently reached-for bits, blades, and hardware within arm’s length instead of across the room.
Building it from wood rather than buying a metal cart means the dimensions fit the garage and the saw, not the other way around.
Heavy-duty casters are the part worth spending on: swivel casters with a locking mechanism keep the bench from drifting mid-cut, and larger wheels roll smoothly over a concrete floor without catching on expansion joints.
13. Garage Gym Equipment Rack
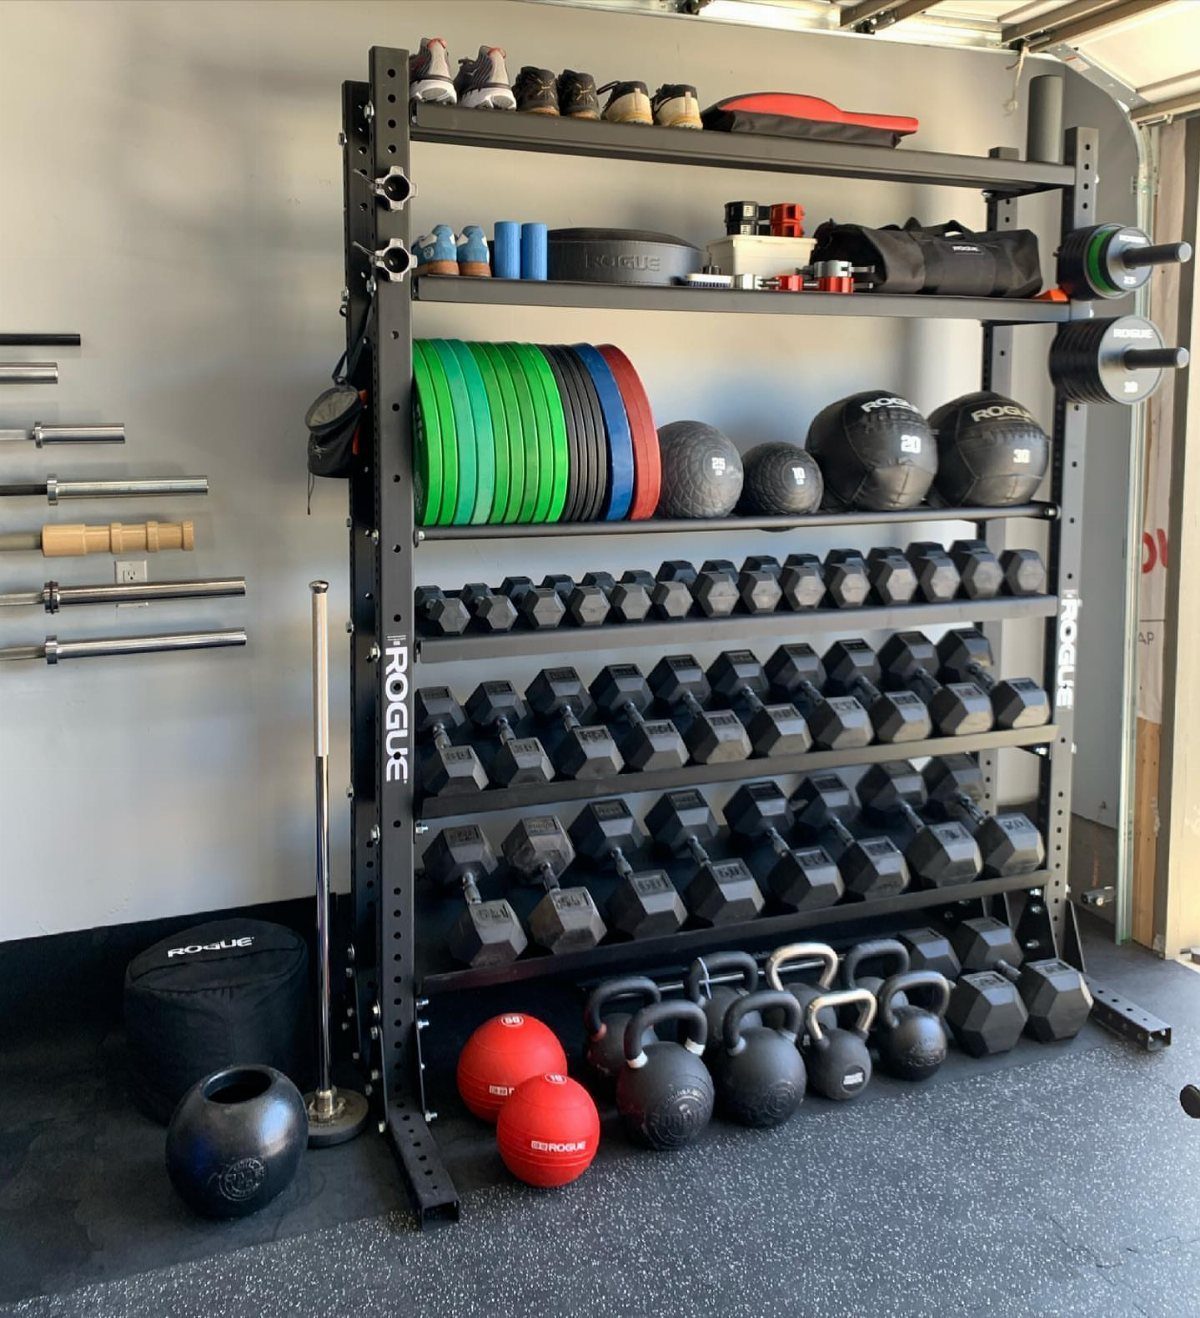
A dedicated gym rack solves the problem that kills most garage gym setups: weights scattered across the floor and rolling under the car.
A multi-tier metal rack keeps dumbbells, kettlebells, medicine balls, and plates in one vertical footprint. A rack you can step around is far easier to live with in a shared garage than equipment spread across the floor.
Barbells stored on wall-mounted holders, separate from the rack, keep them from rolling and free up the rack tiers for the pieces you grab more often.
14. Overhead Garage Storage Racks
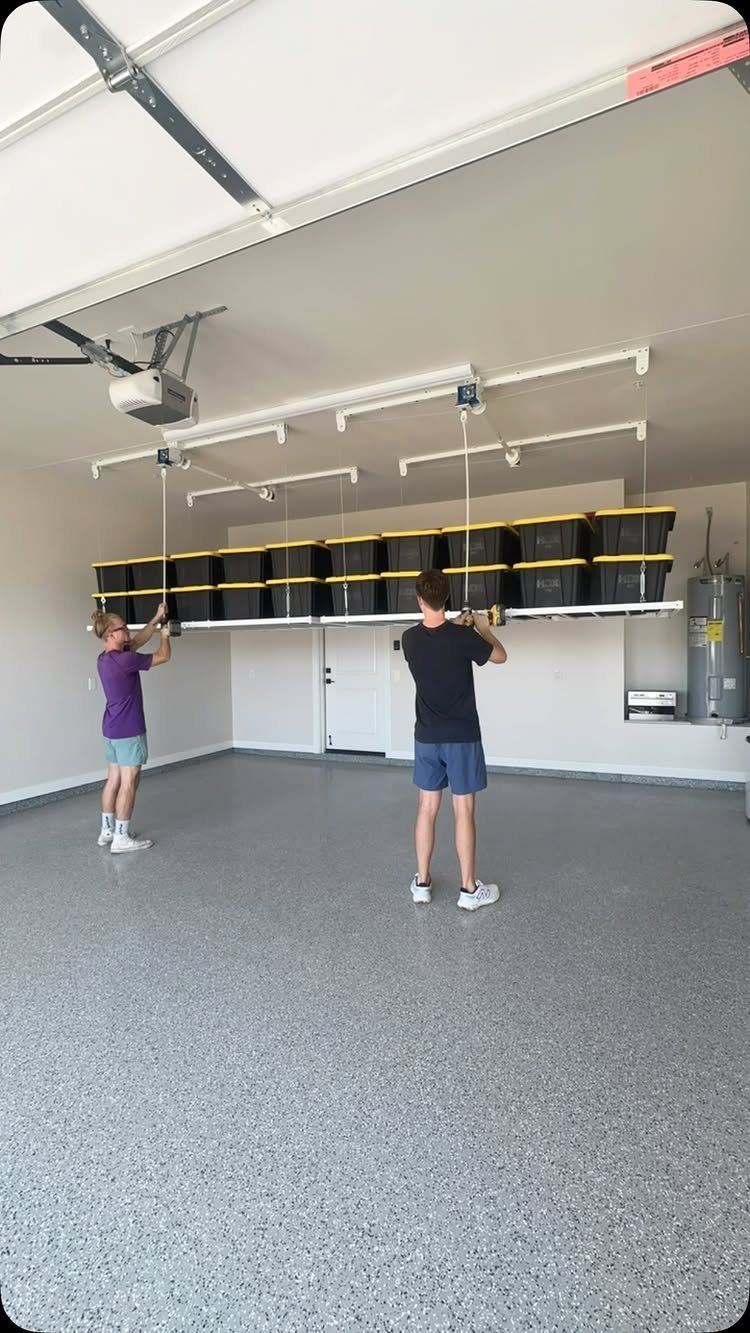
Ceiling space is the most underused storage real estate in a garage, and an overhead rack system puts it to work without touching a single wall.
The bins hang from a ceiling-mounted track and lower on a hoist, so getting something down doesn’t require a ladder or a shoulder press.
That makes it practical for seasonal gear, holiday décor, and anything else used a few times a year rather than daily.
For a garage that parks a vehicle, confirm the rack height clears the roof before installing. Most systems mount between the ceiling joists, so the joists need to run in a direction that works with your layout.
15. Wall-Mounted Bike Racks
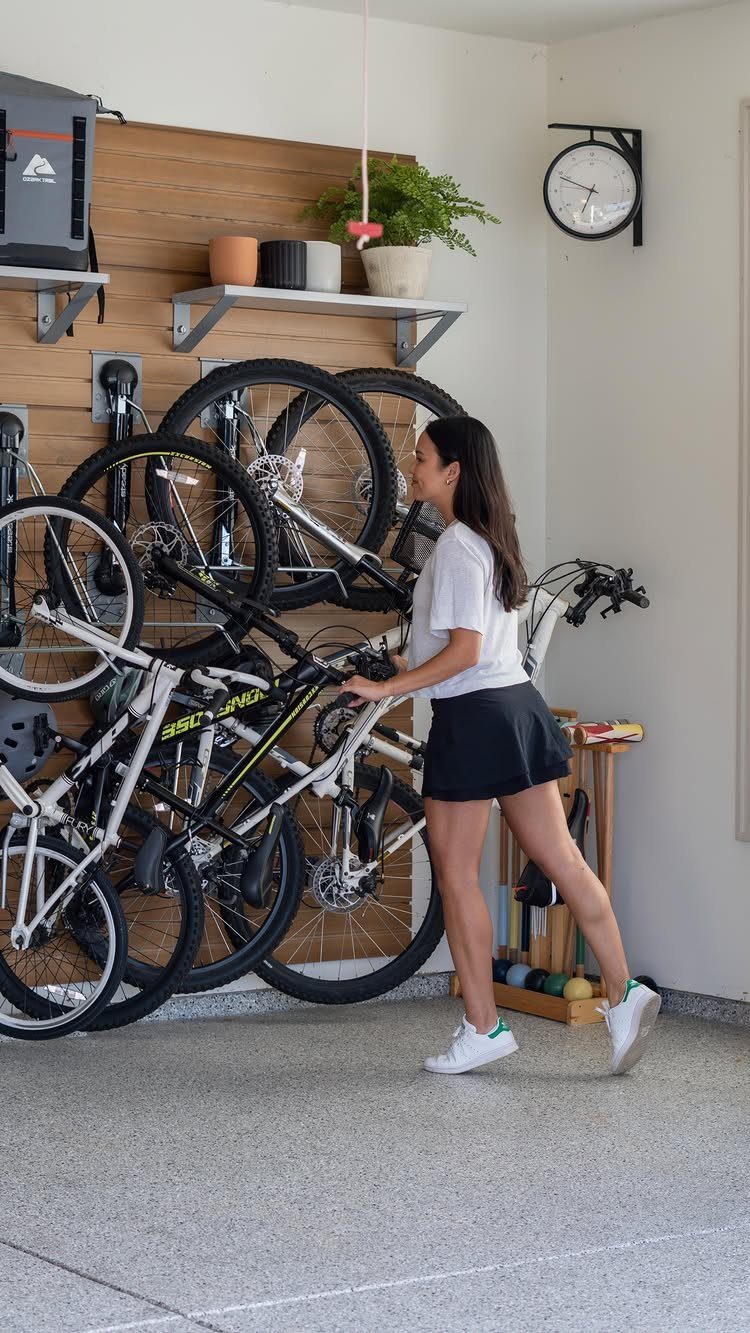
Bikes leaned against a wall take up floor space and tip over; wall-mounted racks get them vertical and completely off the ground.
A rack that holds multiple bikes side by side, like the setup here, keeps them from tangling handlebars and scratching each other.
Most wall-mount hooks hold the bike by one wheel, and the spacing between hooks is what determines whether a fat-tire bike and a road bike can hang next to each other without fighting for room.
For a garage that also stores tools or has shelving, bike hooks leave those systems undisturbed since the bikes live on their own section of wall.
16. Rolling Sports Equipment Cart
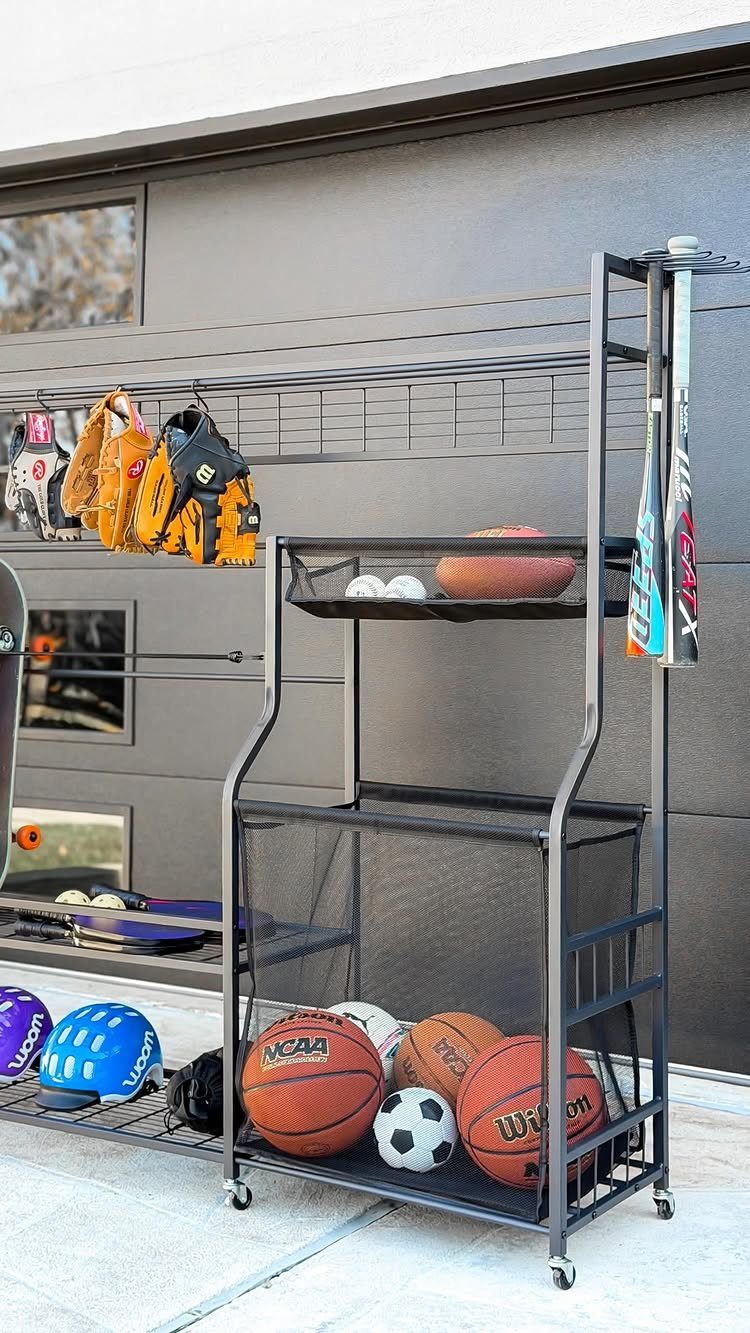
Sports gear is the category that fights organization hardest, because the pieces come in every size and none of them stack.
A rolling metal cart with open tiers handles that by giving each item a visible, reachable spot without demanding that things be sorted by size or type.
Balls sit in the lower tiers, helmets and gloves on the upper ones, bats and sticks along the side.
Rolling it out of the corner and back again takes seconds, which is the only reason a storage solution like this actually gets used consistently.
The wheels are what make it worth choosing over a fixed rack if the garage layout shifts seasonally.
17. Tire Storage Rack
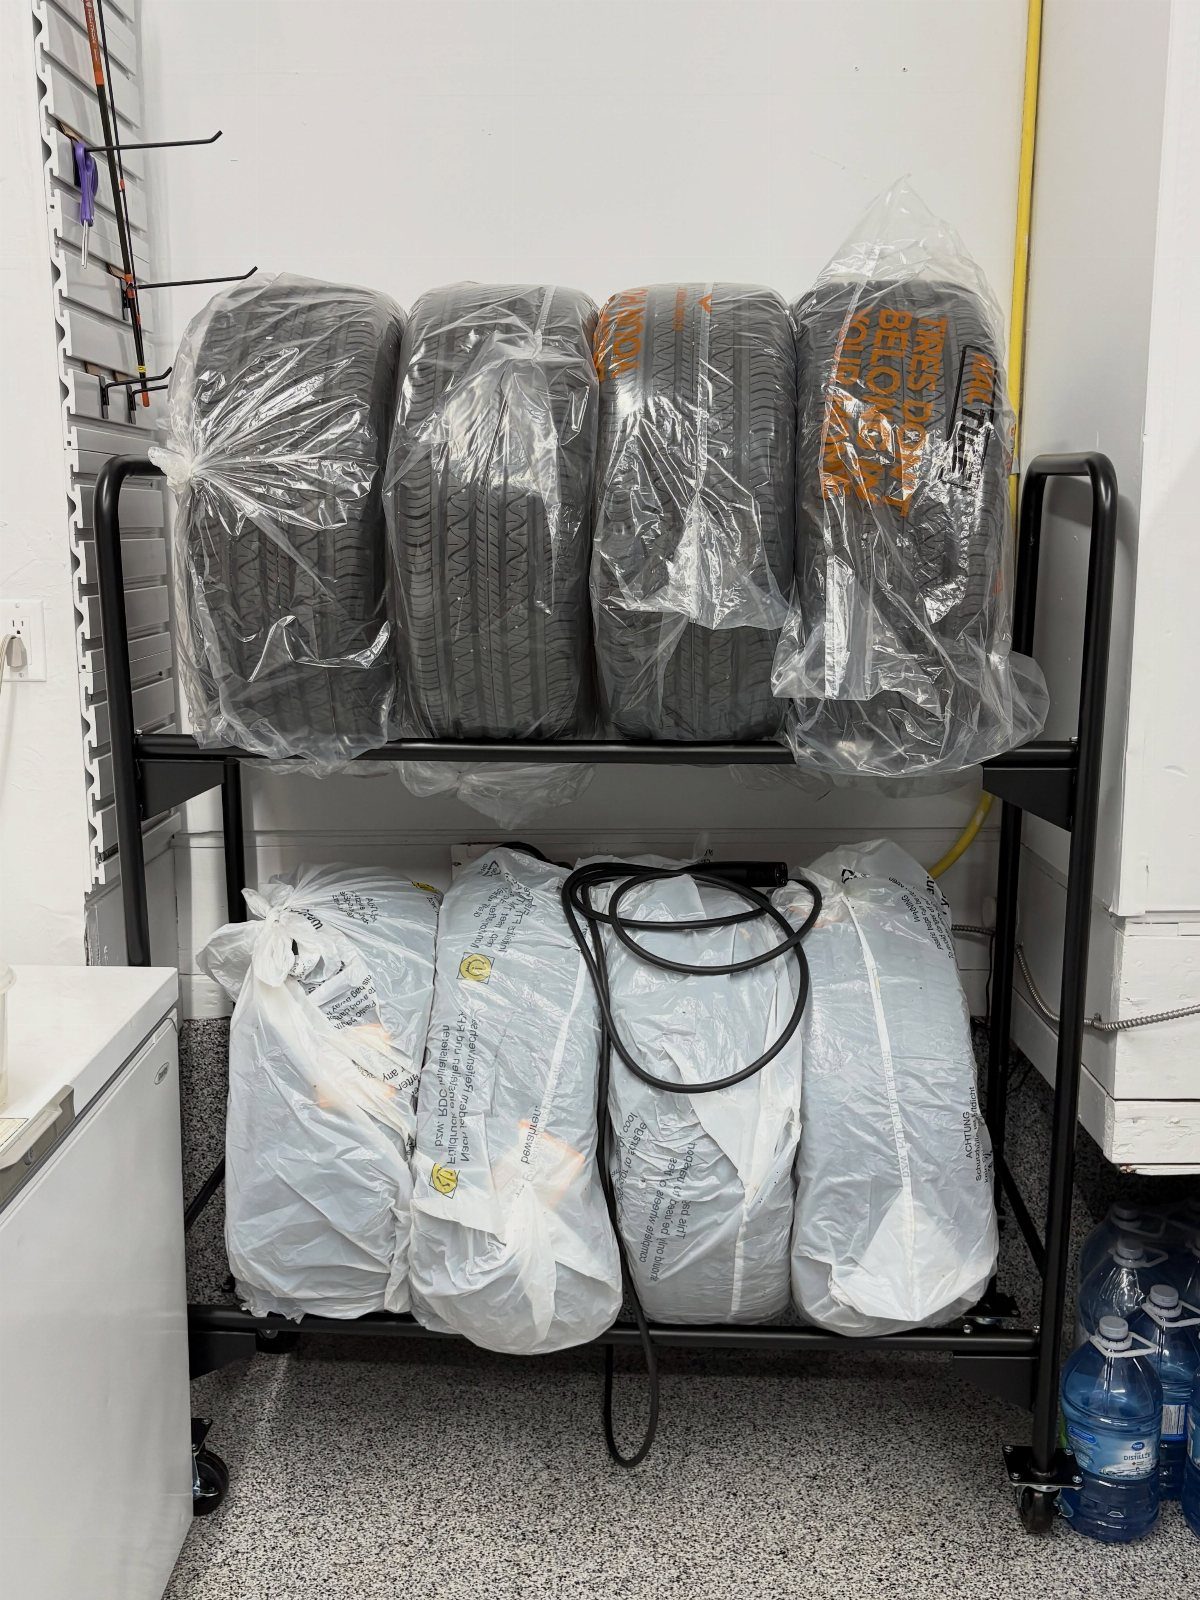
Seasonal tires stored upright on bare concrete develop flat spots over time; getting them up off the floor onto horizontal cradles solves that problem without taking up much room.
A two-tier rack like this one holds 2 full sets of tires in a small wall footprint, with each tire resting on its side across two horizontal arms.
The plastic wrap visible here keeps road grime from transferring to the rack or anything near it, which is a practical habit if the tires come in still dirty.
Storing tires in a garage works well as long as the space stays reasonably cool and dry; heat and humidity degrade rubber faster than cold does.
Plan and Declutter First
Pulling everything out forces you to confront the actual volume and condition of what you own, rather than guessing at it from behind cabinet doors.
Most garage cleanouts take 8 hours if done properly, because each item demands a decision: keep, donate, recycle, or dispose of.
The time stretches longer when you pause mid-task to sort or organize; it shortens when you commit to removing first and sorting later.
Using the yard or driveway as a staging area only works if the weather holds.
A tarp-covered zone system, with tape or chalk marking boundaries for different categories, keeps sorted piles from mixing back together before they reach their final homes.
Expired chemicals, broken tools, and anything unused for 2 years are the easiest calls. Donate the rest or hold a yard sale before the storage plan begins.
Keep Garage Zones Safe
Group belongings by how you use them, not by how they arrived in the garage.
Bikes, helmets, and locks live together; gardening tools claim their own zone; seasonal gear gets its own corner. That clustering cuts the search time to seconds when you’re loading up for a weekend project.
Frequently grabbed items go near the door or at waist height, where you can reach them without stepping around a parked car or climbing over boxes. Less-used gear moves higher or deeper.
Children’s toys and sports equipment belong in a separate zone from chemicals, paints, and sharp tools.
That physical separation means a kid grabbing a soccer ball isn’t also within reach of herbicide or an angle grinder. Hazardous supplies get enclosed storage with a latch or lock, not an open shelf at child height.
Plan the layout with the car in mind: measure door swing, walking paths, and clearance before committing a zone to permanent shelving.
Maintain and Secure Storage
Ceiling racks need to attach to joists, not just drywall, or the weight pulls the hardware straight out.
Before mounting, check for ductwork and garage-door tracks; both need clearance to move freely, and a rack that blocks either one stops working the moment you try to use it.
Keep the heaviest bins and equipment on lower shelves where tipping or a failed bracket won’t send them falling from head height.
Load shelves from the bottom up when possible, and spread weight evenly across the shelf span rather than concentrating it in the middle.
Gaps between the garage and the house let in dust, pests, and conditioned air loss.
Caulk works for narrow cracks; spray foam handles anything wider. Both seal the opening and cut down on the dirt that ends up coating stored items over time.






