
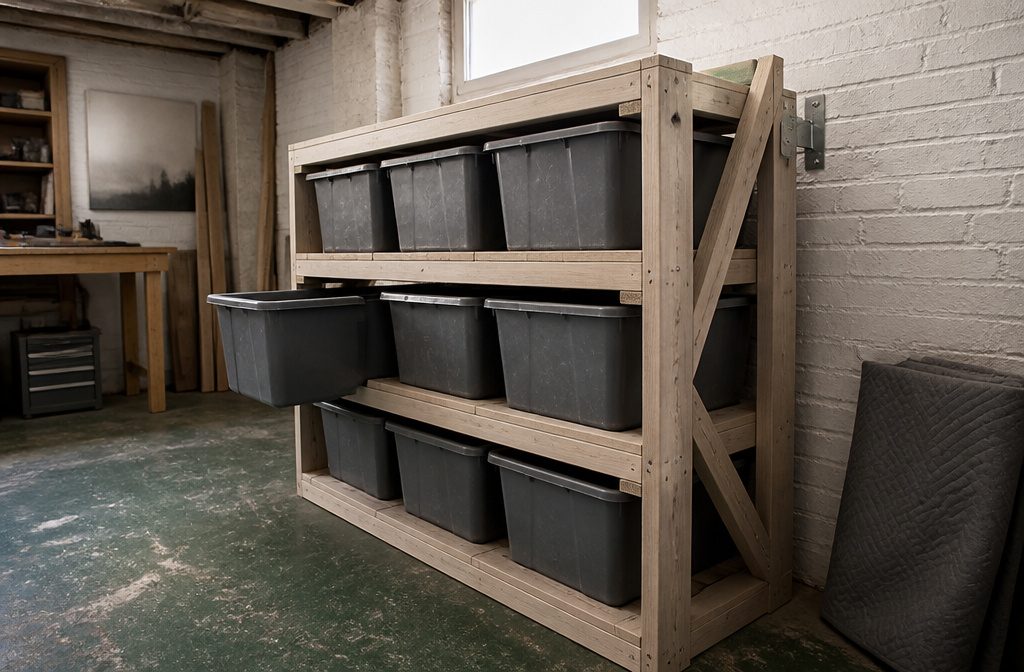
A DIY tote storage rack that holds 12 bins costs around $150 in lumber and hardware and takes one afternoon to build.
Most people skip the diagonal bracing and anchor step, then watch the loaded rack tip forward the first time someone pulls a bin from the top row.
The runners work like drawer slides: each tote hangs by its lip from a pair of 2×4 rails, so you can pull any bin without unstacking the three above it.
1. Measure Your Totes and Decide the Rack Layout
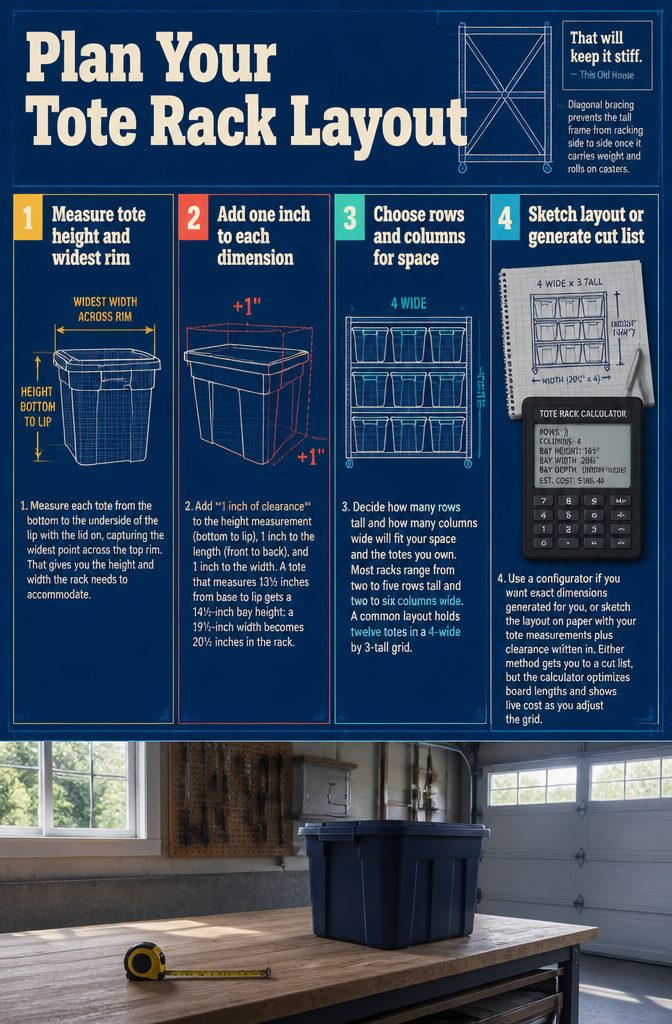
- Measure each tote from the bottom to the underside of the lip with the lid on, capturing the widest point across the top rim. That gives you the height and width the rack needs to accommodate.
- Add 1 inch of clearance to the height measurement (bottom to lip), 1 inch to the length (front to back), and 1 inch to the width. A tote that measures 13½ inches from base to lip gets a 14½-inch bay height; a 19½-inch width becomes 20½ inches in the rack.
- Decide how many rows tall and how many columns wide will fit your space and the totes you own. Most racks range from two to five rows tall and two to six columns wide. A common layout holds twelve totes in a 4-wide by 3-tall grid.
- Use a configurator if you want exact dimensions generated for you, or sketch the layout on paper with your tote measurements plus clearance written in. Either method gets you to a cut list, but the calculator optimizes board lengths and shows live cost as you adjust the grid.
That will keep it stiff.
Diagonal bracing prevents the tall frame from racking side to side once it carries weight and rolls on casters.
2. Cut and Label All the Parts
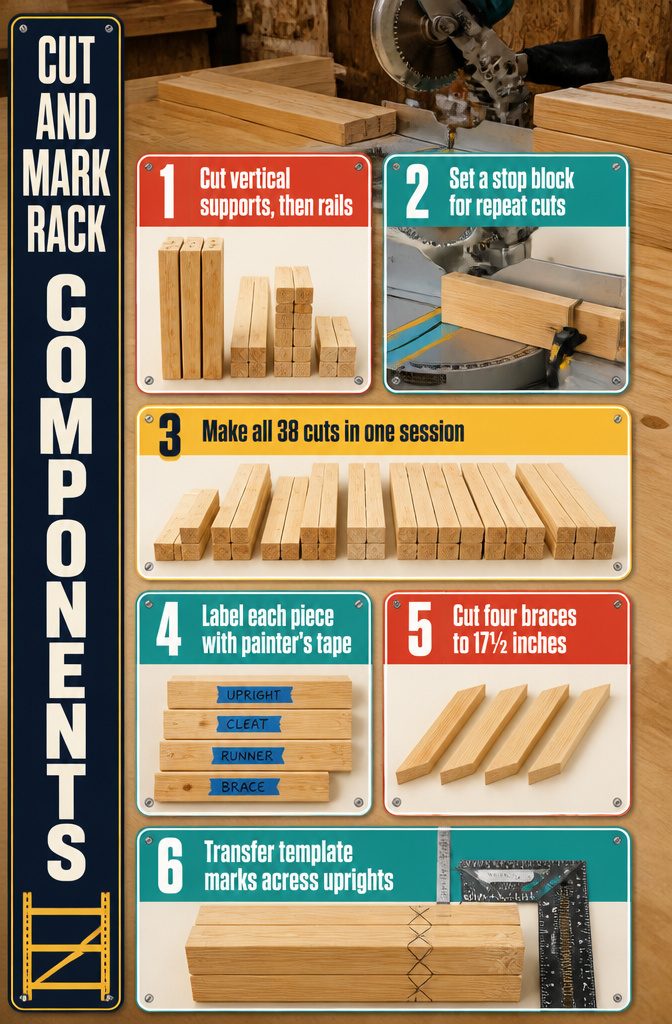
**1.
Cut the vertical supports first**, then the top and bottom pieces, and finally all horizontal cleats and braces. Starting with the tallest pieces makes it easier to bundle and mark them at once.
2. Set up a stop block on your miter saw for repetitive cuts.
If your saw lacks a built-in stop, clamp a scrap piece to your bench at the correct distance. This eliminates remeasuring every cleat and runner.
**3.
Make all 38 cuts in one session** before you move to assembly. Walking back to the saw mid-build doubles the time and invites mistakes.
**4.
Label each piece with painter’s tape** as it comes off the saw. Write "upright," "cleat," "runner," or "brace" so you’re not guessing which board goes where.
**5.
Cut four diagonal braces** at 17½ inches long, then miter both ends at 45 degrees. These nail to the back of the rack and keep it from racking side to side once it’s loaded.
**6.
Bundle uprights flush at both ends** and transfer your template marks across all four (or six, or eight) at once with a framing square. One template board beats marking every piece individually.
3. Build the Side Frames or Ladders
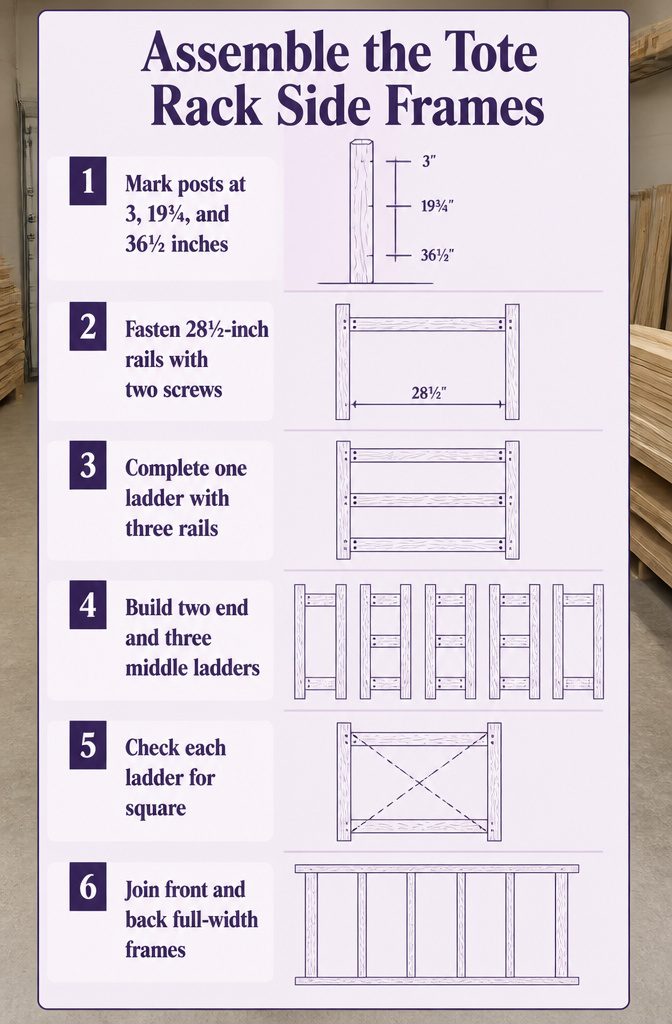
- Lay the first post flat and mark from the top end at 3″, 19¾″, and 36½″. The top edge of each rail sits on its mark. These marks control where the totes hang, so measure from the same end on every post.
- Screw the first rail to the post with two screws per end. Rails are 28½″ long and sit flush with the outer edge of both posts. Use a spacer block cut to the distance between rails to position the second and third rails quickly without measuring each time.
- Attach all three rails to complete one ladder. A ladder is a front post and a back post with three rails screwed across them as rungs. The totes hang from their lips below each rail.
- Build two end ladders with rails on the inward face only, then three middle ladders with rails on both faces. Middle ladders carry a tote on each side; end ladders mirror each other and close off the rack.
- Check each frame for square on a flat floor before the final screws. A rack built from square ladders goes together straight. One racked frame throws off every slot.
- Assemble front and back frames using 4×4 vertical pieces and horizontal 2×4 pieces, then space the vertical 2×4 pieces evenly apart. This method trades individual ladders for two large frames that span the full width of the rack.
4. Install the Runners or Horizontal Slides
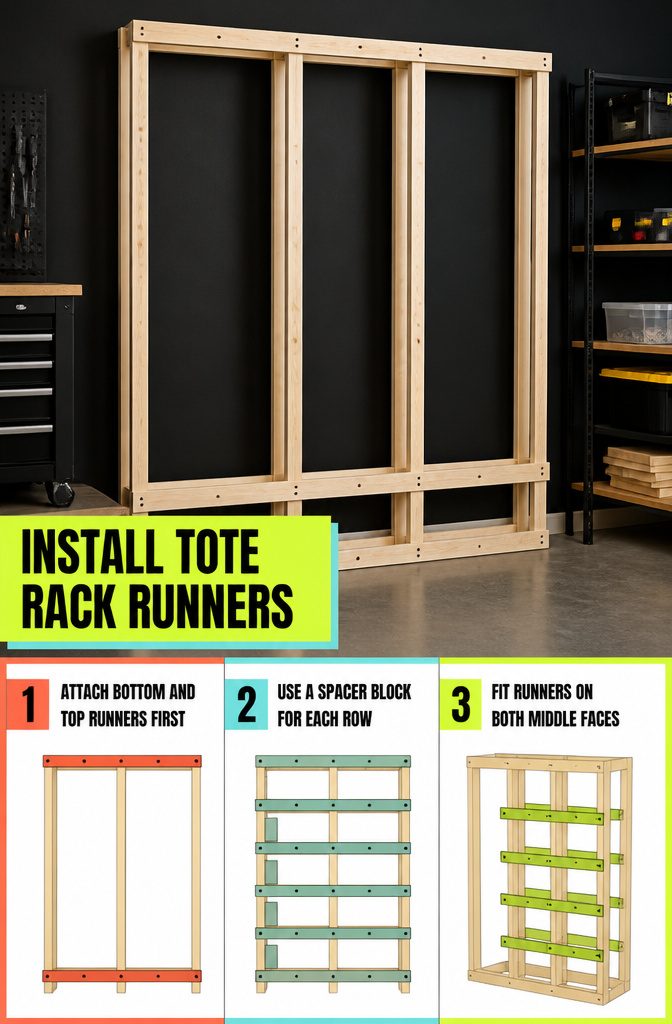
1. Attach the bottom and top runners first.
Stand the two side frames at the correct spacing and measure down from the top board to your first mark.
Clamp the runner to both uprights before you drive screws; stagger screw placement along the length so you don’t split the wood.
Two screws per rail end holds it. Install a runner at the very top next, then fill in the rows between.
2. Use a spacer block for every row after the first.
Cut a scrap piece to the vertical distance between totes. Clamp it below the installed runner, set the next runner flush against it, clamp again, and screw.
Repeat down the frame. The spacer saves measuring every time and keeps spacing consistent.
3. Add runners to both sides of middle uprights.
End frames carry runners on one face only.
Any upright set in the middle of the rack needs cleats on both sides so a tote can hang from each face. Two cleats per tote location.
5. Join the Frames and Check for Square
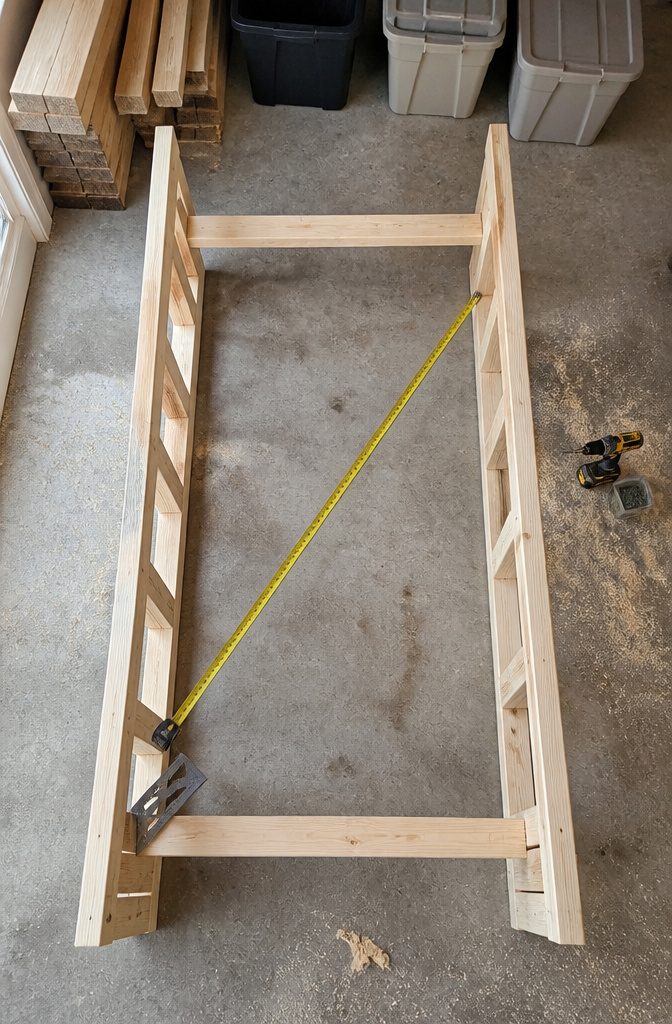
- Stand the side frames 20⅛ inches apart (post to post, measured so each tote lip lands on a pair of rails with a quarter inch to spare on each side).
- Screw four long connectors across the top and bottom: one connector on top of the front posts, one on top of the back posts, then two more across the bottom the same way.
- Before driving the last few screws, measure both diagonals. When the two measurements match, the rack is square; when they differ, push the frame until they line up.
- For racks three totes tall or higher, add diagonal braces nailed to the back or 1×4 cross-bracing between the posts.
- Check the assembled rack with a level to confirm it stands plumb front to back and side to side before you anchor it.
6. Anchor the Rack to Wall Studs
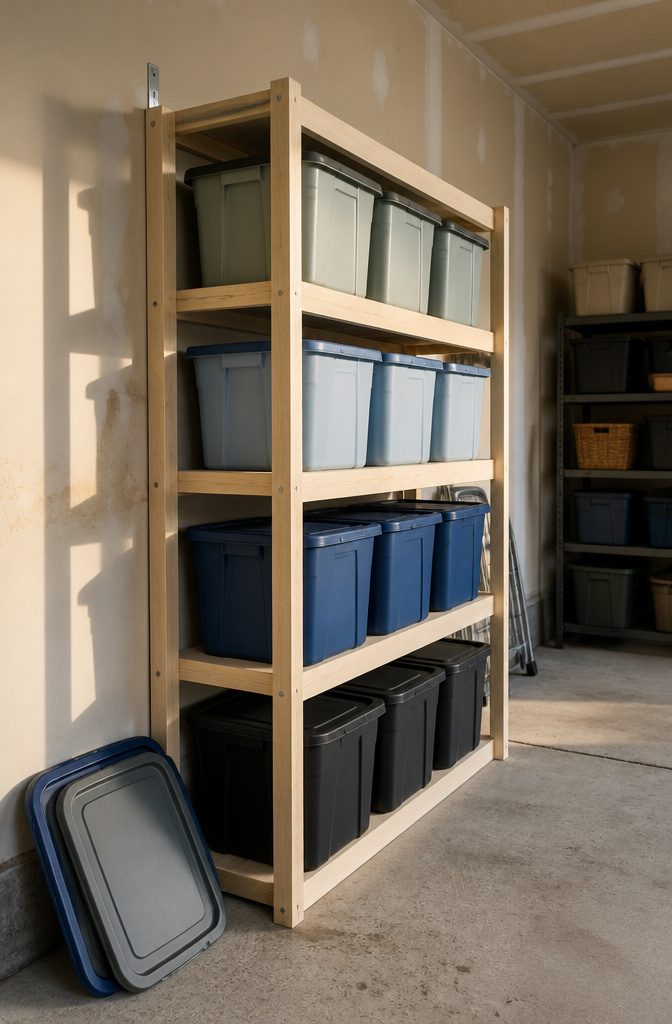
A tall rack loaded with totes tips forward more easily than you think. Screw the rack to wall studs before you load anything into it, especially if you are stacking three or more totes high.
The anchoring matters most when the rack goes above four totes tall, because pulling a bin out from that height shifts the center of gravity forward and the whole structure wants to follow.
I attach the upper corners of the frame to studs with two metal L brackets, one on each side.
That keeps the top from pulling away even when someone tugs hard on a stuck tote. If you have cross bracing on the back of a larger rack, you can screw through those 1x4s directly into the studs instead.
Either method works, but skipping the step entirely leaves you with a structure that looks stable until the day it leans.
Heavy totes go on the bottom row, light and seasonal items up top. That low center of gravity helps, but it does not replace the wall anchor.
What Lumber and Hardware You Need
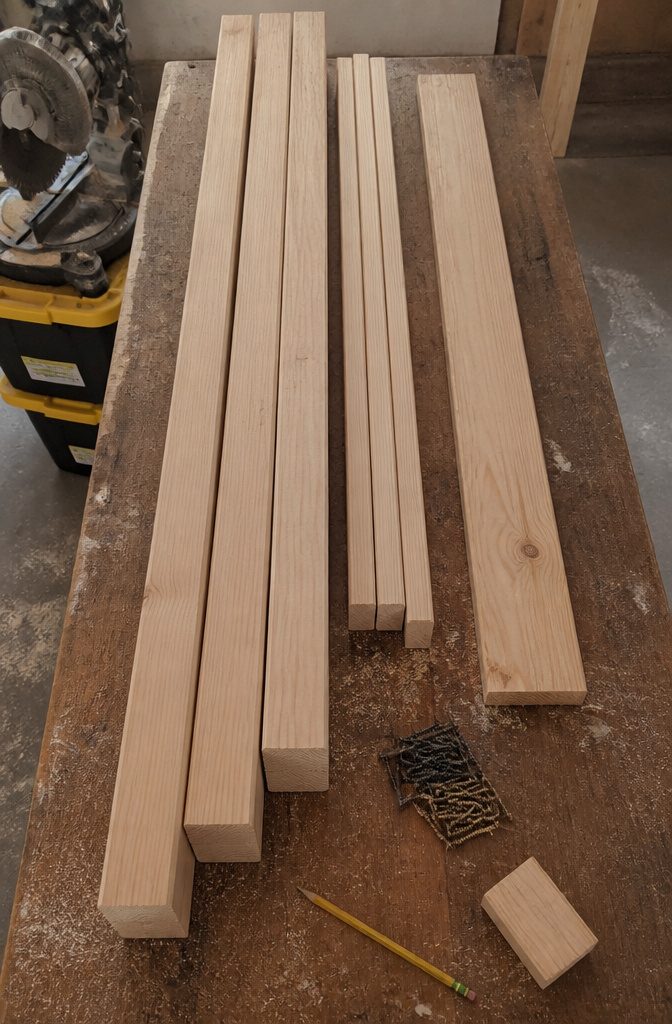
Before you buy anything, walk through the rack plan you settle on and count exactly what length and thickness each piece needs to be.
Most builds call for 2×4 lumber for the vertical posts and side frames, with either 2×2s or more 2×4s for the horizontal runners that hold the totes.
A common setup uses five 8-foot 2×4s and four 8-foot 2×2s, though swapping all 2×2s for 2×4s gives you heavier-duty runners if the totes run full of tools or paint.
For fastening:
- 2½-inch construction screws or deck screws for joining 2×4 frames
- 3½-inch screws if you add 4×4 posts for a freestanding rack
- 1½- to 2-inch screws for any 1×6 top boards
- Star-bit or square-drive heads grip better than Phillips under drill torque
Grab one extra 8-foot board as insurance against a bad cut.
At the lumber yard, sight down each board lengthwise and reject any with a noticeable bow or twist; a crooked frame won’t sit square, and the totes will bind on crooked runners.
Tools for Cutting and Assembly
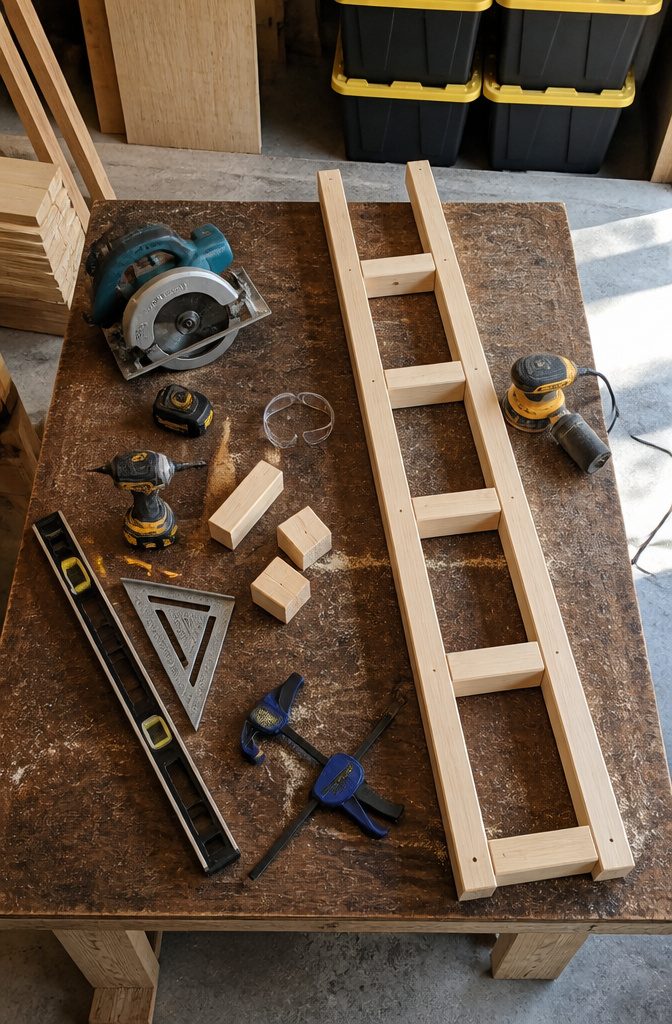
You’ll need a mix of measuring, cutting, and fastening tools. Most builds call for the same core set, with a few extras if you want cleaner edges or square frames from the start.
- Measuring tape, speed square, and pencil for marking cut lines and checking right angles on the frame
- Circular saw or miter saw to cut all vertical supports, horizontal rails, and cleats to length
- Drill and impact driver for pilot holes and driving deck screws through joints
- Safety glasses whenever you’re cutting or driving fasteners
- Level to check that uprights sit plumb before you anchor the rack
- Clamps to hold boards steady during cuts and keep frames from shifting during assembly
- Orbital sander for knocking down sharp edges after all cuts are made
- Framing square if you’re building ladder frames on the floor and want to square them before final assembly
How Runners Let Totes Slide Like Drawers
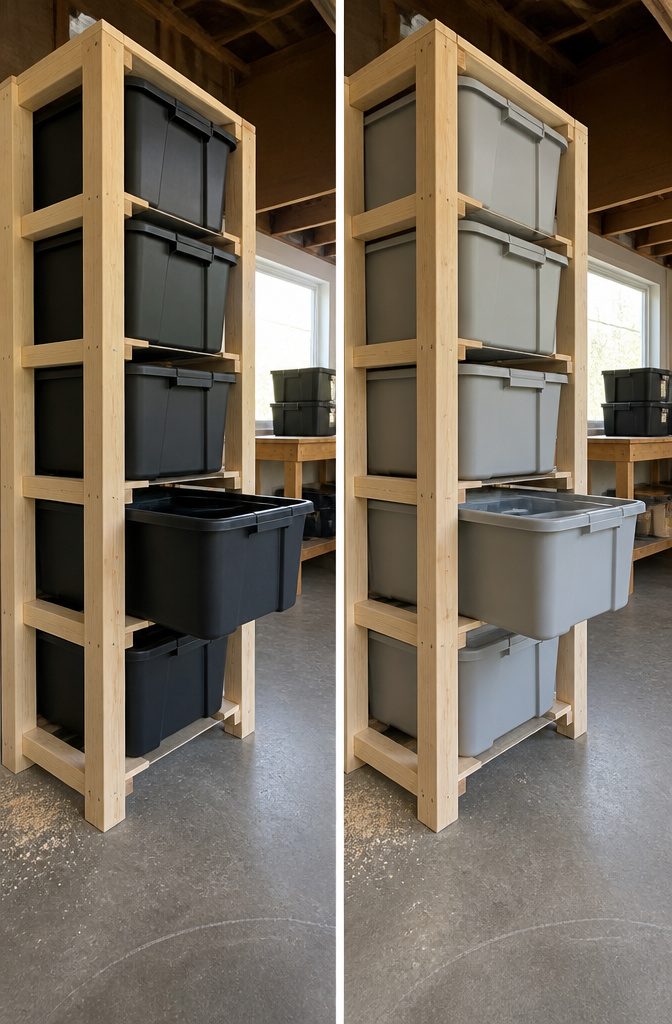
The rail design treats each tote like a drawer. Instead of stacking bins on plywood shelves, the rack uses horizontal 2×4 runners that catch the tote lip on both sides.
The lip hangs there, and when you need something from the bottom bin, you pull straight out without lifting the three above it.
This setup skips shelving entirely, which cuts lumber use and keeps the frame lighter. Each pair of runners does the same job a full shelf would, but with far less material.
The tote rides on the wood the way a drawer rides on slides, and access stays direct no matter how many bins you stack.
Every tote becomes individually reachable. Where shelves force you to clear the top tier before touching the bottom, runners let you grab any bin in the column without unstacking.
The lip does all the work, and the spacing between runners sets the height for whatever tote dimensions you measured.
What a DIY Tote Rack Costs
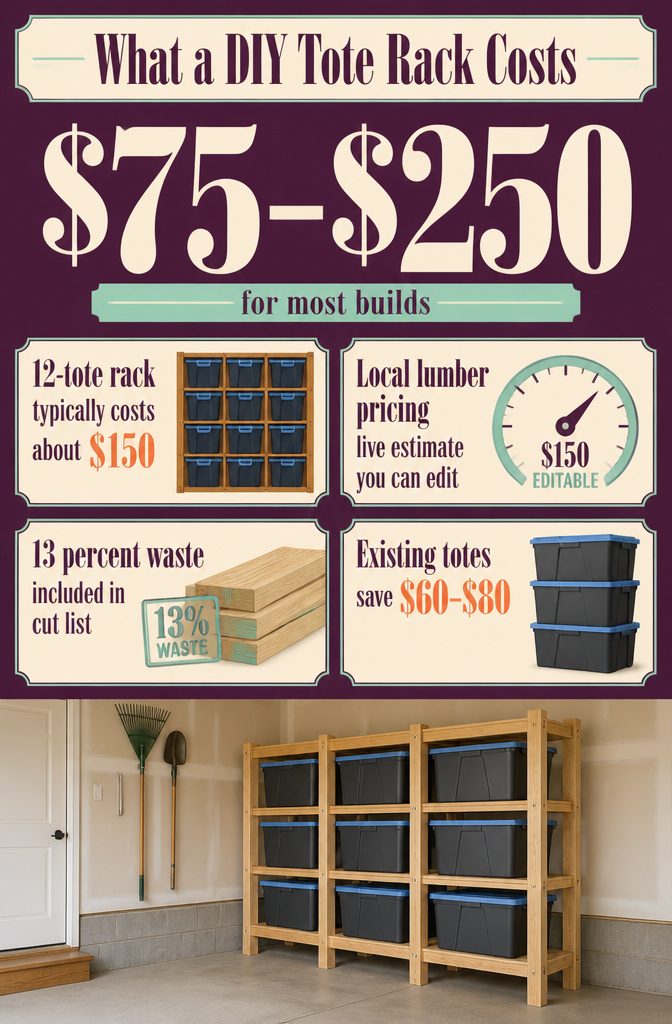
Most builds land between $75 and $250 depending on rack size and local lumber prices. A 4-wide by 3-tall rack that holds 12 totes typically costs around $150 including the totes themselves.
The calculator on SnapFind provides a live estimate for your exact design, and every price is editable so you can plug in what your local store actually charges.
Costs depend on three things: how many totes you want to store, what lumber costs in your area, and whether you already own the totes or need to buy them.
The calculator accounts for 13 percent waste in the cut list and recommends buying one extra board to cover micuts and knots.
If you already have a stack of totes in the garage, you can knock $60 to $80 off the total by skipping the bin cost entirely.
Loading Heavy Totes on the Bottom
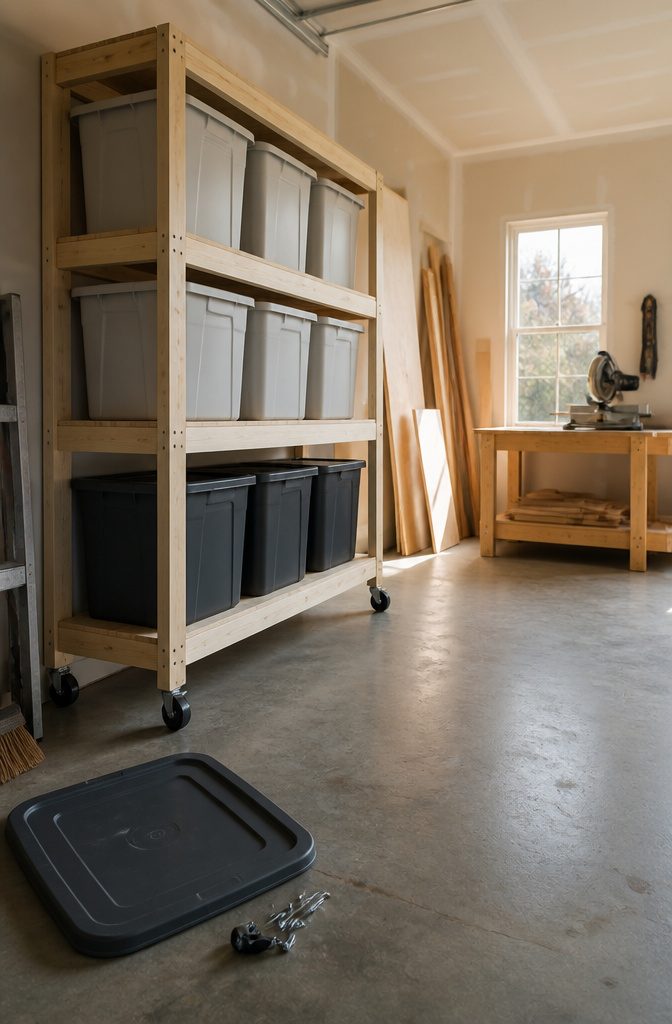
Heavy totes belong on the bottom shelf, lighter and seasonal bins up top.
The physics are simple: a bottom-heavy rack resists tipping, and the frame carries the load better when the weight pushes straight down through the legs rather than leveraging against the joints three feet above the floor.
I add casters before I turn the rack upright and load it. Flipping a loaded frame risks racking it out of square, and sliding a finished rack around to bolt on wheels usually means unloading it anyway.
Get the casters on while the frame is still flat on the garage floor, then stand it up and bring the totes in.
Overfilling the bins causes problems you will not see until you try to slide one out and the sides have bowed enough to wedge it in the frame.
Fill each tote to where the lid still closes flat without forcing it, and the bin keeps its shape under the weight of whatever you stack above it.
QR Code and Label Systems for Tracking Contents
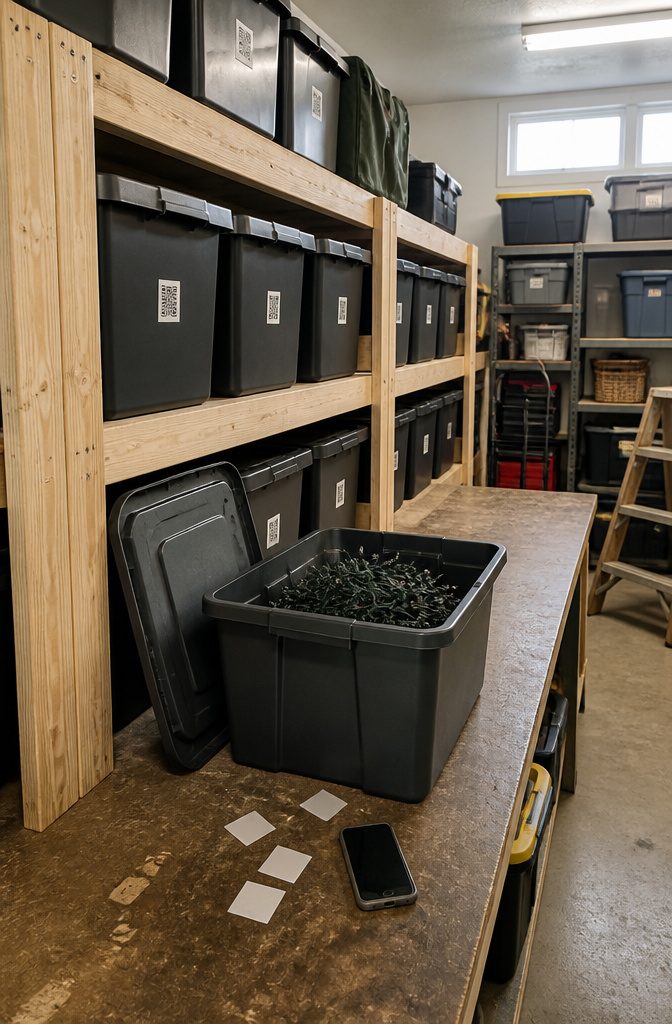
QR Code and Label Systems for Tracking Contents
A QR label on the front of each tote lets you photograph what goes inside and search the app later for a single item without pulling four totes to find it.
Stick the label, snap the contents as you pack, then search "Christmas lights" six months later and the system tells you which bin it’s in.
One option offers 48 waterproof QR labels with a 30-day free trial of the tracking app, enough for your 12 totes and 36 left over for the rest of the garage. You pay shipping, and if the trial converts you cancel anytime.
If you already own a Cricut Joy, you can use Cricut Smart Vinyl and weeding tools to cut your own labels and pair them with QR code stickers.
Both paths solve the same problem: remembering what is inside without opening anything.
Frequently Asked Questions
How much does it cost to build a DIY tote rack?
Most builds run $75 to $250 depending on rack size and local lumber prices. A 4-wide by 3-tall rack that holds 12 totes typically costs around $150 including the totes.
The total depends on how many totes you want to store, what lumber costs in your area, and whether you already own the bins or need to buy them.
What lumber do I need for a tote storage rack?
Most builds use 2×4 lumber for the vertical posts and side frames, with 2×2s or more 2×4s for the horizontal runners.
A common setup needs five 8-foot 2×4s and four 8-foot 2×2s, though swapping all 2×2s for 2×4s gives heavier-duty runners if the totes run full of tools or paint.
You also need 2½-inch construction screws or deck screws for joining the frames.
Why store totes on rails instead of shelves?
Rails let each tote slide out like a drawer by catching the bin’s lip on both sides.
This setup skips shelving entirely, which cuts lumber use and keeps the frame lighter. Every tote becomes individually reachable without unstacking, and access stays direct no matter how many bins you stack.
What size totes work with this rack design?
Any tote with a lid lip that overhangs the body will work.
Measure each tote from the bottom to the underside of the lip with the lid on, capturing the widest point across the top rim. Add 1 inch of clearance to the height, length, and width measurements when sizing the rack.
How big can I make the rack?
Most racks range from 2 to 5 rows tall and 2 to 6 columns wide.
A common layout holds 12 totes in a 4-wide by 3-tall grid. For racks 3 totes tall or higher, screw the rack to wall studs before loading anything into it.
What tools do I need to build it?
You need a measuring tape, speed square, and pencil for marking, a circular saw or miter saw for cutting, and a drill and impact driver for fastening.
You also need safety glasses, a level to check that uprights sit plumb, and clamps to hold boards steady during cuts.
Can I download the plans as a PDF?
Some sources offer a free 2-page printable PDF with shopping list, cut list, board-by-board cut map, and build steps. Design your rack using an online calculator, enter your email, and the PDF lands in your inbox with every dimension labeled.
How do I remember what is inside each tote?
A QR label on the front of each tote lets you photograph what goes inside and search the app later for a single item without pulling 4 totes to find it.
Stick the label, snap the contents as you pack, then search for an item 6 months later and the system tells you which bin it’s in.
How many 2x4s to build a tote rack?
A common setup uses 5 eight-foot 2×4s and 4 eight-foot 2×2s, though swapping all 2×2s for 2×4s gives you heavier-duty runners.
The exact count depends on how many rows tall and columns wide you build. Grab 1 extra 8-foot board as insurance against a bad cut.
How can I build a DIY storage rack for a 27-gallon tote?
Measure the tote from bottom to underside of the lip with the lid on, then add 1 inch of clearance to height, length, and width.
For a standard 27-gallon tote that measures 13½ inches from base to lip, build bays 14½ inches tall. Use 2×4 lumber for vertical posts and 2×2 or 2×4 runners that catch the tote lip on both sides.
How can I build a DIY tote storage rack on wheels?
Attach casters to the bottom of the rack at each corner before you turn it upright and load it. Use short structural screws to mount the casters while the frame is still flat on the floor.
Flipping a loaded frame risks racking it out of square, and sliding a finished rack around to bolt on wheels usually means unloading it anyway.






