
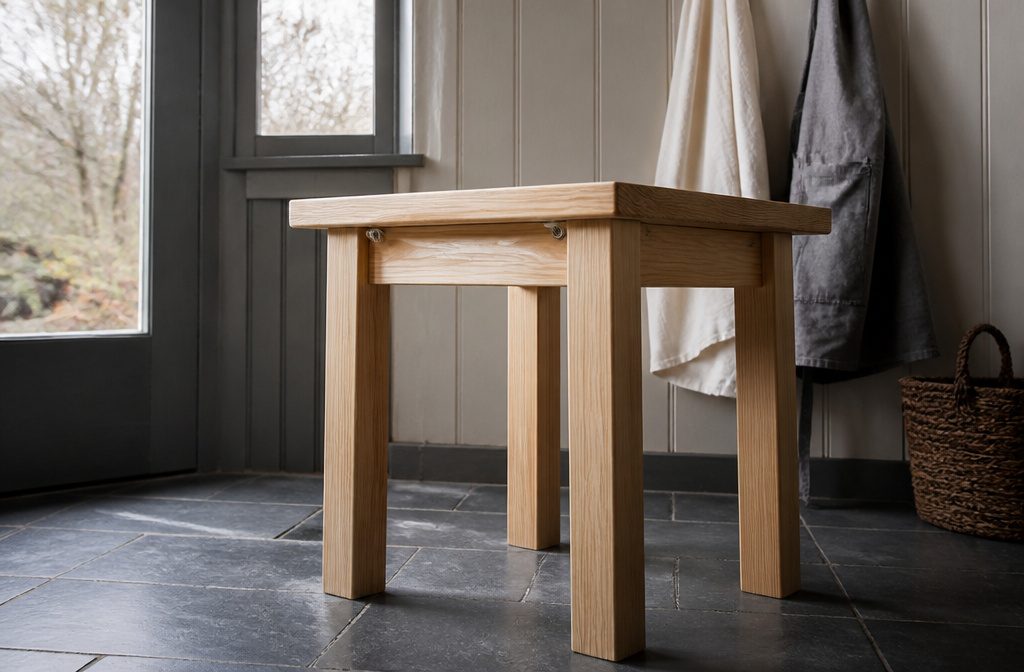
A basic side table with four legs and a pocket-screwed top takes an afternoon and under $50 in pine, but people rush the tabletop attachment and the wood cracks six months later when humidity shifts.
Recessing double washers into the apron with a 3/4-inch spade bit lets a solid-wood top expand and contract without fighting the frame.
1. Prepare and Cut the Tabletop Parts
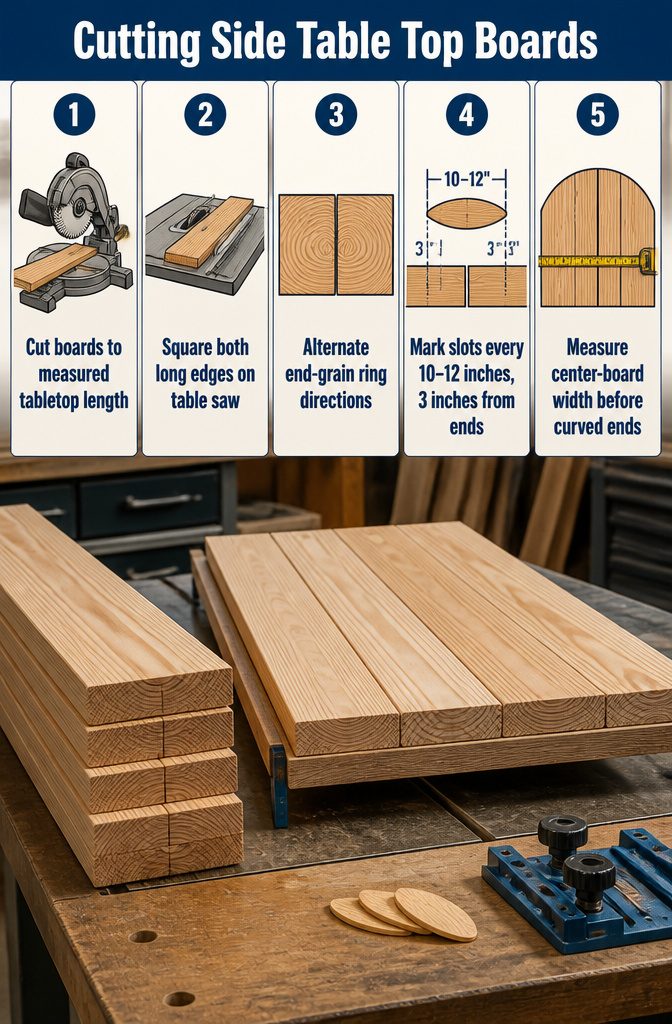
- Cut all boards to the tabletop length you measured for. A miter saw gives clean, square ends. Stack the boards after cutting and check that they match; if one runs even a quarter-inch long, the assembled top will not sit flush.
- Rip the edges square on a table saw. Decking and rough lumber often arrive with rounded or waney edges that leave gaps when pressed together. A single pass down each long edge turns them into tight-fitting boards.
- Lay the boards side by side and look at the end grain. Alternate the curve direction so that one board’s rings arch up and the next board’s arch down. This keeps the glued-up top from cupping over time as the wood moves.
- Mark biscuit slots every 10 to 12 inches along each joint, staying 3 inches from the ends. The biscuits keep the boards aligned during glue-up so the seams stay flush.
- If you are building the arched design, press the two center top boards together and measure the actual width before cutting the curved end pieces. Adjust your cut list to match what you see rather than trusting the plan measurement alone.
2. Glue Up the Tabletop Panels or Attach the Frame
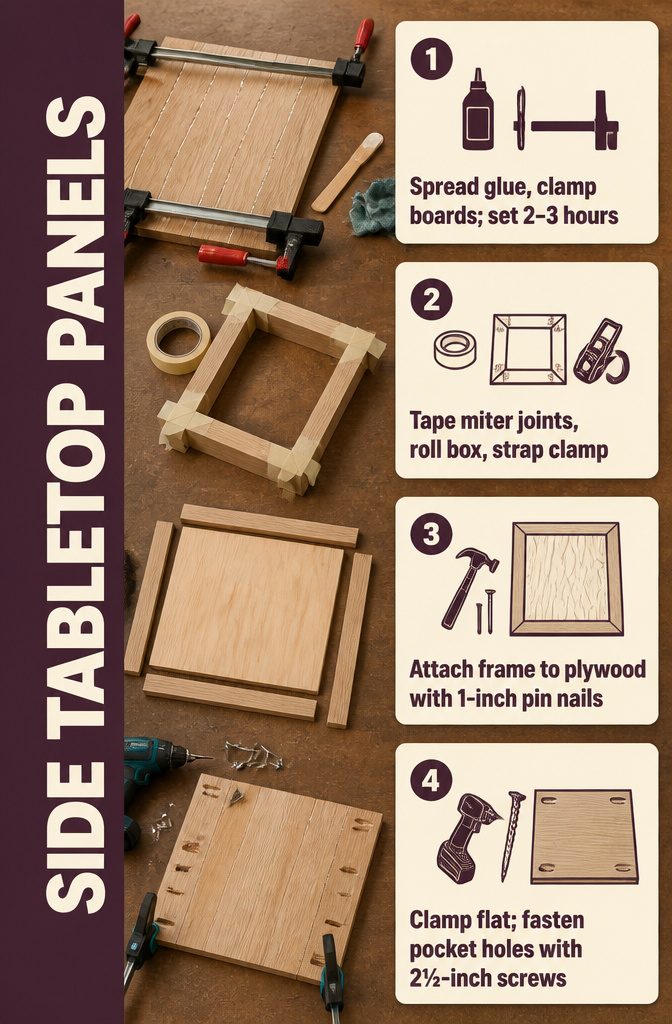
- Apply glue along the edges of the boards or panels. Spread it evenly with a narrow stick so every pore gets covered, then align the pieces and clamp them together with bar clamps. Wipe away squeeze-out with a damp cloth while it’s still wet. Allow 2–3 hours for the glue to set before moving on.
- For mitered tops, line up the boards and tape the joints to hold alignment. Flip the assembly, apply glue to each joint, roll the pieces into a box, and tape the final seam. Lift the assembly off the bench and tighten with a strap clamp or ratchet straps, using scrap wood between the metal and your workpiece.
- If you’re building a plywood top with a solid-wood frame, measure and cut the long frame pieces first. Attach them to the plywood with wood glue and 1-inch pin nails, then repeat for the short pieces to close the frame.
- For pocket-screw joinery, drill pocket holes in the top boards according to your plan, clamp the pieces flat, and fasten them with 2½-inch pocket screws and glue.
3. Create the Decorative Parquet Pattern and Trim
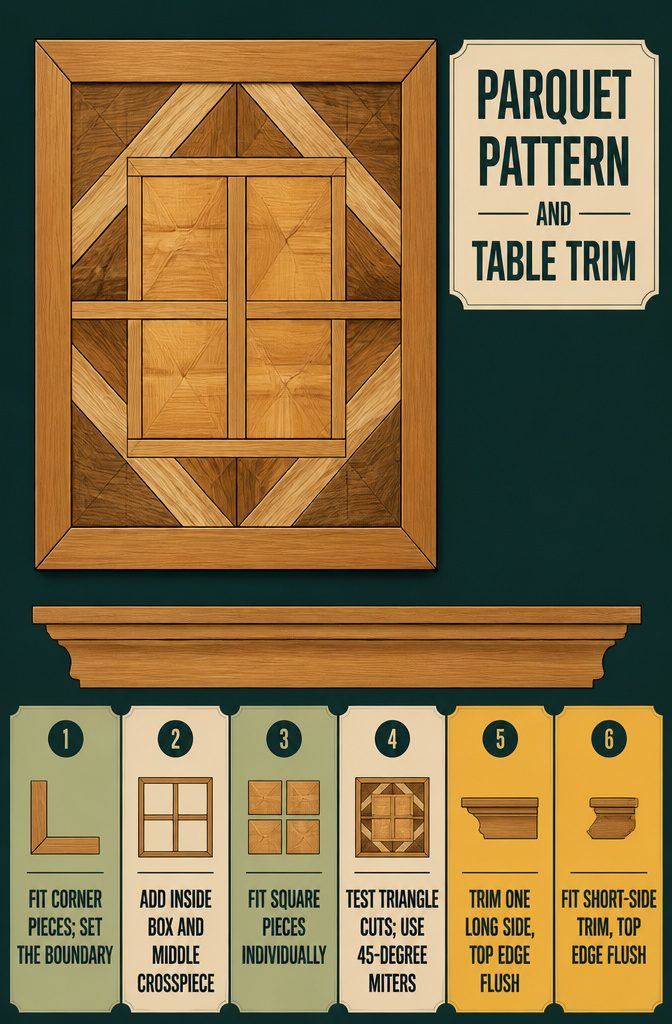
- Measure and cut the corner pieces to fit the angles of your plywood base, then attach them with 1" pin nails and wood glue. The corners set the boundary for everything that follows.
- Measure and cut the inside-box pieces and middle cross piece. Attach them with 1" pin nails and wood glue. These pieces divide the surface into sections that hold the decorative fill.
- Cut the square pieces to size and attach them with 1" pin nails and wood glue. Fit each one individually rather than batch-cutting a stack; the spaces rarely match exactly.
- Measure and cut the triangle pieces last. I test each cut on scrap before committing to the final piece, because triangle dimensions shift depending on how the squares and cross pieces landed. All cuts are 45-degree miters where pieces meet.
- Cut the first set of trim pieces and attach them to one long side of the tabletop with 1" pin nails and wood glue. The top edge of the trim should sit flush with the tabletop surface.
- Cut the short trim pieces to length and attach them to the short sides with 1" pin nails and wood glue, keeping the same flush alignment at the top.
4. Cut and Shape the Legs or Select the Base
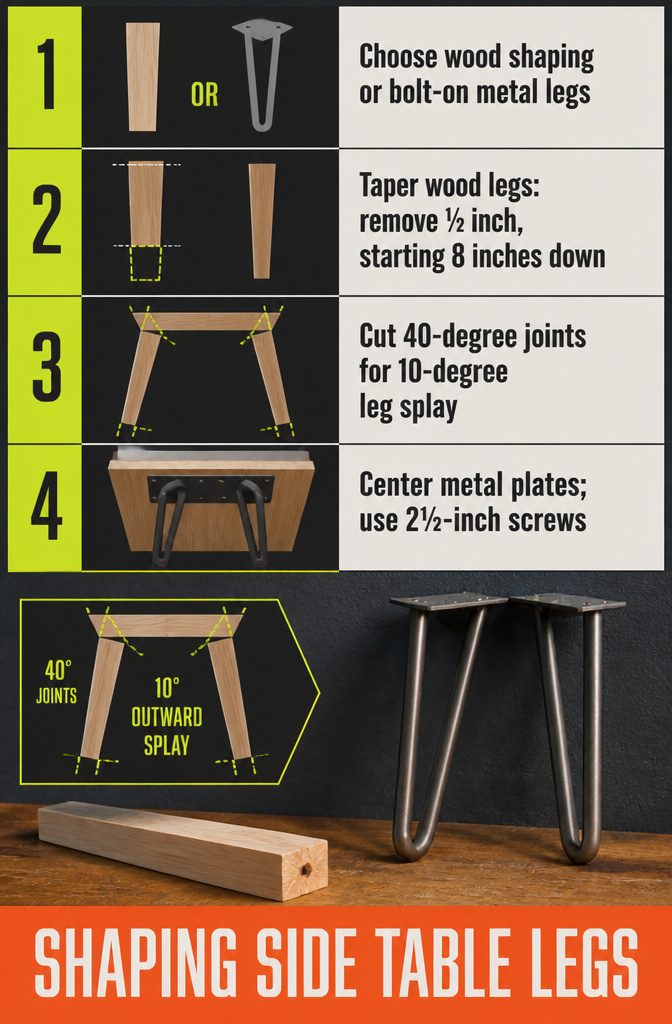
- Pick wood or metal based on how involved you want the build to be. Wooden legs need tapering and angle cuts if you want splay; metal legs bolt straight to the base and skip most of the shaping.
- If you’re tapering wood legs, build a jig from 3/4-inch plywood and a 1-by-4 board. Cut a notch that removes 1/2 inch from each leg, starting the taper 8 inches from the top. Add a toggle clamp to hold the leg while you run it past the table saw blade. Cut one face, rotate the leg 90 degrees, and cut again.
- For a splayed base, cut 1-inch-thick leg blanks to length, then cut 40-degree angles at the top of each leg and on the ends of the top stretcher. That geometry gives you a 10-degree outward splay. Use the stretcher and a miter saw laser to mark exactly where the angled cut lands on each leg, then trim to final length with a 10-degree bevel at the bottom.
- Metal legs skip all of this. Flip the assembled top upside down, center the leg plate on the underside, mark both ends with a pencil, and screw through the pre-drilled pockets with 2 1/2-inch wood screws.
5. Join the Legs, Aprons, and Stretchers
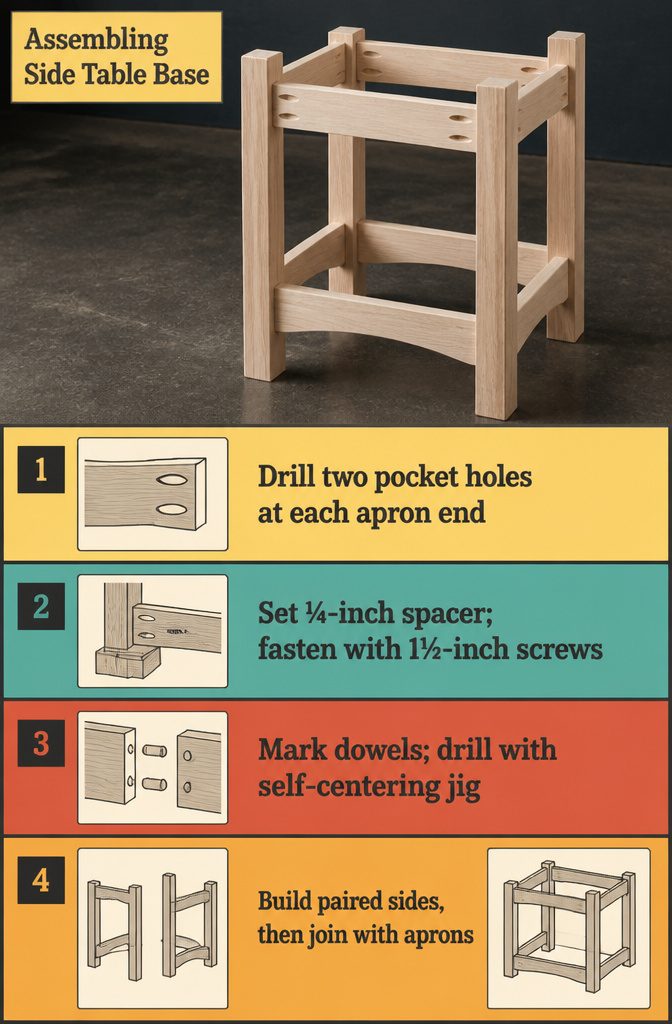
- Drill pocket holes at both ends of each apron piece. Set the pocket-hole jig for 1½-inch material if you’re following that method. Two holes per end gives you the grip you need without splitting narrow stock.
- Position the aprons between the legs with a ¼-inch spacer block underneath to create a uniform reveal. Fasten with 1½-inch pocket screws, checking that each joint pulls tight before moving to the next corner.
- If you’re using dowel joinery instead, mark dowel locations on the leg faces and stretcher ends, label each joint so parts don’t get mixed, then drill with a self-centering dowel jig. Apply glue to the holes and mating surfaces, insert 3/8-inch dowel pins, and clamp with angled blocks if the joints are mitered.
- Assemble two opposing sides first if the design calls for it. Attach arched or flat stretchers between pairs of legs, keeping edges flush at the top, and secure with 2½-inch pocket screws and glue. Build both side assemblies before joining them with front and back aprons.
6. Build and Install a Drawer
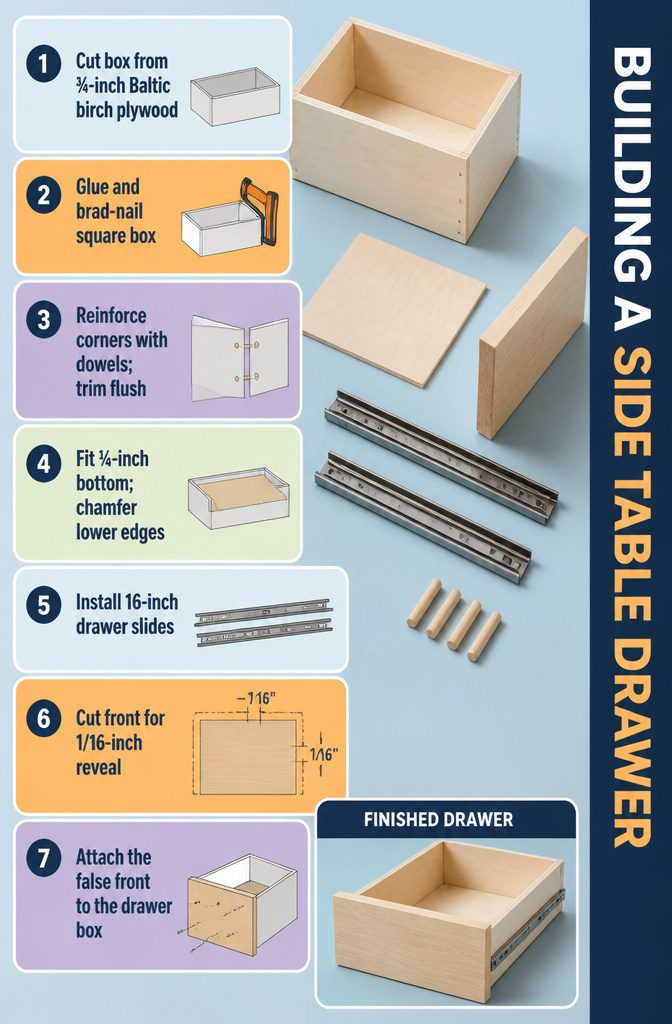
- Cut the drawer box from ¾-inch Baltic birch or similar plywood, with the front, back, and two sides sized to fit your opening minus the slides and clearance.
- Apply wood glue to the edges and tack the box together with brad nails, keeping corners square as you work.
- Drill two holes at each corner joint and tap in dowels for reinforcement, then trim them flush once the glue dries.
- Cut a ¼-inch plywood bottom to exact size and attach it with glue and brads, then run a chamfer bit along the bottom edges to hide the plywood when viewed from above.
- Install 16-inch drawer slides on both the cabinet sides and the drawer box, following the manufacturer’s spacing.
- Glue up your drawer front material and cut it ⅛ inch shorter than the opening height and width for a 1/16-inch reveal on all sides.
- Attach the false front to the drawer box with screws from inside, checking the reveal before tightening fully.
7. Attach the Tabletop to the Base
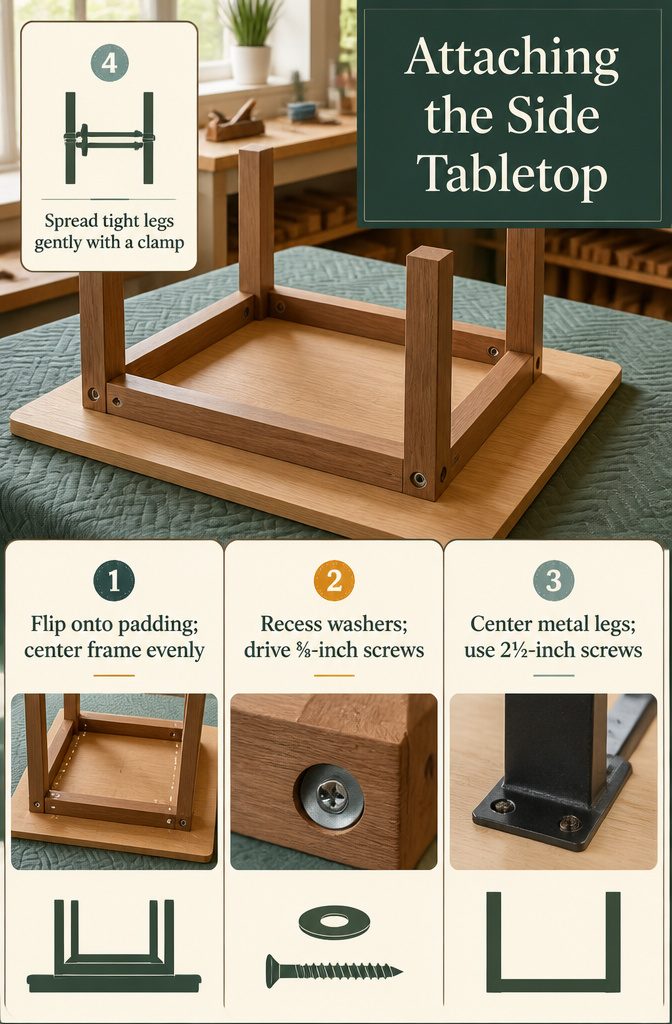
- Flip the tabletop upside down on a padded surface so you can work from underneath without scratching the finish. Center the assembled leg-and-apron frame on the underside, checking that the overhang is even on all sides.
- If you built a traditional four-leg frame with aprons, recess steel double washers into the top edge of each apron using a 3/4-inch spade bit, then drive 5/8-inch screws through the washers into the tabletop. The recessed washers let a solid-wood top expand and contract with humidity changes without cracking.
Using washers recessed into the apron—set down to the thickness of the washer—allows the top to move independently from the frame, preventing the wood from cracking or warping over time.
That matters most if your top is glued-up solid boards rather than plywood.
- For a simpler build with metal legs, center the legs on the plywood underside, mark both ends with a pencil, and screw through the pre-drilled mounting holes with 2 1/2-inch wood screws. Figure-eight fasteners work too if you routed shallow slots for them earlier.
- If the legs feel too tight to slide the top between them, use a clamp as a spreader to open the gap gently, then secure with pocket screws drilled for 1 1/2-inch stock.
8. Sand, Fill, and Finish the Table
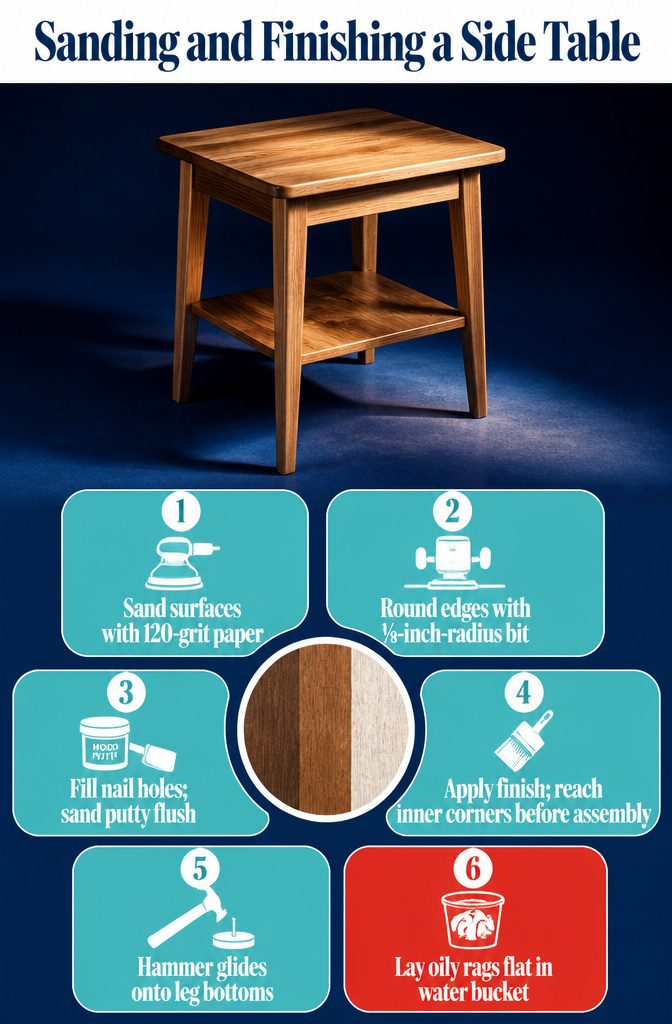
- Sand all surfaces with 120-grit sandpaper to smooth rough spots and prep the wood for finish. A random-orbit sander handles flat areas fastest, but hand-sand tight corners and edges where the machine can’t reach.
- Round over sharp edges with a router fitted with a 1/8-inch-radius rounding-over bit. This softens the transition between tapered leg faces and keeps edges from splintering under use.
- Fill any exposed nail holes with wood putty, let it dry, then sand flush. Barnwood pieces sometimes get away without this step if the weathered look suits the room, but new lumber needs the holes dealt with or they pull the eye.
- Apply your chosen finish. Oil-based polyurethane brings out grain and adds a protective coat; stain layering works too. One approach uses Minwax Chestnut followed by Varathane Antique White for a warm, understated tone. For tung oil or similar penetrating finishes, wipe on the first coat or two before assembly so you can reach inside corners without contorting a brush.
- Attach furniture glides to the bottom of each leg with a hammer. They let the table slide without gouging the floor.
- Dispose of oil-soaked rags safely. Never bunch them up in a corner; they can generate heat and ignite. Open them flat and drop them in a bucket of water instead.
Materials and Tools for Different Designs
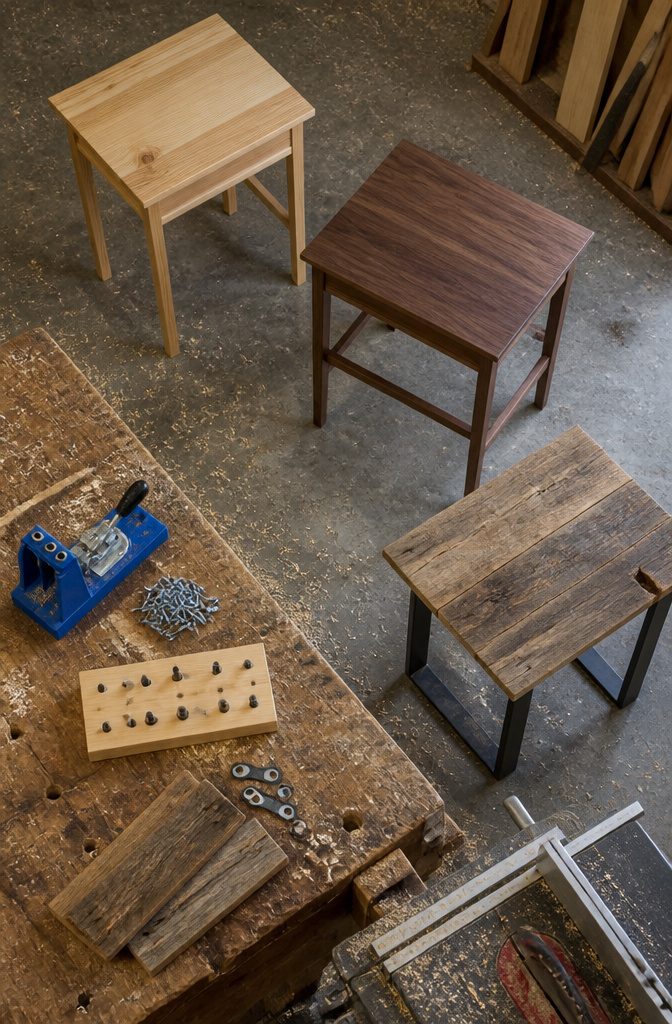
Each of these designs asks for something different, so the materials and tools shift depending on whether you’re building with pocket holes, dowel joinery, or simple glue and nails.
For pocket-hole builds, you’ll need a Kreg 720, 520, or 320 jig along with 1½-inch pocket screws. One design calls for 1-by-4 decking for the aprons, 2-by-2 stock for the legs, and 5/4-by-6-inch fir decking for the top.
Another uses one 2×4, one 2×6, and one 2×2. A router with a 1/8-inch-radius rounding-over bit smooths the edges, and a table saw or circular saw handles the cuts.
For walnut builds with milled lumber, the material list grows more specific:
- Four 8-foot 1×4 walnut boards
- One 4×4 walnut beam (if you’re resawing your own stock)
- JET 18-36 drum sander
- JET 8-inch jointer
- Self-centering dowel jig and 3/8-inch dowel pins
- Figure-eight fasteners for attaching the top
- Tablesaw, miter saw, and flush-cut saw
For a rustic barnwood design, the parts are simpler:
- Three 1/2-inch × 6-inch × 48-inch barnwood planks
- One 1/2-inch × 24-inch × 24-inch hardwood plywood panel
- Two metal legs
- 1-inch pin or brad nails
- Wood glue
The walnut approach demands more milling work but rewards you with matched grain.
The pocket-hole version gets you built faster with standard lumber. The barnwood route skips most joinery and leans on metal legs for the structure.
Wood Movement and Top Attachment
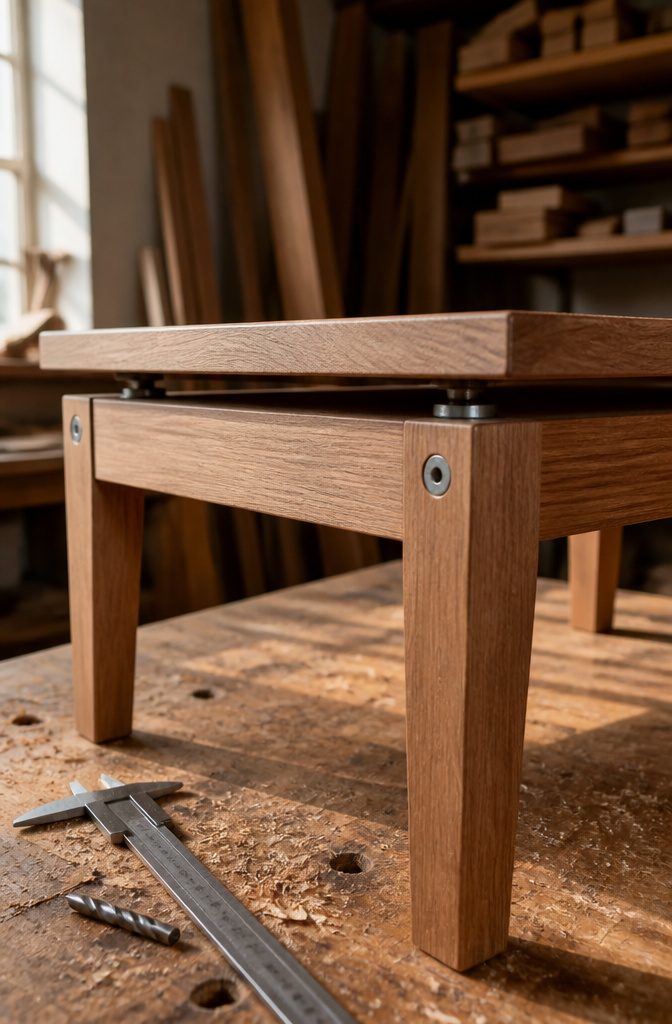
A solid wood top will expand and contract with changes in humidity, and if you lock it down rigidly to the base, it can crack or warp.
The fix is to give it room to move. Before you attach the tabletop, use a 3/4-inch spade bit to drill four shallow recesses into the top edge of each apron, near the legs.
Drop a pair of washers into each recess and fasten them with 5/8-inch screws so they sit flush with the surface.
When you flip the top and drive screws through those recessed washers into the underside of the tabletop, the double washers act as a pivot point.
The top can shift slightly with seasonal swelling and shrinking while the frame stays put.
This method keeps the attachment secure without fighting the wood’s natural movement, and it works better than a rigid connection that transfers stress straight into the grain.
Tapered Legs and Outward Splay
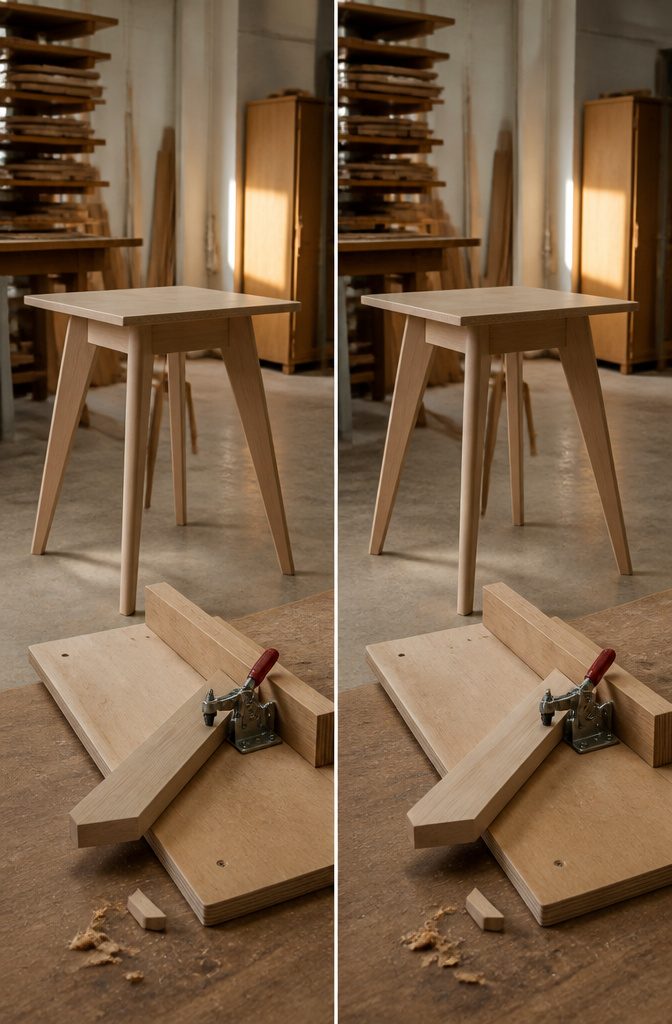
Tapering the legs slims them toward the floor and keeps the table from looking heavy.
I start with a simple jig: a piece of 3/4-inch plywood with a 1-by-4 board attached, notched to guide the cut. The taper removes 1/2 inch from each leg, starting 8 inches down from the top.
A toggle clamp holds the leg steady against the jig while the saw runs through, and the result is four legs that match without fussing over layout each time.
Adding outward splay takes the build a step further.
The legs angle 10 degrees away from vertical, which widens the footprint and makes the table harder to tip. To get there, cut 40-degree miters first on the top stretcher, then on the tops of the legs where they meet it.
The bottom of each leg gets a 10-degree bevel cut so it sits flat on the floor despite the splay.
Line up the stretcher against the leg blank with a laser guide or pencil mark, cut long, then sneak up on final length with a second pass.
Beginner-Friendly Builds
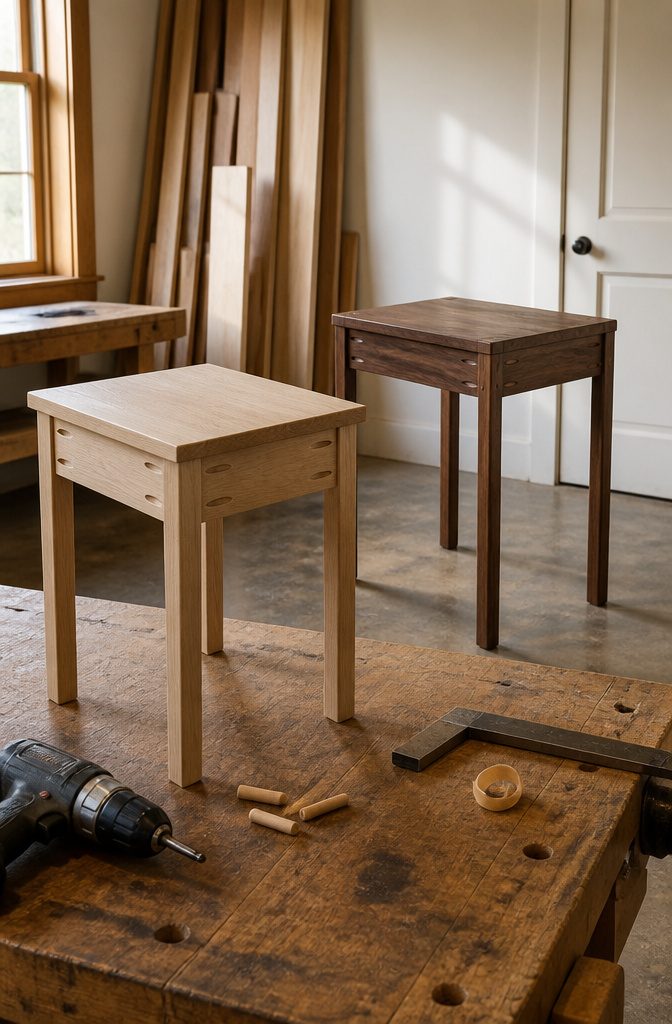
The smallest builds are often the most approachable for someone picking up a drill for the first time.
A table measuring 14 inches wide, 24 inches deep, and 22 inches tall asks for just a few boards and an afternoon, and pocket-hole joinery turns what might have been a mortise-and-tenon marathon into something you can screw together with confidence.
Those 2 1/2-inch screws, set for 1 1/2-inch stock, hold better than most people expect and leave clean lines when the holes face hidden surfaces.
Not every beginner plan stops at the basics. A walnut box paired with dowel-joined legs will stretch your accuracy and your patience, but the result looks nothing like the first project you built.
The dowels demand tight drilling and dry-fit checks, and walnut shows every mistake under finish in a way pine forgives. If your goal is to learn rather than just to own a table, the harder build pays off faster.
Frequently Asked Questions
How to build a table for beginners?
Start with a pocket-hole build measuring 14 inches wide, 24 inches deep, and 22 inches tall. The joinery requires only a Kreg jig and 2½-inch screws, turning what could be complex mortise-and-tenon work into something you can assemble in an afternoon with confidence.
Pick pine or construction lumber over walnut, since softer wood forgives layout mistakes that hardwood shows under finish.
What’s a good size for a side table?
A side table 14 inches wide, 24 inches deep, and 22 inches tall fits next to most sofas and chairs without crowding the room.
If you need more surface area, scale up to 18 inches wide and 26 inches deep, keeping the height between 22 and 24 inches so the top sits level with the arm of a standard sofa.
What is the cheapest way to build a table?
Use 1 2×4, 1 2×6, and 1 2×2 from a home center along with pocket-hole joinery.
The lumber costs under $20, and the pocket screws and glue add another $10, bringing the total under $30 before finish. Metal legs and plywood cost more but cut assembly time if you want to skip milling and tapering solid wood.






