
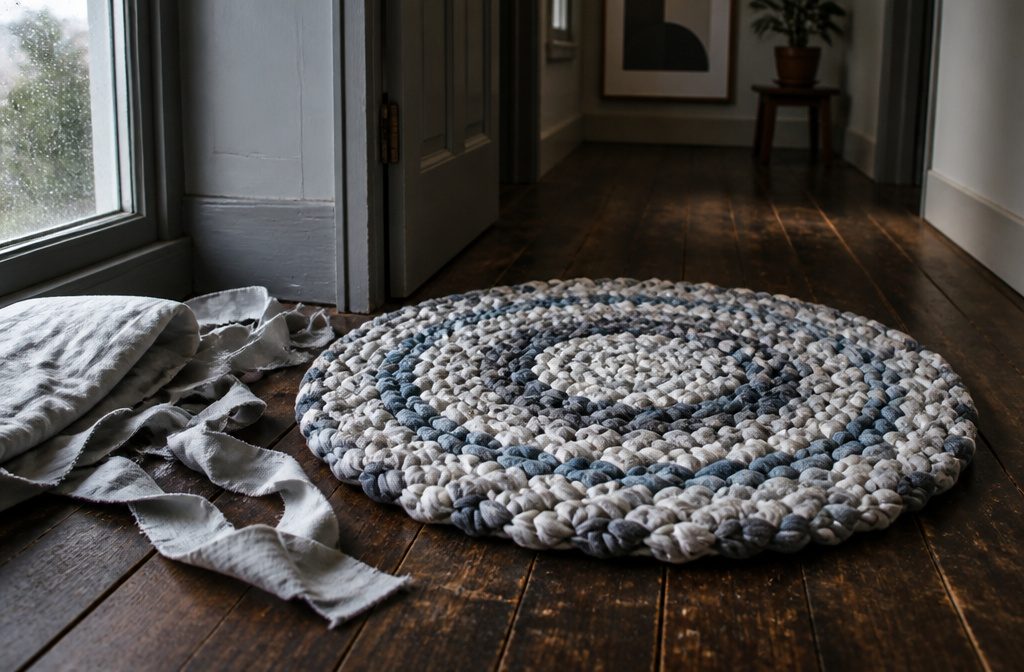
A knotted rag rug made from one double duvet cover cut into 1½-inch strips produces a 27-inch diameter circle.
The size and fabric consumption both depend on strip width, and most people cut their strips too wide or too narrow without checking how fabric weight changes the math.
The biggest planning mistake happens before the first knot: splitting your fabric evenly across three colors leaves you with a single-color outer ring, because the final rounds eat more yardage than all the inner ones combined.
What fabric to use and how to prepare it
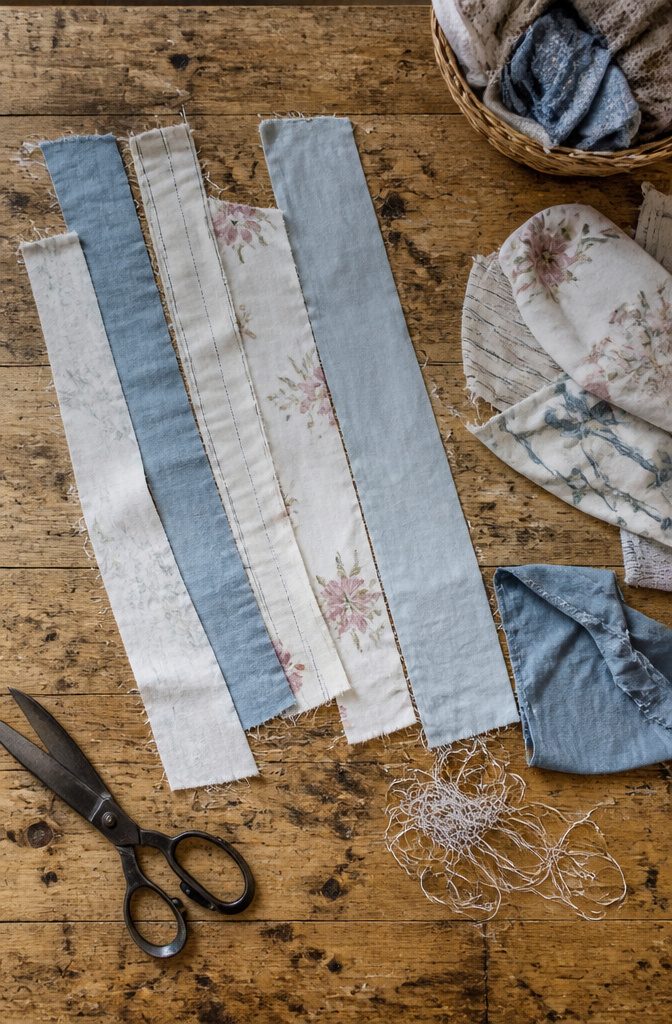
Old bed sheets and duvet covers work best, followed by worn clothing and fabric scraps.
Cotton tears cleanly along the grain, so you can snip one edge and rip the rest of the way down in a straight line. Pull off any loose threads before you start knotting.
Strip width runs 1 to 2.5 inches depending on fabric weight. A king-size duvet cut into 1-inch strips made a 39-inch diameter rug, while 1½-inch strips produced a 27-inch rug and 2-inch strips a 20-inch one.
Heavier fabric needs narrower strips to stay flexible; lighter fabric can go wider without stiffening the knots.
Woven fabric tears along the warp or weft threads.
Knitted fabric stretches too much to tear cleanly, so you have to cut it with scissors instead. Do not mix woven and knitted strips in the same rug.
Different stretch creates uneven tension, and the rug will buckle. T-shirt fabric is all knit, and the stretch makes the finished rug bouncier underfoot than one made from sheets.
The toothbrush needle and wire alternatives
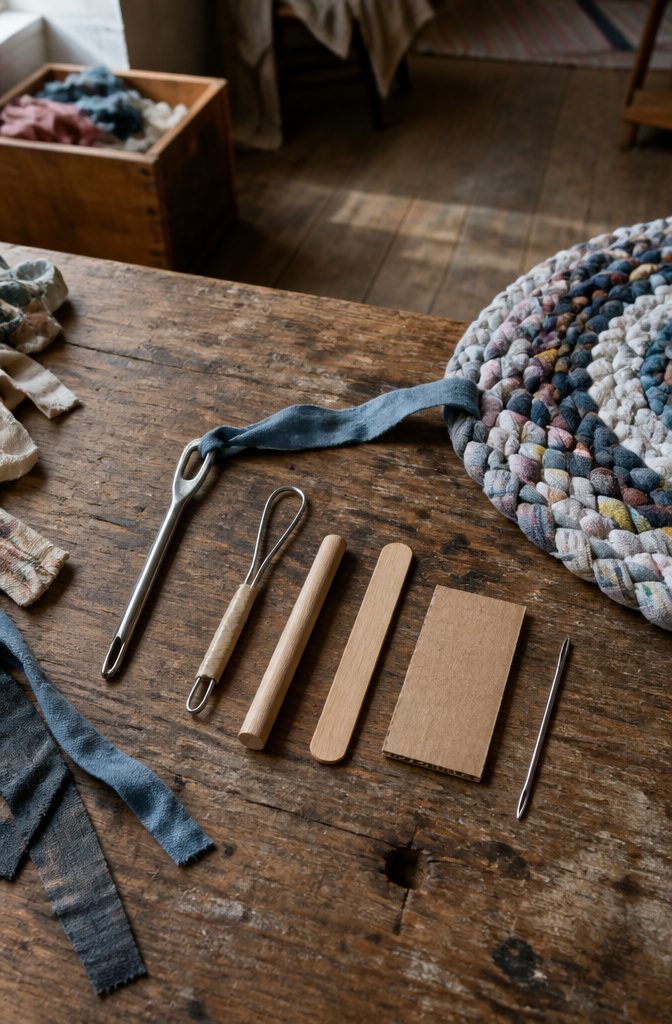
A needle speeds the work and I recommend using one, but fingers alone can pull the fabric through if you want to start right away.
The traditional tool is a toothbrush needle, a flat piece with a large eye that slips through tight knots without disturbing them.
You can buy one online or make your own from a three-inch piece of wire: fold both ends toward the center to form two loops, then wrap the ends together with painter’s tape.
That homemade version works exactly like the bought one.
Dowels, popsicle sticks, cardboard, or a larger darning needle from the yarn aisle all do the same job if the opening is wide enough for your fabric strip to pass through.
Cardboard tears after a while, so plastic or wood lasts longer if you plan to make more than one small rug.
Working without a needle slows you down but stays manageable for a first project, and you can always add one partway through when your fingers get tired.
1. Tear the fabric into strips
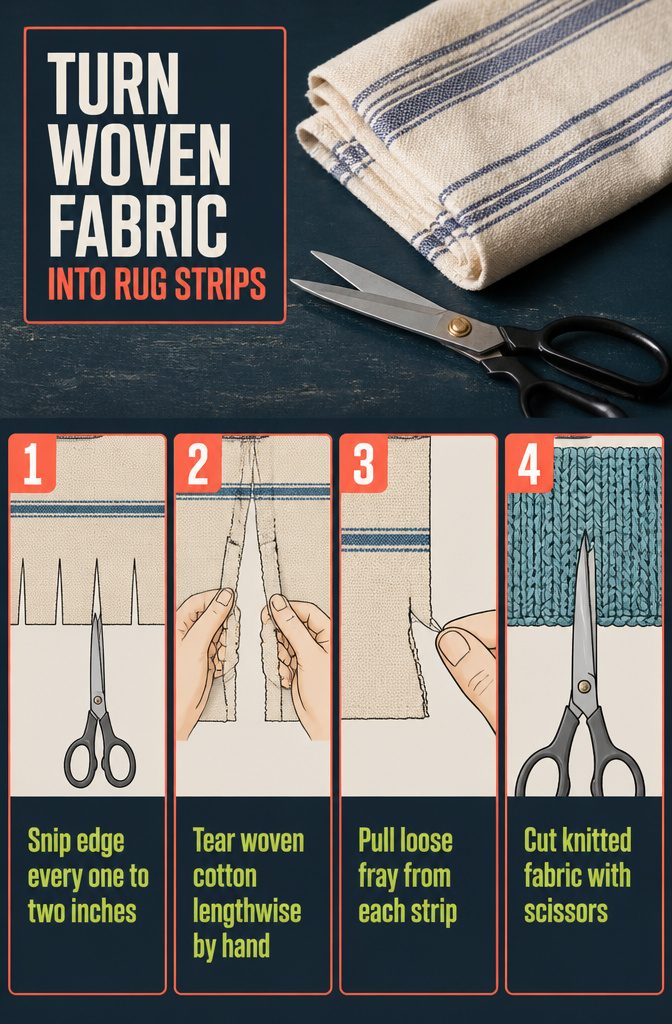
- Make scissor cuts one to two inches apart along the edge of your fabric, spacing them however evenly you can manage without measuring.
- Starting from each cut, rip the fabric lengthwise down its entire length to form strips. Tearing by hand is faster than cutting the whole strip with scissors, and cotton fabric tears in a straight line naturally.
- Pull off any loose fray from the torn edges once the strip is complete.
- Skip the ruler if you want—uneven widths are completely fine, and eyeballing the spacing works. Mixing different strip widths adds texture to the finished rug without any real downside.
- If you’re working with knitted fabric instead of woven cotton, you’ll need to cut the strips with scissors rather than tearing them. Knit doesn’t rip cleanly the way woven fabric does, so tearing will stretch and distort the material.
2. Attach the first two pieces
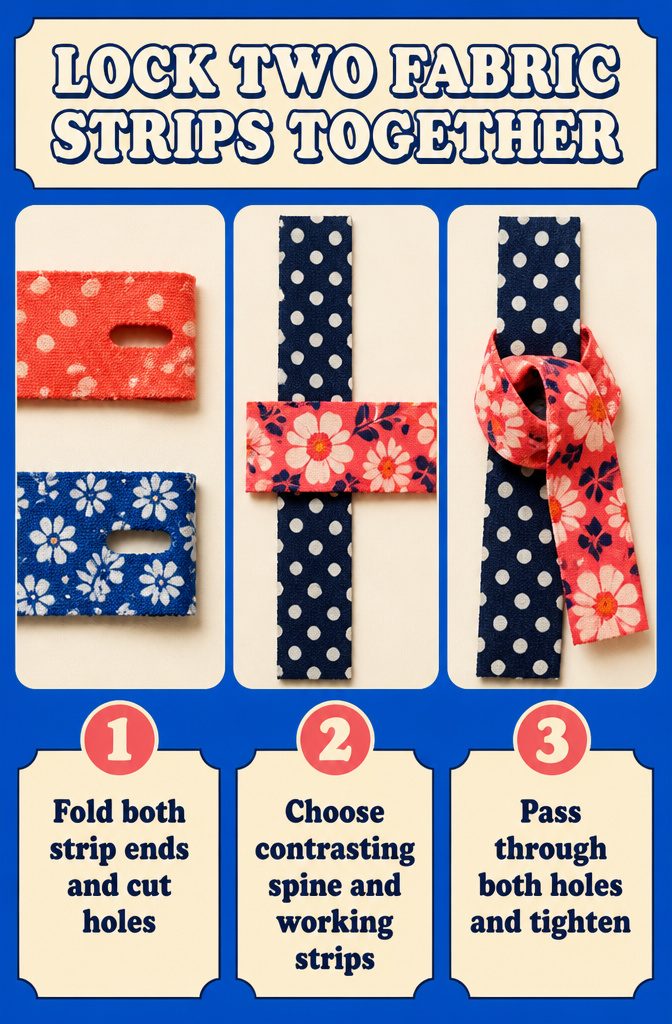
- Fold the end of each fabric strip about an inch or two from the edge, then cut a small hole through the fold with your scissors. The hole should sit like a buttonhole. Do this for both strips.
- Choose two strips in different colors or patterns to start. One becomes the spine, the other your working fabric, and the contrast makes it easier to tell them apart as you build the rug.
- Pull the end of the first strip through the hole in the second strip, then take that same end and pass it back through its own hole. Pull tight to lock the knot.
3. Create the starter loops
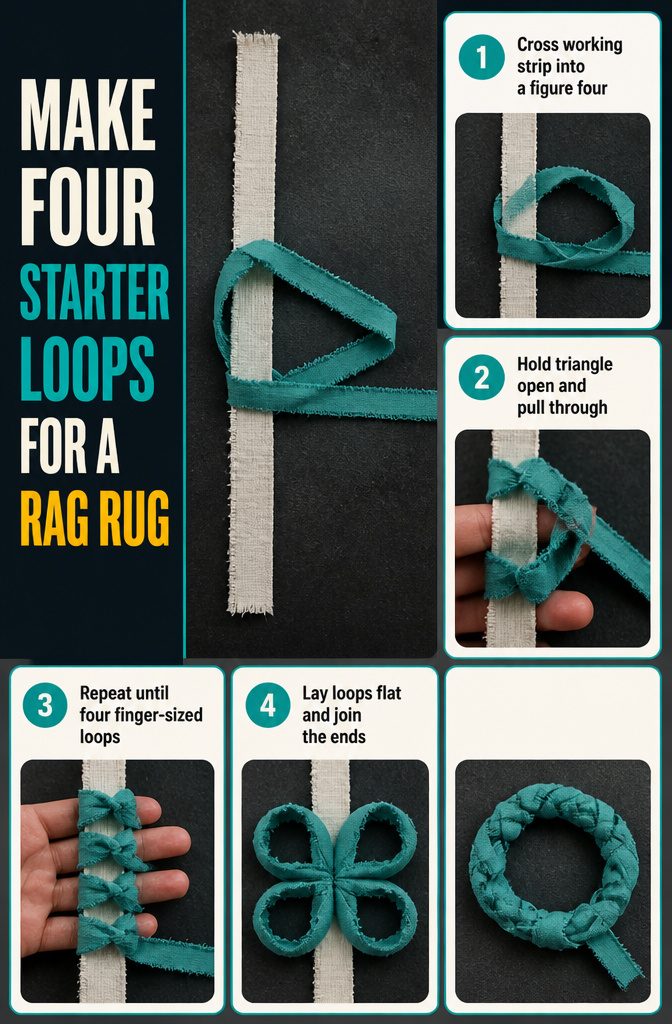
- Hold the spine strip taut (step on one end to keep both hands free) and position your working strip so it forms the shape of the number 4 against it, with the spine as the vertical line and the working fabric crossing over to create a triangle.
- Keep your index finger inside the triangle opening, then pull the end of the working fabric through to make a loose knot around the spine. Leave your finger in place.
- Repeat on your remaining three fingers to create four finger-sized loops total. For a round rug you need fewer loops; for an oval, aim for four or five.
- Slide your fingers out and lay the loops flat. Pull the first and last loop together to form a circle, or thread the tail loosely through the final loop if you’re working an oval.
This foundation decides how the entire rug builds outward, so take care to keep the loops even and the tension consistent before you move to the next round.
4. Knot around the starter circle
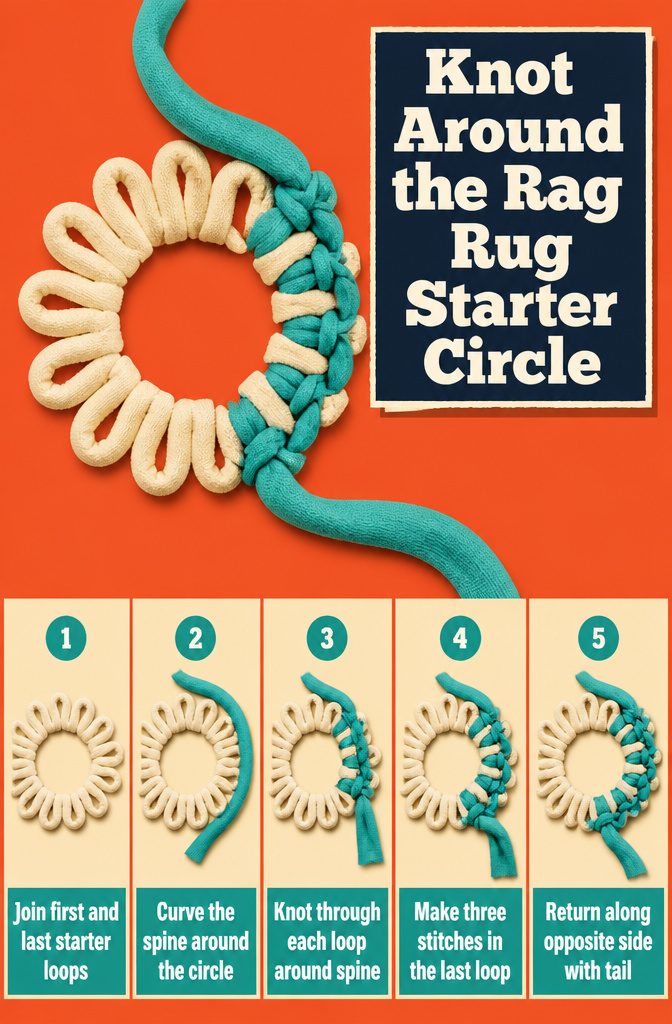
Knot around the starter circle
- Bring the first and last starter loop together to form a circle, then position your fabric spine so it begins to curve around that circle.
- Take the working strip end, point it downward (away from you), and thread it through the first loop to create a blanket-type knot that catches both the loop and the spine beneath it. The working fabric comes through the starter loop, then back through the opening it just made, locking the spine in place.
- Repeat on the second loop, then continue around the circle, knotting through each starter loop and catching the spine each time.
- When you reach the last loop, put three stitches into it instead of one. This turns the corner and starts you back along the opposite side.
- Work back along the other side of the circle, knotting through each loop and incorporating the fabric tail as you go.
The first two rounds will look like a knotted mess.
That’s normal. The piece starts to resemble a rug after about the third or fourth round, once the spiral fills in and the center tightens.
5. Continue in a spiral and add fabric
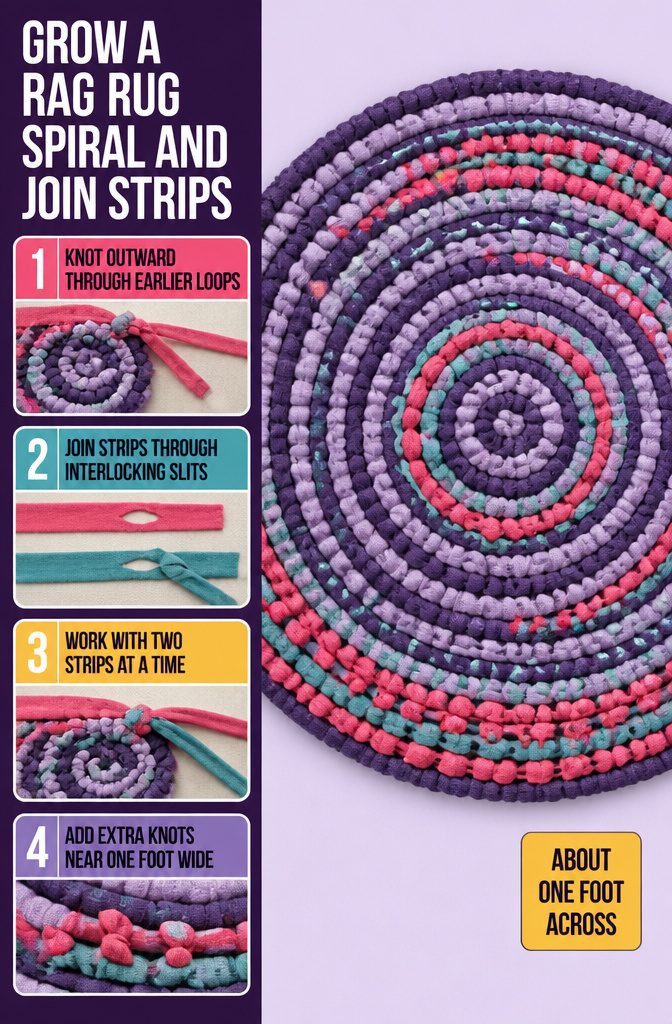
- Knot into the loops from your first round, working outward in a spiral. Each new knot pulls through a loop you made earlier, and the circle grows as you move around.
- Join new strips when one runs short. Fold the end of the first strip and cut a small hole through both layers. Pull a new strip through that hole, then cut a slit near the end of the new strip and pass its opposite end through its own slit. Pull tight to lock.
- Work with two strips at a time, each no longer than arm span. Longer pieces tangle and slow you down; shorter ones mean more joins but keep the motion smooth.
- Add knots as the circle widens. One knot per loop held the starter round flat, but the growing diameter needs extra knots to avoid a bowl. I add a second knot into some loops once the rug reaches about a foot across, checking every few rounds that it still lies flat on the floor.
6. Add extra knots to keep the rug flat
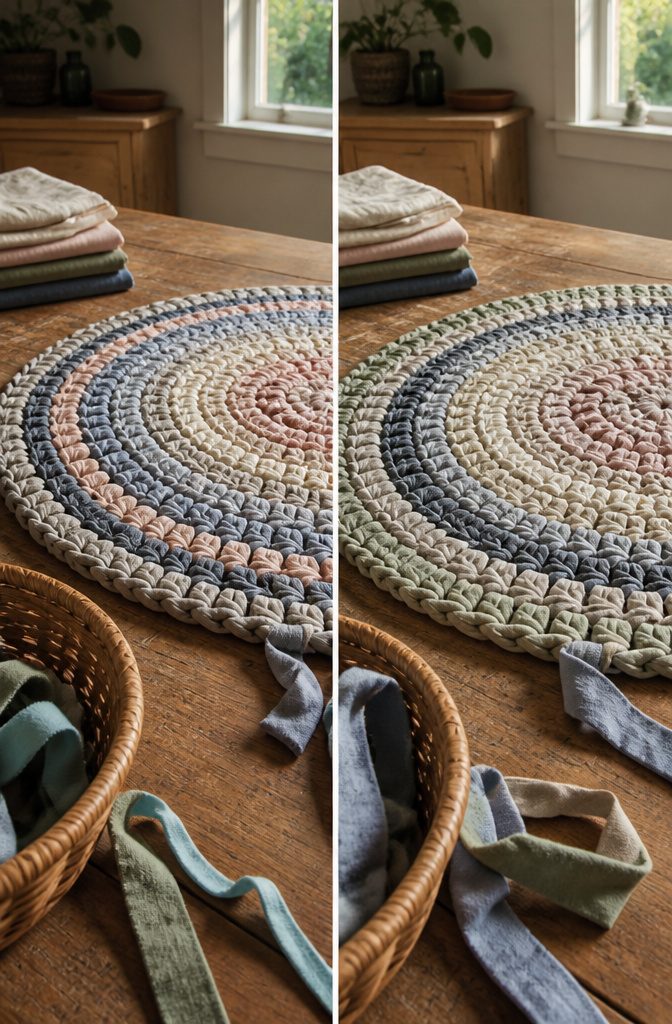
As the circle grows, you will need to add extra knots or stitches per loop to keep the rug lying flat. The number depends on how thick your fabric is and how tightly you pull each knot.
Too few additions will make the rug pull inward and form a bowl. Too many will make the edge wavy and rippled.
I recommend working on a flat surface so you can check whether the rug is staying even as you go. When you increase, just tie two knots in the same loop instead of one.
Do this if you notice the rug starting to pull in at the edges. The extra knots give you the room you need to work toward the outer rows without distorting the shape.
Watch the foundation as you add each round. You want to see an even strip of knots all the way around, with no tight spots or gaps that signal you’ve missed an increase.
If knots are pulled too tight, you will end up with a bowl instead of a rug.
7. Finish the edge and hide the ends
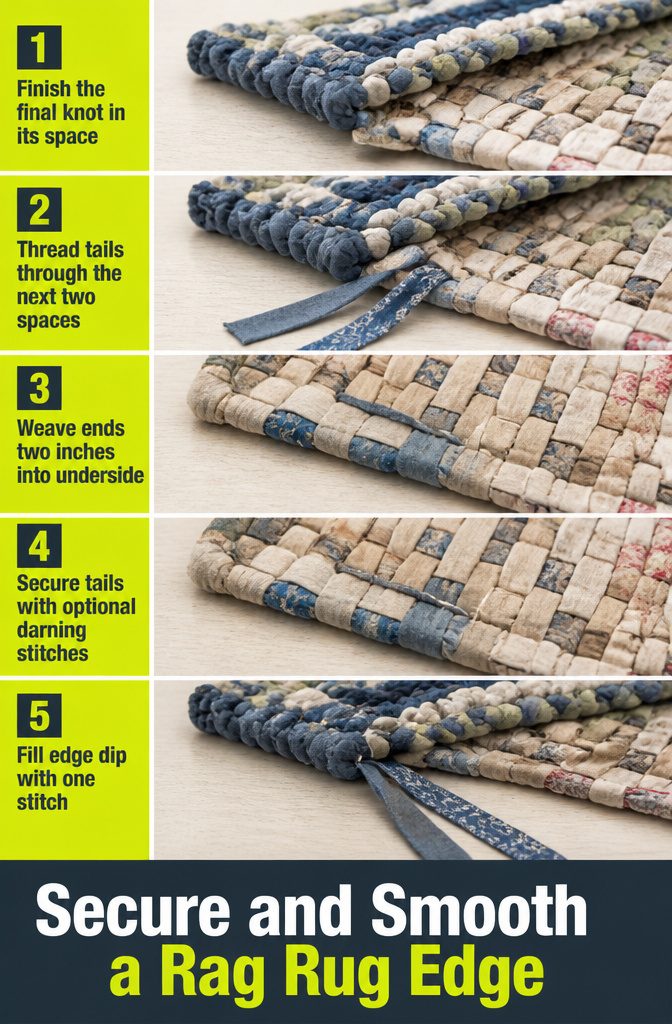
Finish the edge and hide the ends
- Make your final knot in the last loop space the same way you made all the others.
- Thread the fabric tails through the next two spaces instead of knotting them, pulling them flat against the surface.
- Flip the rug over and weave both ends at least two inches into the underside, working them through the knots already there.
- Sew a few stitches with a darning needle and thread to lock the tails in place if you want extra hold.
- Add one stitch (not a knot) to fill in the small dip where the last knot sits, so the edge contour stays smooth all the way around.
- Leave the ends on the longer side when you weave them in. If you trim too short, they can pull free, and if you keep them long, you can unweave them later to make the rug bigger.
How much fabric each rug size needs
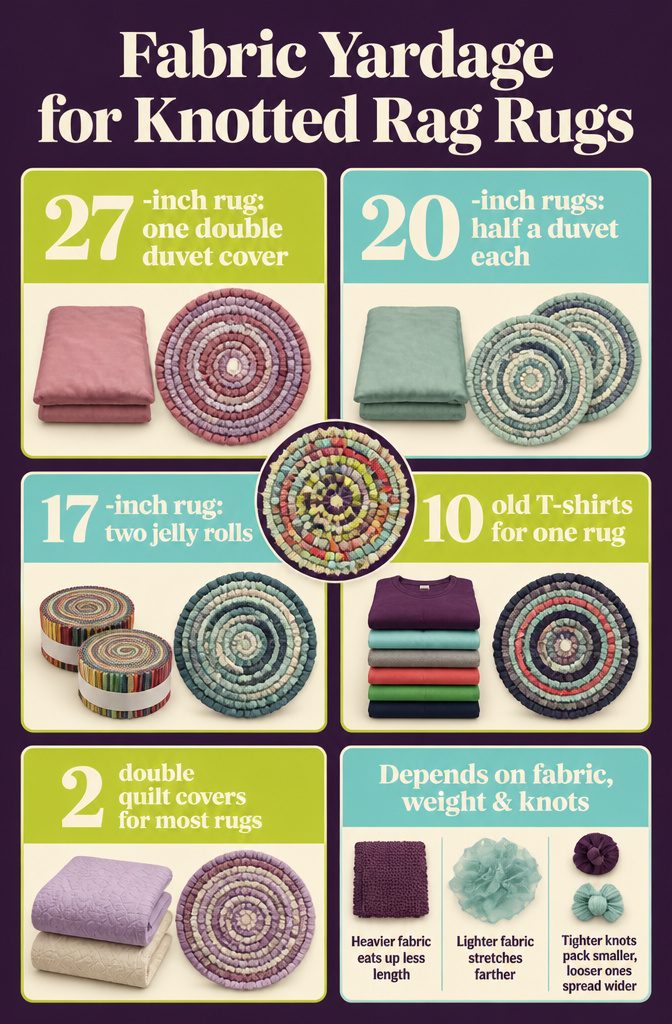
The duvet cover in my linen closet started sounding like a good idea once I saw the numbers.
A 27-inch diameter rug used one double duvet cover in 1½-inch strips. Two 20-inch rugs each took half a double duvet cover in 2-inch strips.
A 39-inch rug pulled from a king-size duvet in 1-inch strips. Most rugs need about the equivalent of two double-sized quilt covers.
Quilting-weight cotton reads differently. Two 20-strip jelly rolls, about 1.3 yards each, made a 17-inch circle.
One jelly roll alone made about a 12-inch rug. T-shirts work too: about ten old shirts cut into 2-inch strips for one rug, though the count shifts with shirt size.
The amount depends on rug size, fabric weight, and how tightly you pull the knots.
Heavier fabric eats up less length; lighter fabric stretches farther. Tighter knots pack the rug smaller and denser, looser ones spread it wider with the same yardage.
Planning color and pattern before starting
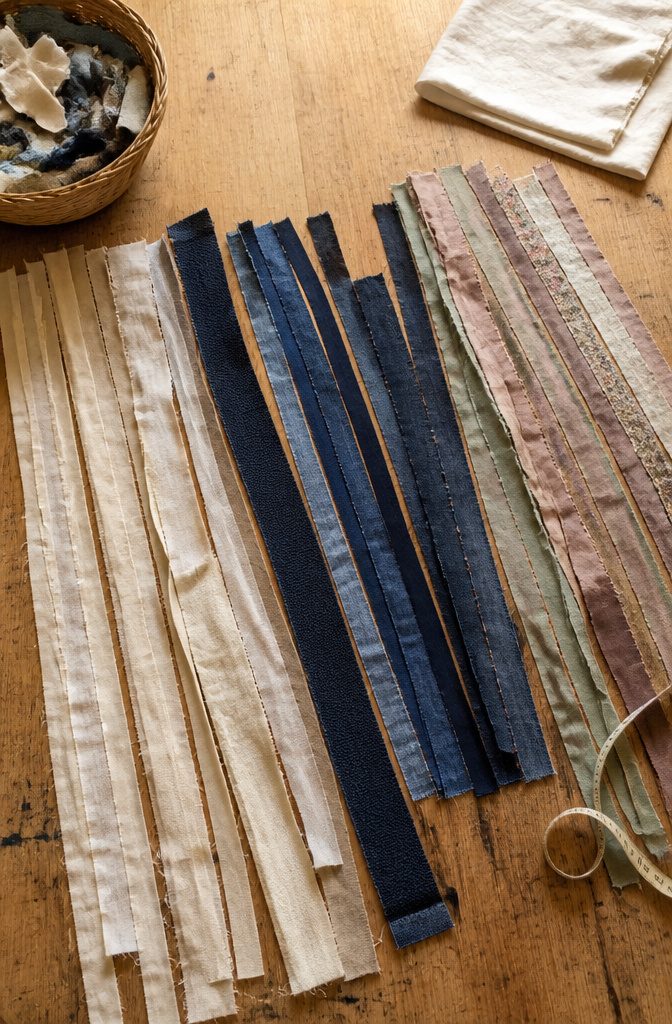
The biggest mistake happens before the first knot goes in. Lay all your strips out and arrange them by color before you touch the base.
A circular rug grows outward, and the math of that growth matters: the outer rounds eat more fabric than the inner ones because each lap covers a longer path.
If you split your yardage evenly across three colors, you will run out of two of them halfway through and finish with a ring of whatever is left.
Strip width changes how much ground each knot covers.
Thick fabric like fleece fills faster than thin cotton voile. Tight knots pull the rug dense and slow the spiral; loose ones let it sprawl.
Color placement reads differently depending on all three variables. A two-inch strip knotted loosely in a pale color can disappear next to a one-inch strip of dark denim pulled snug.
Washing and caring for the finished rug
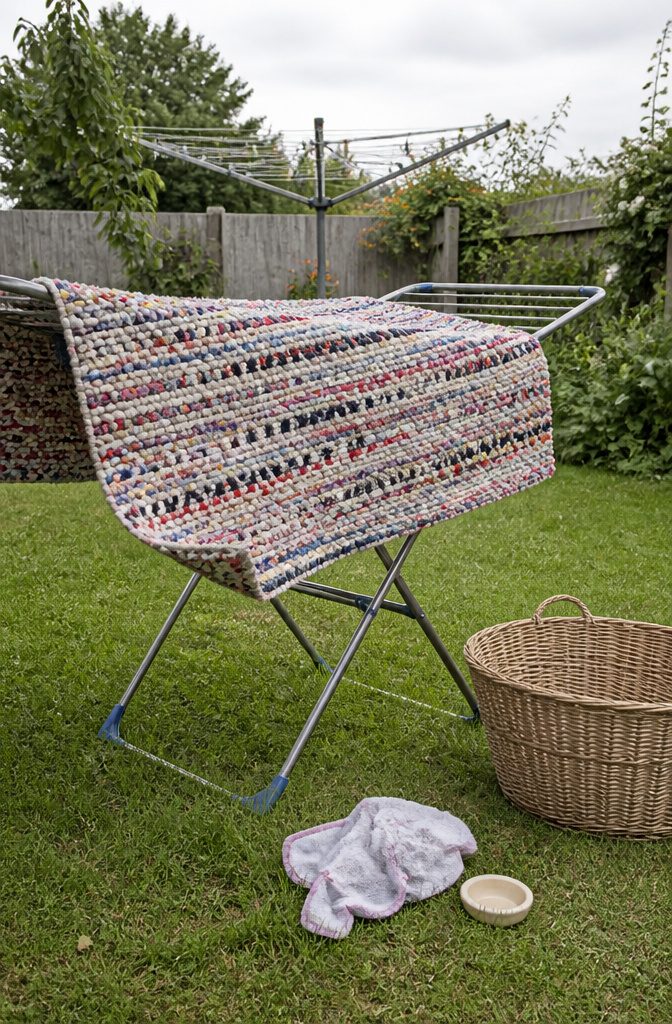
A finished knotted rag rug holds up well with straightforward care. Vacuum regularly to pull dirt from between the fabric knots, and shake the rug outdoors when dust builds up.
For deeper cleaning:
- Wash on the gentle cycle with mild soap and cold water. The fabric strips handle machine washing without trouble, especially if you used all cotton.
- Air-dry outside whenever you can. Rag rugs are thick and take time to dry, so sun and breeze cut the wait. If weather won’t cooperate, lay the rug flat on a drying rack indoors or aim a blow dryer at it to speed things along.
- Skip the dryer if possible. The heat and tumbling can mat the knots or stress seams that you worked to keep tight.
For larger rugs that won’t fit in your machine, hang them outside and beat the dust out the old way, then spot-clean stains with a damp cloth and a drop of soap.
These rugs last for years if you keep ahead of the dirt.
Frequently Asked Questions
What is an Amish rag rug?
An Amish rag rug is made from fabric strips connected with blanket-stitch-like knots, built outward from the center without a loom.
You create each row by pulling strips through the loops of the previous round, forming a flat spiral. The method is also called a toothbrush rug after the traditional needle used to make it.
How much fabric does it take to make an Amish knot rag rug?
A 27-inch diameter rug uses one double duvet cover cut into 1½-inch strips, while two 20-inch rugs each need half a double duvet cover in 2-inch strips.
A 39-inch rug requires a king-size duvet in 1-inch strips, and most rugs take about the equivalent of two double-sized quilt covers. The amount shifts with rug size, fabric weight, and how tightly you pull each knot.
Can you make an Amish knot rag rug with old t-shirts?
Yes, t-shirts work for knotted rag rugs.
About 10 old shirts cut into 2-inch strips will make one rug, though the count changes with shirt size. T-shirt fabric is all knit, which stretches more than woven cotton and creates a bouncier rug underfoot.
How do you make a color pattern in a rag rug?
Lay all your strips out and arrange them by color before you start knotting.
The outer rounds of a circular rug eat more fabric than the inner ones because each lap covers a longer path, so if you split your yardage evenly across three colors, you will run out of two of them halfway through.
Plan more of the colors you want toward the outside.
How do you clean a rag rug?
Vacuum regularly and shake the rug outdoors when dust builds up.
Wash on the gentle cycle with mild soap and cold water, then air-dry outside or lay flat on a drying rack indoors. Skip the dryer if possible, since the heat and tumbling can mat the knots or stress seams.
What fabric works best for an Amish knot rug?
Old bed sheets and duvet covers work best, followed by worn clothing and fabric scraps.
Cotton tears cleanly along the grain, so you can snip one edge and rip the rest of the way down in a straight line. Strip width runs 1 to 2.5 inches depending on fabric weight.
Do you need a toothbrush needle to make one?
A needle speeds the work, but fingers alone can pull the fabric through if you want to start right away. The traditional toothbrush needle is a flat piece with a large eye that slips through tight knots without disturbing them.
You can buy one online or make your own from a 3-inch piece of wire folded into two loops and wrapped with painter’s tape.
How do you keep an Amish knot rug from curling?
Add extra knots or stitches per loop as the circle grows to keep the rug lying flat.
The growing diameter needs more knots to avoid forming a bowl, so tie two knots in the same loop instead of one once the rug reaches about a foot across.
Too few additions will make the rug pull inward, and too many will make the edge wavy.
How can a beginner make a rag rug?
Tear old sheets into 1 to 2.5-inch strips, lock two strips together through a small cut hole, then knot each strip through a loop in a widening circle using a toothbrush needle or your fingers.
The method is beginner-friendly and needs no loom or sewing machine. Working without a needle slows you down but stays manageable for a first project.






